Finding the perfect balance between a flaky texture and a soft, airy center can be a challenge when making savory treats. Many people assume that scones are naturally dry or crumbly, but that is simply not the case when they are made with the right technique. These savory delights bring together the smoky crunch of bacon, the sharp tang of cheddar cheese, and the fresh, peppery bite of chives.
Table of Contents
The result is a golden-brown pastry that feels substantial enough for a morning meal yet light enough to enjoy as a snack. Whether looking for something to pair with a warm bowl of soup or a quick grab-and-go breakfast, these scones offer a satisfying combination of flavors that appeal to everyone. They are incredibly simple to put together, making them an excellent choice for those who are just starting their journey into home baking.
Why You Will Love This Recipe
One of the best things about this recipe is how it transforms basic pantry staples into something that feels gourmet. Using cold butter and a gentle mixing hand creates those sought-after “super fluffy” layers that rise beautifully in the oven. The cheddar melts into the dough, creating little pockets of cheese, while the bacon ensures every bite has a savory depth.

The chives add a pop of color and a mild onion-like flavor that brightens the entire experience. Because they are savory rather than sweet, they work well at any time of day. They are especially wonderful when served warm, allowing the cheese to stay soft and the edges to remain perfectly crisp.
Ingredients
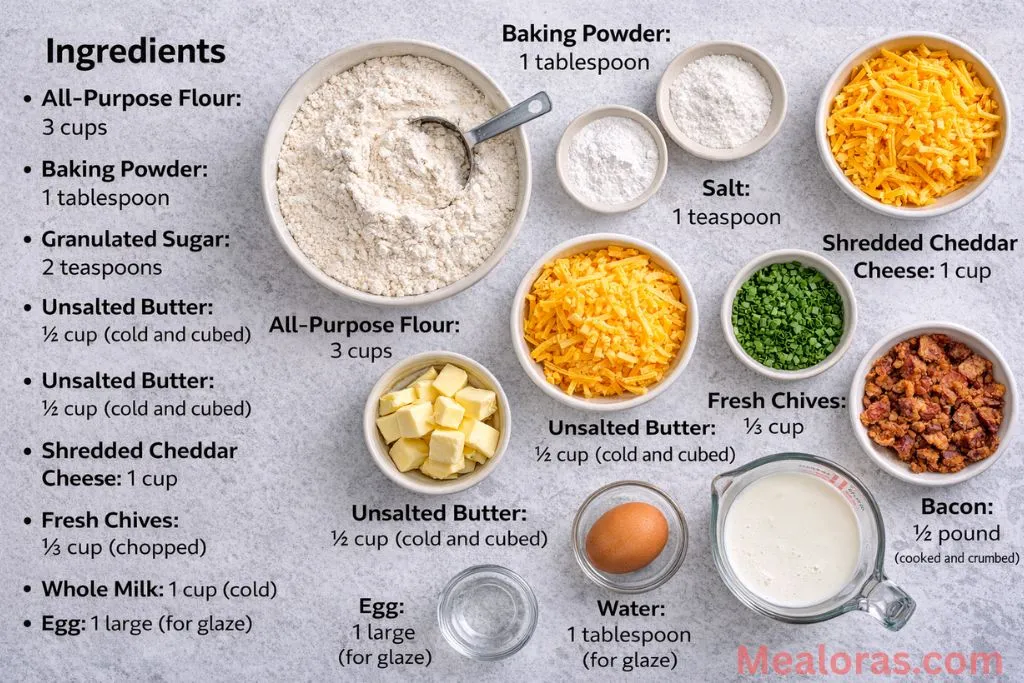
To ensure the best results, it is important to use high-quality ingredients and keep everything as cold as possible. Chilled ingredients are the secret to achieving that signature flaky lift.
For the Scone Dough:
- All-Purpose Flour: 3 cups (spooned and leveled for accuracy)
- Baking Powder: 1 tablespoon
- Salt: 1 teaspoon
- Granulated Sugar: 2 teaspoons
- Unsalted Butter: ½ cup (must be cold and cut into small cubes)
- Shredded Cheddar Cheese: 1 cup
- Fresh Chives: ⅓ cup (finely chopped)
- Bacon: ½ pound (cooked until crispy and crumbled)
- Whole Milk: 1 cup (kept cold until the last moment)
For the Glaze:
- Egg: 1 large
- Water: 1 tablespoon
Essential Tools and Equipment
- Large Mixing Bowl: For combining the dry ingredients and forming the dough.
- Pastry Cutter or Two Forks: To incorporate the cold butter without melting it.
- Baking Sheet: Lined with parchment paper or a silicone mat to prevent sticking.
- Sharp Knife or Bench Scraper: To cut the dough into clean triangles.
- Pastry Brush: To apply the egg wash for a golden finish.
Step-by-Step Instructions
Following these steps carefully will ensure the scones turn out light and fluffy rather than dense.
1. Prepare the Bacon
Start by cooking the bacon until it reaches a nice, crispy consistency. This can be done in a pan or on a baking sheet in the oven. Once cooked, let the strips drain on a paper towel-lined plate to remove excess grease. After they have cooled completely, crumble or chop them into small pieces and set aside.
2. Mix the Dry Ingredients
In a large mixing bowl, whisk together the all-purpose flour, baking powder, salt, and sugar. Ensure everything is well combined so the leavening agent is distributed evenly throughout the flour.
3. Incorporate the Butter
Add the cold, cubed butter into the flour mixture. Using a pastry cutter or two forks, work the butter into the flour until the mixture looks like coarse crumbs with some pea-sized chunks of butter remaining. It is vital not to overwork the butter; those small pieces of cold fat are what create the steam pockets for a flaky rise.
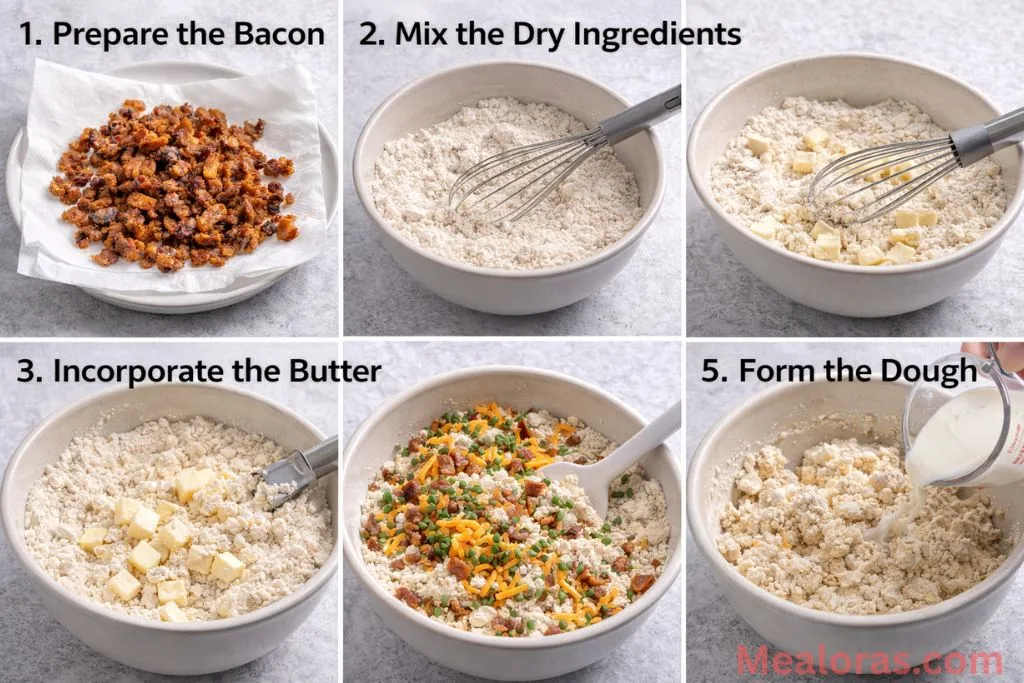
4. Fold in the Savory Add-ins
Gently stir in the shredded cheddar cheese, the chopped chives, and the cooled bacon crumbles. Make sure these are evenly distributed throughout the dry mixture before adding any liquid.
5. Form the Dough
Pour the cold milk into the bowl. Using a spatula or a wooden spoon, gently fold the mixture together until a shaggy dough begins to form. Stop as soon as the flour is mostly incorporated. Over-mixing at this stage will lead to tough scones.
6. Shape and Cut
Preheat your oven to 375°F (190°C). Turn the dough out onto a lightly floured surface. With floured hands, knead the dough very briefly—just a few times—until it holds together in a ball. Pat the dough into a flat disc about 8 inches in diameter and 1 inch thick. Use a sharp knife to cut the disc into 8 even triangles.
7. Chill (Optional but Recommended)
If the dough feels warm or the butter has started to soften during the shaping process, place the triangles on your prepared baking sheet and pop them into the refrigerator for 15 to 20 minutes. Chilling the dough right before baking helps the scones maintain their shape and rise higher.

8. Apply Egg Wash and Bake
Whisk the egg and water together in a small bowl to create an egg wash. Lightly brush the tops of the scones with the mixture. This step provides a beautiful golden-brown sheen. Place the baking sheet in the center of the oven and bake for 20 to 25 minutes.
9. Cool and Serve
The scones are done when the tops are golden and the edges feel firm to the touch. Remove them from the oven and let them sit on the baking sheet for a few minutes before transferring them to a wire rack. They are best enjoyed while still warm.
If you enjoy preparing wholesome meals at home, you might also find this guide to creamy chocolate brownie overnight oats helpful for planning a balanced breakfast routine.
Tips for Success
- Keep it Cold: The most important rule for scone making is keeping the butter and milk cold. If the butter melts before the scones hit the oven, you will lose the flaky layers.
- Don’t Over-Knead: When moving the dough to the counter, only handle it enough to make it stick together. The more you work the dough, the more gluten develops, which makes the pastry heavy.
- Use Sharp Cheese: Extra sharp cheddar provides a much better flavor contrast against the rich bacon and flour than mild cheddar does.
- Avoid Twisting the Cutter: If using a circular biscuit cutter instead of cutting wedges, press straight down and pull straight up. Twisting the cutter seals the edges of the dough and prevents it from rising properly.
Variations and Substitutions
- Cheese Swaps: While cheddar is classic, Gruyère or Pepper Jack can be used for a different flavor profile.
- Herbs: If chives are unavailable, finely minced scallions or even a bit of fresh rosemary can work well.
- Gluten-Free Option: A high-quality 1-to-1 gluten-free baking flour can be substituted, though the texture may be slightly more crumbly.

For those who love smaller, bite-sized treats after a savory meal, these no-bake mini biscoff cheesecakes are a fantastic way to round out a brunch menu.
Storage and Serving
How to Store
Keep any leftover scones in an airtight container at room temperature for up to two days. For longer storage, they can be kept in the refrigerator for up to a week.
Freezing Instructions
These scones freeze beautifully. Once completely cooled, wrap them individually in plastic wrap and place them in a freezer-safe bag. They will stay fresh for up to three months. To enjoy, thaw them at room temperature or warm them directly in a low-temperature oven.
Serving Ideas
Serve these warm with a pat of salted butter. They also pair perfectly with scrambled eggs or a fresh garden salad for a light lunch. For a festive touch at a family breakfast, offer them alongside a selection of fresh fruit juices or herbal teas.
FAQ Section
1. Why did my scones come out flat? This usually happens if the baking powder is expired or if the butter was too warm. Ensure your leavening agents are fresh and your butter is chilled.
2. Can I use dried chives instead of fresh? Yes, though fresh chives provide a better color and a more delicate flavor. If using dried, reduce the amount to about one tablespoon.
3. Is it okay to use salted butter? It is fine to use salted butter, but you should reduce the added salt in the recipe by half to avoid the scones becoming too salty.
4. Why is my scone dough so crumbly? Scone dough is meant to be slightly shaggy. However, if it won’t hold together at all, you can add an extra tablespoon of milk until it just reaches a cohesive state.
5. Can I make the dough the night before? Yes. You can shape and cut the scones, then keep them on a baking sheet in the refrigerator overnight, covered tightly. Bake them fresh in the morning.
6. What is the best way to reheat them? The best way to regain that crisp exterior is to heat them in an oven or toaster oven at 300°F (150°C) for about 5-8 minutes.
7. Can I use heavy cream instead of milk? Absolutely. Using heavy cream will result in an even richer, more tender scone.
8. Why are my scones tough? Toughness is almost always caused by over-mixing the dough. Stir until just combined and handle the dough as little as possible.
9. Can I add other vegetables? Small amounts of finely diced jalapeños or sun-dried tomatoes work well, provided they are patted dry so they don’t add too much moisture.
10. Do I have to use an egg wash? The egg wash is not strictly necessary for the structure, but without it, the scones will look pale and matte rather than golden and shiny.
Conclusion
Making these super fluffy bacon cheddar chive scones is a rewarding way to bring a touch of bakery-quality goodness into your own kitchen. The combination of savory ingredients and a tender, flaky crumb makes them an instant favorite for anyone who tries them. By following the simple techniques of keeping ingredients cold and handling the dough gently, you can achieve professional results every time.
We hope you enjoy baking these delicious savory treats! Please feel free to share this recipe with your friends and family so they can experience the joy of fresh, scones too. Happy baking!

Super Fluffy Bacon Cheddar Chive Scones
Ingredients
- All-Purpose Flour: 3 cups
- Baking Powder: 1 tablespoon
- Salt: 1 teaspoon
- Granulated Sugar: 2 teaspoons
- Unsalted Butter: ½ cup cold and cubed
- Shredded Cheddar Cheese: 1 cup
- Fresh Chives: ⅓ cup chopped
- Bacon: ½ pound cooked and crumbled
- Whole Milk: 1 cup cold
- Egg: 1 large for glaze
- Water: 1 tablespoon for glaze
Instructions
- Cook the bacon until crispy, drain on paper towels, and crumble into small pieces once cooled.
- Whisk the flour, baking powder, salt, and sugar together in a large mixing bowl until well combined.
- Cut the cold butter into the flour mixture using a pastry cutter or forks until it resembles coarse crumbs.
- Stir in the shredded cheddar cheese, chopped chives, and bacon crumbles until evenly distributed.
- Pour in the cold milk and fold gently with a spatula until a shaggy dough just begins to form.
- Turn the dough onto a floured surface and pat into an eight-inch disc about one inch thick.
- Cut the disc into eight even triangles and place them on a prepared baking sheet.
- Brush the tops of each triangle with a mixture of beaten egg and water for a golden finish.
- Bake in a preheated oven until the tops are golden brown and the edges feel firm to the touch.
- Allow the scones to rest on the baking sheet briefly before serving them warm.
Notes
• Gentle Handling: Do not over-knead the dough, as this will result in a tough, dense texture.
• Storage: Store leftovers in an airtight container at room temperature for up to two days.

Mealoras your go-to for simple, flavorful recipes! From quick weeknight dinners to sweet treats and family favorites, we make cooking easy, fun, and delicious for everyone in the kitchen.