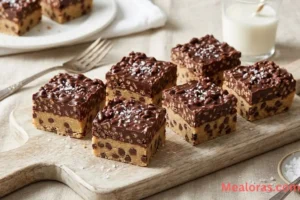
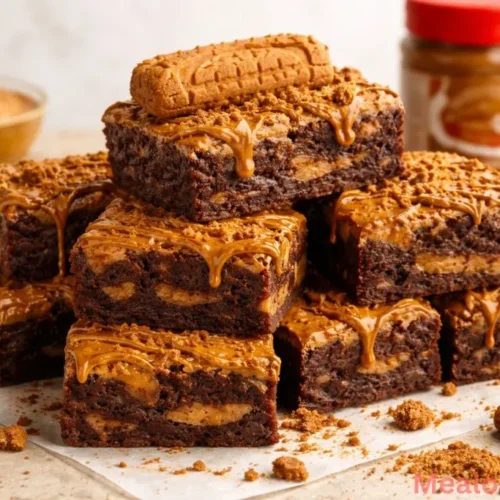
These Biscoff brownies are a true delight for anyone who enjoys a rich, chocolatey treat with a unique spiced twist. Combining the deep, intense flavors of a classic cocoa-based brownie with the iconic caramelized taste of speculoos cookie butter, this recipe creates a dessert that is both sophisticated and comforting. Each bite offers a satisfying contrast between the chewy chocolate base and the creamy, gooey pockets of cookie butter hidden within.
Table of Contents
What makes this particular version stand out is the layering technique. By freezing a thin sheet of Biscoff spread before adding it to the batter, you ensure a distinct, thick layer of cookie butter in every single square. Finished with a crunchy topping of crushed biscuits and a beautiful golden drizzle, these treats look as good as they taste. Whether you are baking for a family gathering or simply want to brighten up a quiet afternoon, these squares are guaranteed to disappear quickly.
Ingredients for Biscoff Brownies
To get the best results, it is helpful to have all your components measured and ready before you start mixing.
The Wet Ingredients
- Unsalted Butter: 10 tablespoons (140g)
- Semi-Sweet Chocolate Chips: 2/3 cup + 1/4 cup (156g total)
- Light or Dark Brown Sugar: 1/2 cup (100g), firmly packed
- Granulated Sugar: 1/2 cup (100g)
- Large Eggs: 2 whole eggs
- Large Egg Yolk: 1 extra yolk for added richness
- Vanilla Extract: 1 tablespoon
The Dry Ingredients
- All-Purpose Flour: 2/3 cup + 1 tablespoon (90g)
- Unsweetened Dutch Cocoa Powder: 1/4 cup (25g)
- Espresso Powder: 1 teaspoon (enhances the chocolate depth)
- Fine Sea Salt: 1/2 teaspoon
The Biscoff Components
- Biscoff Cookie Butter: 3/4 cup (for the middle layer and topping)
- Biscoff Cookies: 4 to 5 biscuits, roughly crushed
Essential Kitchen Tools
- 8×8 Inch Square Baking Pan: A metal pan works best for even heat.
- Parchment Paper: Used for lining and for the frozen layer.
- Mixing Bowls: One heatproof bowl for melting and a medium bowl for whisking.
- Whisk and Rubber Spatula: For combining ingredients without overworking the batter.
Step-by-Step Instructions
1. Prepare the Cookie Butter Layer
Start by taking a piece of parchment paper and marking the size of your 8×8 pan on it. Flip the paper over so the ink doesn’t touch the food. Take roughly 1/2 cup of the cookie butter and spread it evenly within those marked edges. Place this flat on a tray and slide it into the freezer. It needs to be completely firm before you handle it, which usually takes about 30 minutes.
2. Set Up the Oven and Pan
While the cookie butter chills, preheat your oven to 350°F (180°C). Prepare your baking pan by lining it with parchment paper, leaving a bit of an overhang on the sides. This “sling” makes it much easier to lift the finished bars out later.
3. Melt the Chocolate Base
Combine the butter and the chocolate chips in a heatproof bowl. You can melt these using a double boiler or in the microwave in short 20-second bursts, stirring in between. Once the mixture is silky smooth, whisk in the cocoa powder until no lumps remain. Set this aside to cool slightly.
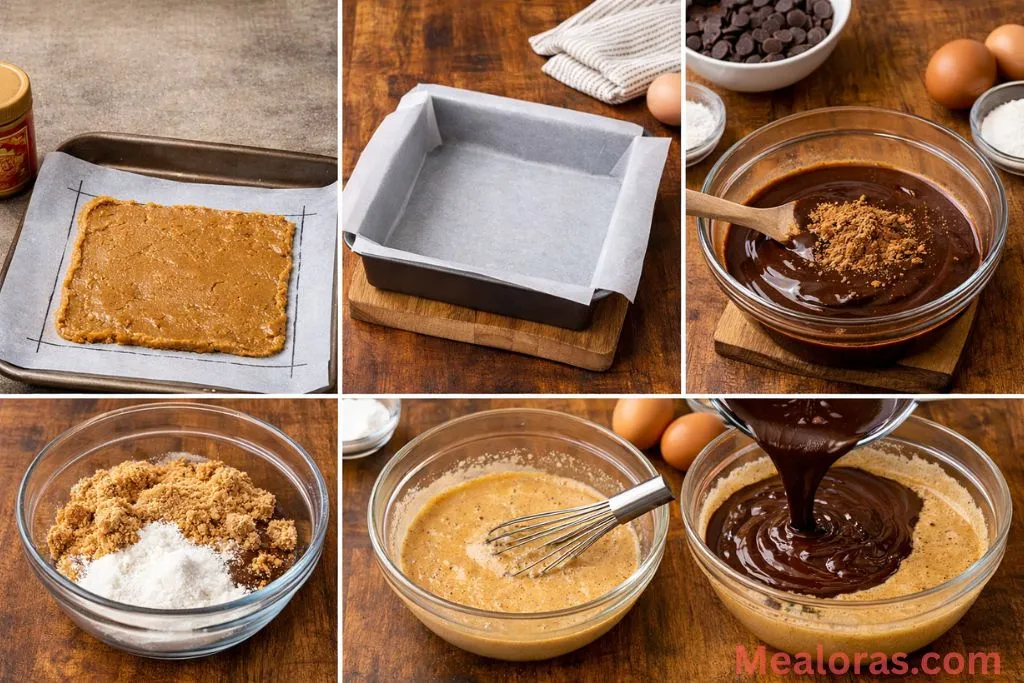
4. Whisk the Sugars and Eggs
In a separate medium bowl, whisk together the brown sugar, granulated sugar, whole eggs, egg yolk, and vanilla extract. Whisk vigorously for a minute or two until the mixture looks slightly pale and well-combined.
5. Combine the Mixtures
Slowly pour the melted chocolate and butter into the egg mixture. Use your whisk to stir them together gently until the batter is uniform in color.
6. Fold in the Dry Ingredients
Sift the flour, espresso powder, and salt directly into the bowl. Switch to a rubber spatula and gently fold the dry ingredients into the wet batter. Stop as soon as you see no more streaks of flour. Overmixing at this stage can lead to a cake-like texture rather than a fudgy one.
7. Assemble the Layers
Pour approximately half of your chocolate batter into the prepared pan and smooth it out to the corners. Take the frozen cookie butter square out of the freezer, peel off the parchment, and place it directly on top of the batter. Pour the remaining brownie batter over the Biscoff layer, spreading it carefully to cover it entirely.
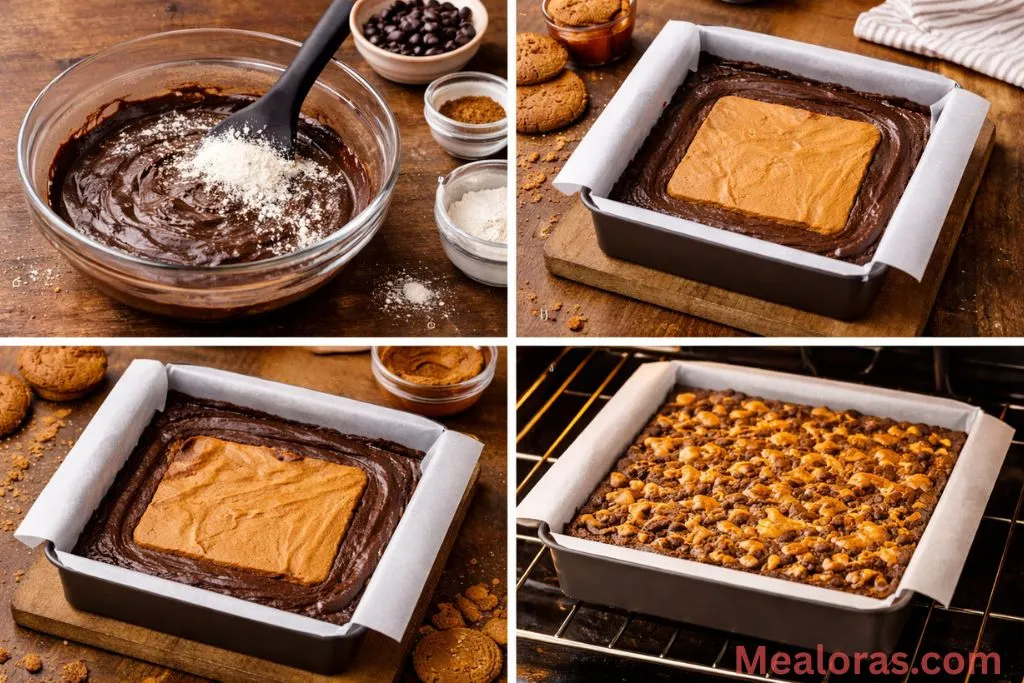
8. Add the Finishing Touches
Crumble the Biscoff cookies over the top of the batter. If you have extra cookie butter, you can warm it slightly in the microwave for 15 seconds until it reaches a pouring consistency, then drizzle it over the top in a decorative pattern.
9. Bake to Perfection
Slide the pan into the center of the oven and bake for 30 to 40 minutes. You can test for doneness by inserting a toothpick into the center; it should come out with a few moist crumbs attached, but not wet batter.
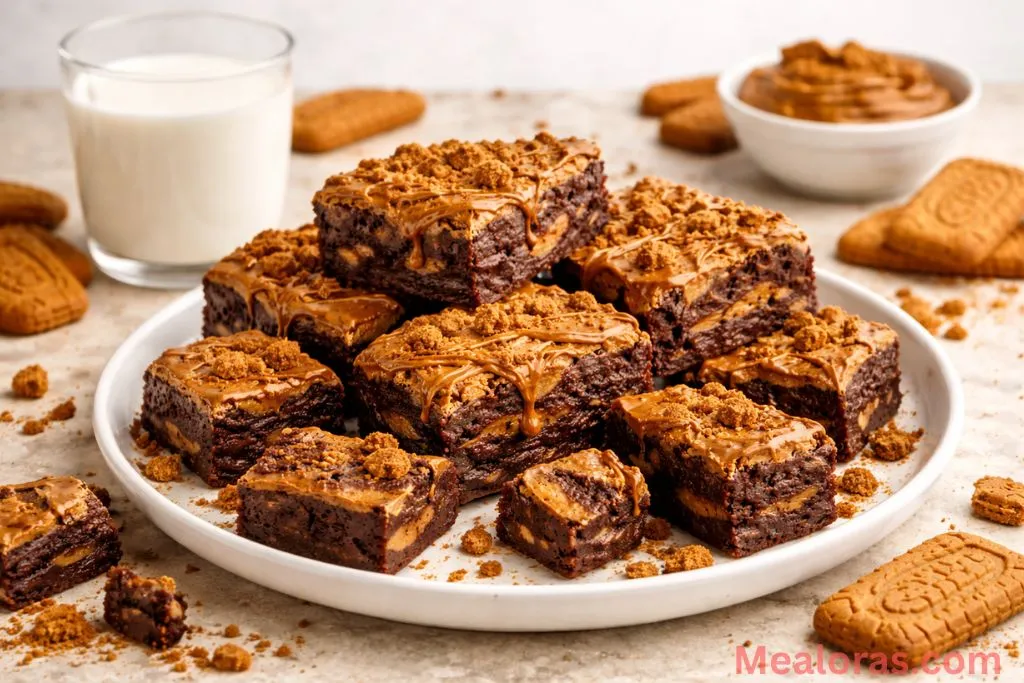
10. Cool and Slice
This is the hardest part: let the pan cool completely on a wire rack. Cooling allows the fats to set, which creates that classic fudgy bite. For the cleanest slices, you can even chill the pan in the fridge for an hour before cutting into squares.
Tips for the Best Results
Achieving that perfect balance of a crackly top and a gooey center is an art. If you enjoy experimenting with different textures, you might find that adding a touch of coffee flavor really brings out the cocoa, much like in these brown butter espresso brownies.
- Weight Matters: Whenever possible, use a kitchen scale to measure your flour and cocoa. It is very easy to accidentally pack too much flour into a measuring cup, which can make the brownies dry.
- Don’t Overbake: Brownies continue to cook for a few minutes after they leave the oven due to residual heat. Pull them out when the edges are set but the middle still has a very slight jiggle.
- Quality Chocolate: Since chocolate is the primary flavor here, using a high-quality semi-sweet variety will significantly improve the final taste.
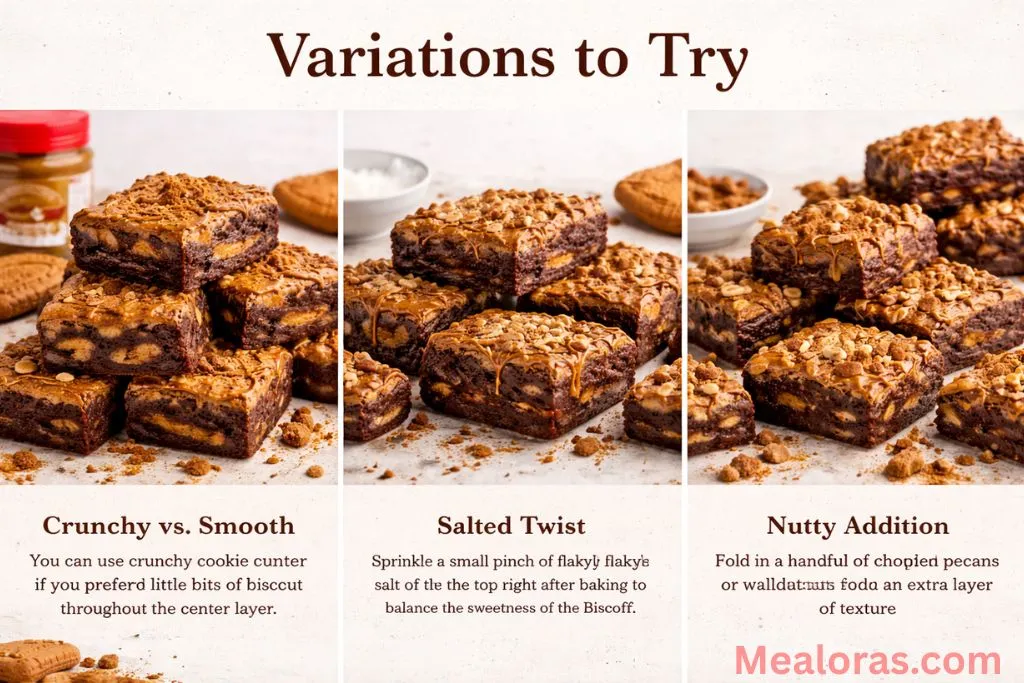
Variations to Try
While the classic speculoos flavor is hard to beat, there are plenty of ways to customize this recipe. If you are a fan of traditional treats with a textured topping, you might also enjoy exploring this easy samoa brownies recipe for a different take on layered desserts.
- Crunchy vs. Smooth: You can use crunchy cookie butter if you prefer little bits of biscuit throughout the center layer.
- Salted Twist: Sprinkle a small pinch of flaky sea salt over the top right after baking to balance the sweetness of the Biscoff.
- Nutty Addition: Fold in a handful of chopped pecans or walnuts for an extra layer of texture.
Storage and Serving
How to Store
Keep the squares in an airtight container at room temperature for up to 4 days. If you prefer them extra fudgy, storing them in the refrigerator is a great option, as it firms up the chocolate and cookie butter.
Freezing
These freeze beautifully. Wrap individual squares tightly in plastic wrap and place them in a freezer-safe bag. They will stay fresh for up to 3 months. Simply thaw at room temperature for an hour before eating.
Serving Ideas
For a simple but elegant presentation, serve a square with a tall glass of cold milk or a warm cup of herbal tea. They are also incredible when warmed slightly in the microwave for 10 seconds and topped with a scoop of vanilla bean ice cream.
Frequently Asked Questions
1. Can I use a different type of cookie butter? Yes, any speculoos-style spread or even a creamy nut butter will work, though the flavor profile will change.
2. Why did my brownies turn out cakey? This usually happens if the eggs are whisked too much or if too much flour was added. Ensure you fold the flour in gently.
3. Do I have to freeze the Biscoff layer? You don’t have to, but it prevents the spread from disappearing into the batter, ensuring a visible, gooey layer.
4. What is the best way to cut clean squares? Wait until they are completely cold. Use a sharp knife, and wipe the blade clean with a damp cloth between every cut.
5. Can I use milk chocolate instead of semi-sweet? You can, but keep in mind that Biscoff is already very sweet, so the final result will be much more sugary.
6. Is espresso powder necessary? It is optional, but it acts as a flavor enhancer that makes the chocolate taste richer without making the brownies taste like coffee.
7. Can I bake these in a glass pan? Yes, but glass retains heat differently. You may need to lower the oven temperature by 25 degrees and increase the bake time slightly.
8. How do I know if they are underbaked? If the toothpick comes out with wet, liquid batter, they need more time. Moist crumbs are what you are looking for.
9. Can I double this recipe? Yes, you can double the ingredients and bake them in a 9×13 inch pan. The baking time will likely increase by 10-15 minutes.
10. What if I don’t have Dutch-processed cocoa? Natural cocoa powder can be used, but the brownies will be lighter in color and have a slightly more acidic chocolate flavor.
Conclusion
Creating a tray of these decadent treats is a wonderful way to spend time in the kitchen. The combination of deep chocolate and spiced cookie butter is a match made in heaven that appeals to both children and adults. Once you see the beautiful swirls and smell the aroma of cinnamon and cocoa filling the air, you will know the effort was well worth it.
If you enjoy this recipe, feel free to share it with your friends and family so they can experience these flavors too. Sharing a great recipe is one of the best ways to bring people together over something delicious. Happy baking!
Biscoff Brownies
Ingredients
- 10 tablespoons 140g Unsalted Butter
- 2/3 cup + 1/4 cup 156g total Semi-Sweet Chocolate Chips
- 1/2 cup 100g Brown Sugar, packed
- 1/2 cup 100g Granulated Sugar
- 2 Large Eggs
- 1 Large Egg Yolk
- 1 tablespoon Vanilla Extract
- 2/3 cup + 1 tablespoon 90g All-Purpose Flour
- 1/4 cup 25g Unsweetened Dutch Cocoa Powder
- 1 teaspoon Espresso Powder
- 1/2 teaspoon Fine Sea Salt
- 3/4 cup 190g Biscoff Cookie Butter
- 4 to 5 Biscoff Cookies crushed
Instructions
- Prepare the cookie butter layer by spreading the spread on parchment paper and freezing until firm.
- Preheat the oven and line a square baking pan with parchment paper.
- Melt the butter and chocolate chips together, then whisk in the cocoa powder.
- In a separate bowl, whisk the sugars, eggs, yolk, and vanilla until pale.
- Combine the chocolate mixture with the egg mixture until uniform.
- Gently fold in the flour, espresso powder, and salt.
- Layer half the batter in the pan, place the frozen cookie butter square on top, and cover with the remaining batter.
- Top with crushed cookies and bake until the edges are set and the center has a slight jiggle.
- Allow the pan to cool completely on a wire rack before slicing.
Notes
• Do not skip freezing the cookie butter layer, as it prevents the spread from melting into the batter.
• Chill the brownies in the refrigerator for an hour before cutting to get perfectly clean edges.

Mealoras your go-to for simple, flavorful recipes! From quick weeknight dinners to sweet treats and family favorites, we make cooking easy, fun, and delicious for everyone in the kitchen.