Finding the perfect balance between a soft, chewy cookie and a satisfying crunch can be a challenge. Most traditional cookies offer one or the other, but this Rice Krispie Chocolate Chip Cookies Recipe brings both worlds together in every bite. By adding a familiar breakfast cereal to a classic buttery dough, a standard treat is transformed into something much more exciting. These cookies are ideal for anyone who enjoys a bit of texture and a deep, caramel-like sweetness.
Table of Contents
Whether baking for a school bake sale, a quiet afternoon at home, or just to stock up the snack jar, this recipe is a reliable choice. The puffed rice cereal adds a light, airy crispness that contrasts beautifully with the melty chocolate chips. Because the steps are so straightforward, even a beginner can achieve bakery-quality results. Let’s dive into how to create these delightful treats that will quickly become a household favorite.
Why These Crispy Chocolate Chip Cookies Work
The secret to this recipe lies in the combination of different textures. While many people love a soft-baked cookie, adding Rice Krispies creates a unique sensation that feels lighter than a heavy oatmeal cookie but more substantial than a plain sugar cookie. The cereal acts as a structural element, providing a “pop” in every mouthful.
Furthermore, the blend of granulated and brown sugar ensures the edges stay crisp while the centers remain tender. Just like enjoying a bowl of best tomato soup cheddar bay dumplings on a cold day, these cookies offer a sense of pure comfort. They are simple, nostalgic, and incredibly easy to customize if you want to get creative in the kitchen.
Ingredients for Rice Krispie Chocolate Chip Cookies
Before starting, it is helpful to gather all the necessary items. Using room-temperature ingredients, especially the butter and egg, will help the dough come together much more smoothly.
The Shopping List
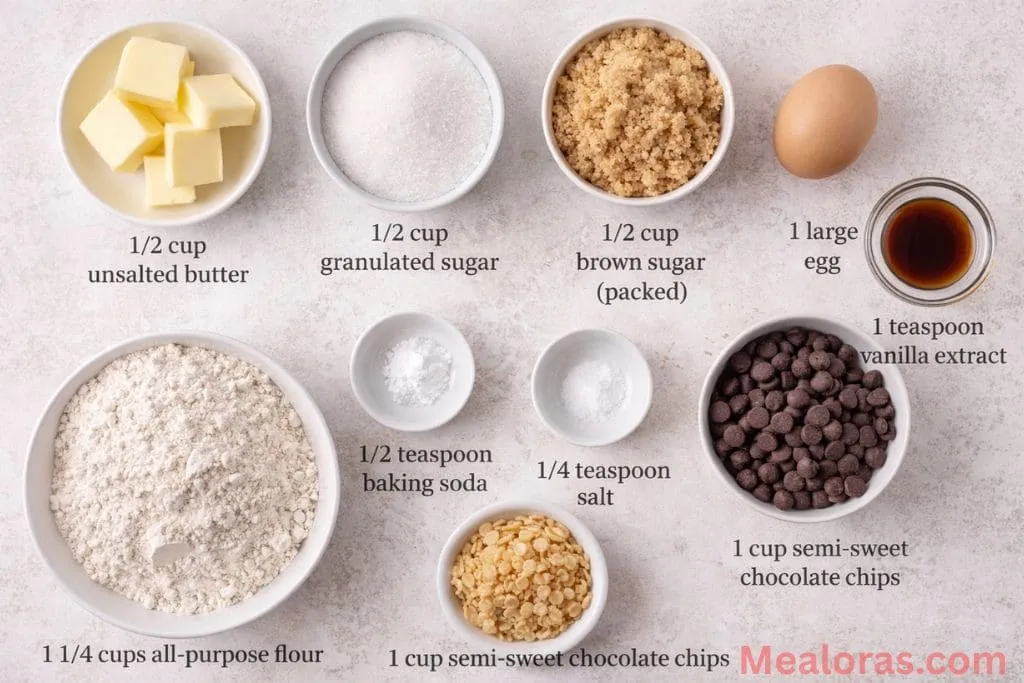
- 1/2 cup unsalted butter: Ensure this is softened to room temperature for easy creaming.
- 1/2 cup granulated sugar: Provides sweetness and helps with the golden-brown edges.
- 1/2 cup brown sugar (packed): Adds moisture and a hint of molasses flavor for a chewy texture.
- 1 large egg: Acts as the binding agent to hold the dough together.
- 1 teaspoon vanilla extract: A splash of high-quality vanilla enhances all the other flavors.
- 1 1/4 cups all-purpose flour: The main structure of the cookie.
- 1/2 teaspoon baking soda: Gives the cookies just enough lift and helps them brown.
- 1/4 teaspoon salt: Essential for balancing the sugars and bringing out the chocolate flavor.
- 1 cup semi-sweet chocolate chips: You can use dark or milk chocolate if preferred, but semi-sweet is the classic choice.
- 1 1/2 cups Rice Krispies cereal: The star ingredient that provides the signature crunch.
Kitchen Tools Needed
- Large and medium mixing bowls
- Electric hand mixer or a sturdy whisk
- Measuring cups and spoons
- Rubber spatula
- Baking sheets
- Parchment paper or silicone baking mats
- Wire cooling rack
Step-by-Step Baking Instructions
Following these steps in order will ensure the cookies have the best possible texture and flavor.
1. Oven and Pan Preparation
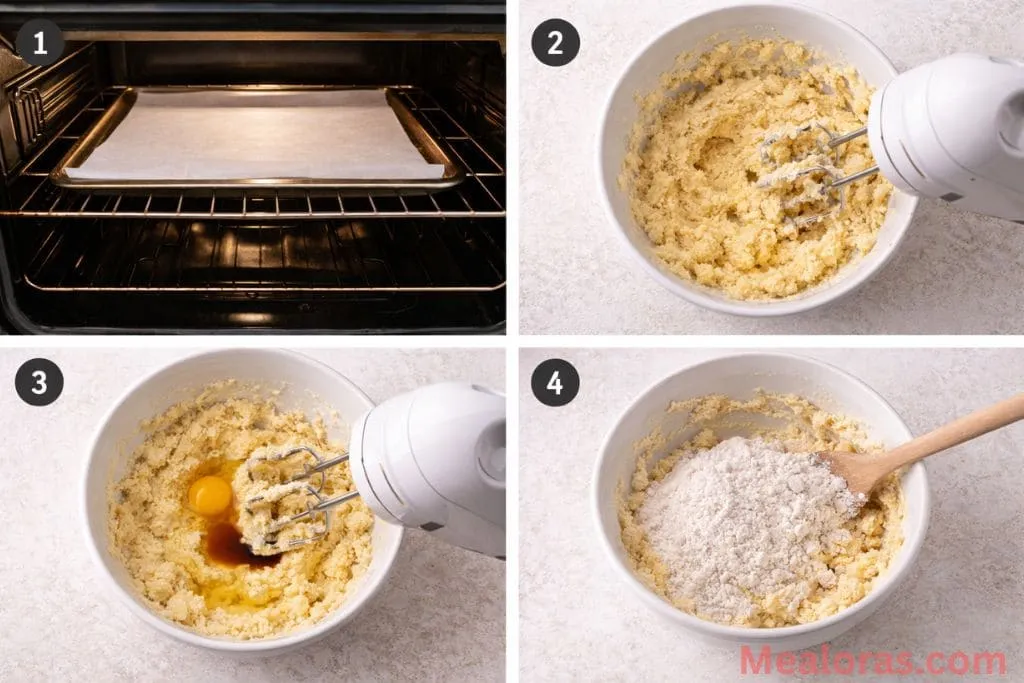
Start by preheating the oven to 350°F (175°C). While the oven warms up, line your baking sheets with parchment paper. This is a crucial step because it prevents the cookies from sticking and ensures the bottoms don’t get too dark too quickly.
2. Creaming the Fats and Sugars
In a large mixing bowl, combine the softened butter, granulated sugar, and brown sugar. Use an electric mixer on medium speed to beat them together until the mixture looks pale and fluffy. This usually takes about 2 to 3 minutes. Properly creaming the butter and sugar incorporates air, which leads to a better cookie structure.
3. Incorporating Liquid Ingredients
Add the egg and the vanilla extract to the creamed mixture. Continue to beat the batter until it is fully combined and smooth. Be sure to scrape down the sides of the bowl with a spatula so everything is evenly mixed.
4. Mixing the Dry Ingredients
In a separate smaller bowl, whisk together the all-purpose flour, baking soda, and salt. Gradually add these dry ingredients to the wet batter. It is best to mix on a low speed or by hand at this point. Stop mixing as soon as the white streaks of flour disappear. Overmixing can lead to a tough cookie, which you definitely want to avoid.
5. Adding the Crunch and Chocolate
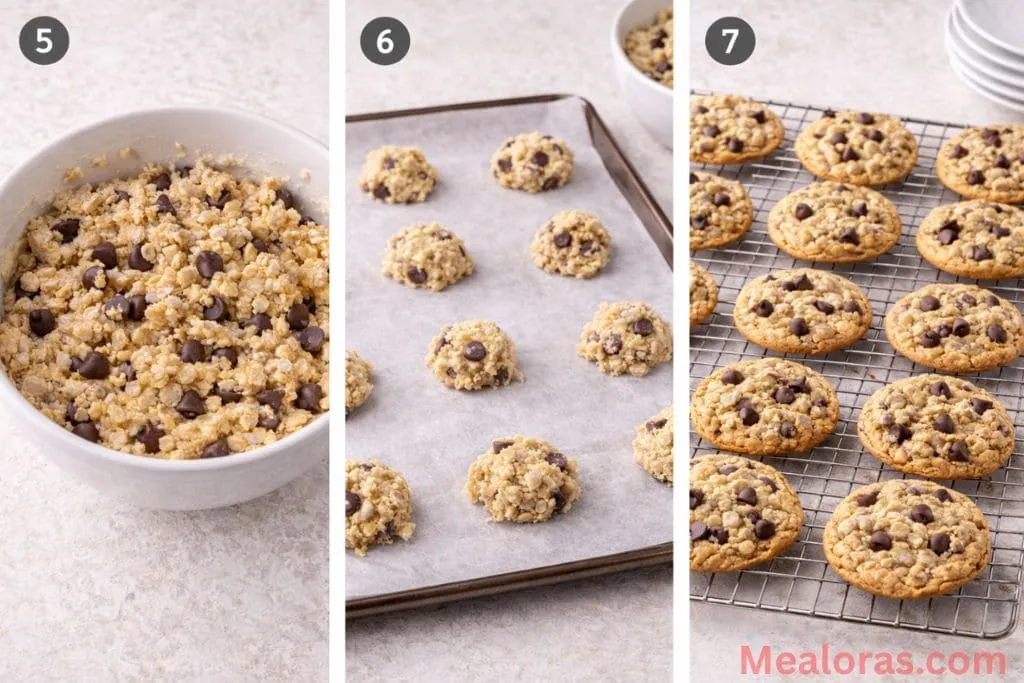
Now comes the best part. Use a spatula to gently fold in the chocolate chips and the Rice Krispies cereal. You want to be careful not to crush the cereal too much, as keeping those little puffed rice pieces whole is what gives the cookies their unique texture.
6. Scooping and Baking
Using a tablespoon or a small cookie scoop, drop rounded portions of dough onto the prepared baking sheets. Space them about 2 inches apart to allow for spreading. Place the sheets in the center of the oven and bake for 10 to 12 minutes. You are looking for the edges to be lightly golden, even if the centers still look a bit soft.
7. The Cooling Process
Remove the cookies from the oven and let them sit on the hot baking sheet for about 5 minutes. This allows them to firm up enough to be moved. Afterward, transfer them to a wire cooling rack to cool completely.

Helpful Baking Tips and Variations
To get the most out of this recipe, keep a few expert tips in mind. If you enjoy making finger foods that everyone loves, you might also be interested in learning about chickpea vegetable nuggets recipe for a savory snack option.
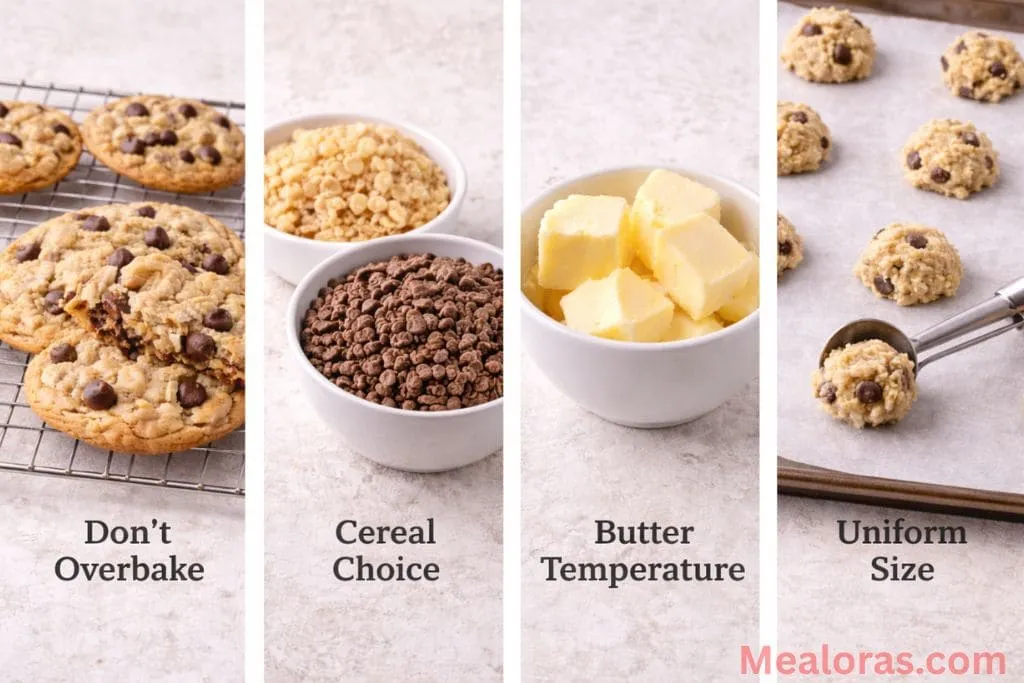
- Don’t Overbake: These cookies can go from perfect to overdone very quickly. Since the cereal is already dry, an overbaked cookie can become too brittle. Take them out when they still look slightly underdone in the middle.
- Cereal Choice: While the classic puffed rice cereal is standard, you can experiment with cocoa-flavored puffed rice for a double-chocolate version.
- Butter Temperature: If your butter is too hot or melted, the cookies will spread into flat puddles. Softened butter should hold an indentation when pressed but still feel cool.
- Uniform Size: Use a cookie scoop to ensure all your cookies are the same size. This helps them bake evenly so you don’t end up with some burnt and some raw.
Storage and Serving Suggestions
Once the cookies have cooled, they are ready to be enjoyed. They pair perfectly with a tall glass of cold milk or a warm cup of herbal tea.
How to Store Leftovers
To keep these cookies fresh, place them in an airtight container at room temperature. They will stay delicious for up to 5 days. If you find they are getting a bit hard, placing a single slice of white bread in the container can help keep the cookies soft. The moisture from the bread transfers to the cookies without making them soggy.
Freezing for Later
If you want to save them for a later date, these cookies freeze beautifully. You can freeze the baked cookies in a freezer-safe bag for up to two months. Alternatively, you can freeze the raw dough balls. When you are ready for a treat, just pop a few dough balls onto a tray and bake them, adding an extra minute or two to the cooking time.
Frequently Asked Questions
1. Can I use margarine instead of butter? Butter is recommended for the best flavor and texture, but a high-quality margarine stick can work. Avoid tub margarines, as they have too much water content.
2. Why did my cookies turn out flat? This usually happens if the butter was too soft or melted. It can also happen if the baking sheet was already hot when you placed the dough on it.
3. Can I add nuts to this recipe? Yes, chopped walnuts or pecans would add another layer of crunch and flavor. Simply fold them in along with the chocolate chips.
4. Can I use gluten-free flour? A 1-to-1 gluten-free baking flour can be used. Just ensure the cereal you are using is also certified gluten-free, as some brands contain malt flavoring.
5. How do I make the cookies more chewy? Using a bit more brown sugar and slightly less granulated sugar can increase the chewiness. Also, be sure not to overbake them.
6. Do I need to chill the dough? Chilling isn’t required for this recipe, but if your kitchen is very warm, putting the dough in the fridge for 30 minutes can help prevent too much spreading.
7. Can I use large chocolate chunks? Absolutely. Large chunks will create bigger pools of melted chocolate, which is a favorite for many chocolate lovers.
8. My cereal got soggy, what happened? This usually happens if the dough sits for too long before baking. Try to get the cookies in the oven shortly after mixing in the Rice Krispies.
9. Can I make these without an electric mixer? Yes, you can cream the butter and sugar by hand with a wooden spoon or whisk, though it will require a bit more effort.
10. How many cookies does this recipe make? Depending on the size of your scoops, this recipe typically yields about 24 standard-sized cookies.
Final Thoughts
This Rice Krispie Chocolate Chip Cookies Recipe is a wonderful way to upgrade a classic dessert. The light, airy crunch of the cereal combined with the rich chocolate makes for a snack that is hard to resist. Because the ingredients are simple pantry staples, it is an easy recipe to whip up whenever a craving strikes.
We hope you enjoy baking these unique treats for your household! If you find this recipe helpful, please consider sharing it with your friends and family so they can experience the perfect cookie crunch too. Sharing a batch of homemade cookies is one of the simplest ways to brighten someone’s day.

Rice Krispie Chocolate Chip Cookies Recipe
Ingredients
- 1/2 cup unsalted butter softened
- 1/2 cup granulated sugar
- 1/2 cup brown sugar packed
- 1 large egg
- 1 teaspoon vanilla extract
- 1 1/4 cups all-purpose flour
- 1/2 teaspoon baking soda
- 1/4 teaspoon salt
- 1 cup semi-sweet chocolate chips
- 1 1/2 cups Rice Krispies cereal
Instructions
- Preheat and Prep: Begin by setting the oven to 350°F and lining baking sheets with parchment paper to prevent sticking and ensure even browning.
- Cream the Base: In a large bowl, beat the softened butter together with the granulated and brown sugars until the mixture is light, pale, and fluffy.
- Add Liquids: Mix in the egg and vanilla extract, beating the batter until it reaches a smooth and silky consistency.
- Whisk Dry Ingredients: In a separate medium bowl, combine the flour, baking soda, and salt, then gradually stir this into the wet mixture until just combined.
- Fold in Mix-ins: Gently fold the semi-sweet chocolate chips and the Rice Krispies cereal into the dough using a spatula, taking care not to crush the cereal.
- Scoop and Bake: Place rounded tablespoons of dough onto the prepared sheets, leaving space for spreading, and bake until the edges turn a light golden brown.
- Cool and Firm: Allow the cookies to rest on the hot baking tray for a few minutes before moving them to a wire rack to finish cooling.
Notes
• Measuring Flour: For the best accuracy, spoon the flour into the measuring cup and level it off with a knife.
• Avoid Overmixing: Stop stirring once the flour is just incorporated to keep the cookies tender rather than tough.
• Storage Tip: Store these in an airtight container with a slice of bread to maintain their soft and chewy center for several days.

Mealoras your go-to for simple, flavorful recipes! From quick weeknight dinners to sweet treats and family favorites, we make cooking easy, fun, and delicious for everyone in the kitchen.