If there is one childhood treat that almost everyone remembers with a smile, it is the classic toaster pastry. The combination of a thin, golden crust, a sweet fruity filling, and that iconic hard icing with colorful sprinkles is truly timeless. But what if those familiar flavors were transformed into something even more decadent? Enter the Pop Tart Cookie Bar. This recipe takes everything you love about the nostalgic snack and turns it into a thick, buttery, and soft cookie bar that is much more satisfying than anything from a box.
Table of Contents
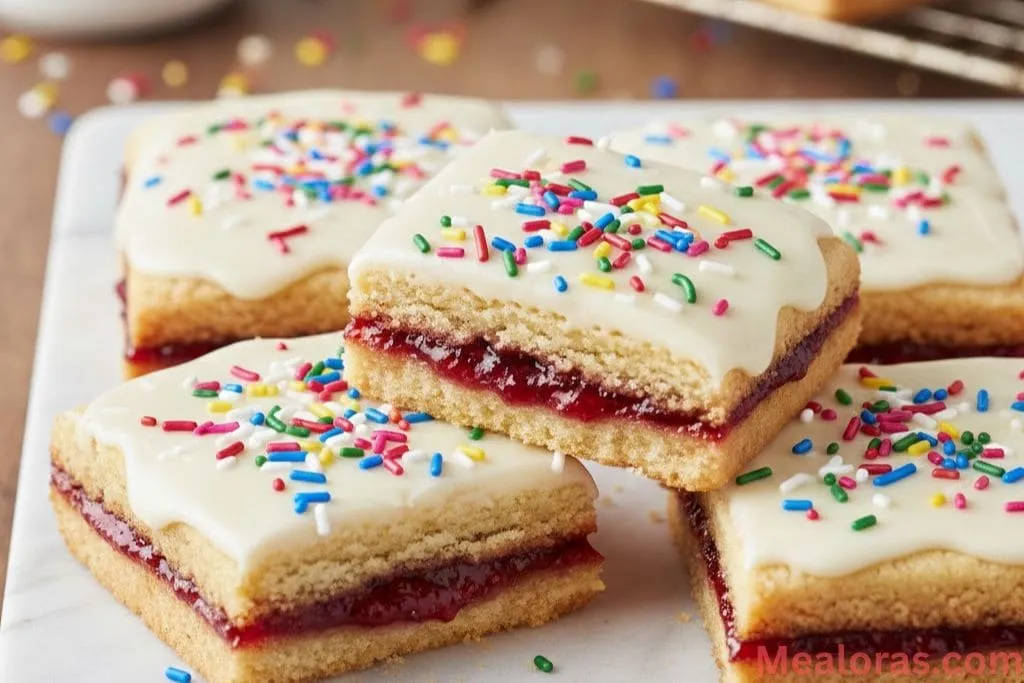
These bars are essentially a hybrid between a soft sugar cookie and a traditional tart. They feature two layers of tender dough with a generous spread of strawberry preserves hidden in the middle. Once baked and cooled, they are topped with a simple vanilla glaze and rainbow sprinkles to complete the look. They are perfect for anyone who wants a fun baking project that feels a bit special but remains very approachable for beginners.
The beauty of this recipe is its simplicity. You do not need any fancy pastry skills to get that “pop tart” effect. By using a cookie base, you get a much softer bite than a traditional pie crust, making these a hit at any gathering or as a sweet afternoon treat. Whether you are looking for a creative dessert to share or just want to treat yourself to a bit of nostalgia, these bars are sure to become a new favorite in your kitchen.
Why You Will Love These Bars
These bars are a fantastic alternative to traditional cookies because they are baked all at once in a single pan. This saves the time of scooping individual portions, and the layered effect makes them look like they came from a professional bakery. The texture is the real star here chewy, buttery, and slightly crisp on the edges.
If you enjoy recipes that put a creative spin on classic treats, you might also love trying out for your next baking session. Much like these bars, they offer a perfect balance of textures and a nostalgic flavor profile that appeals to all ages.
Ingredients for Pop Tart Cookie Bars
To make these delicious bars, you will need a few pantry staples for the dough and the glaze. Using fresh ingredients at the correct temperature will ensure your dough comes together perfectly.
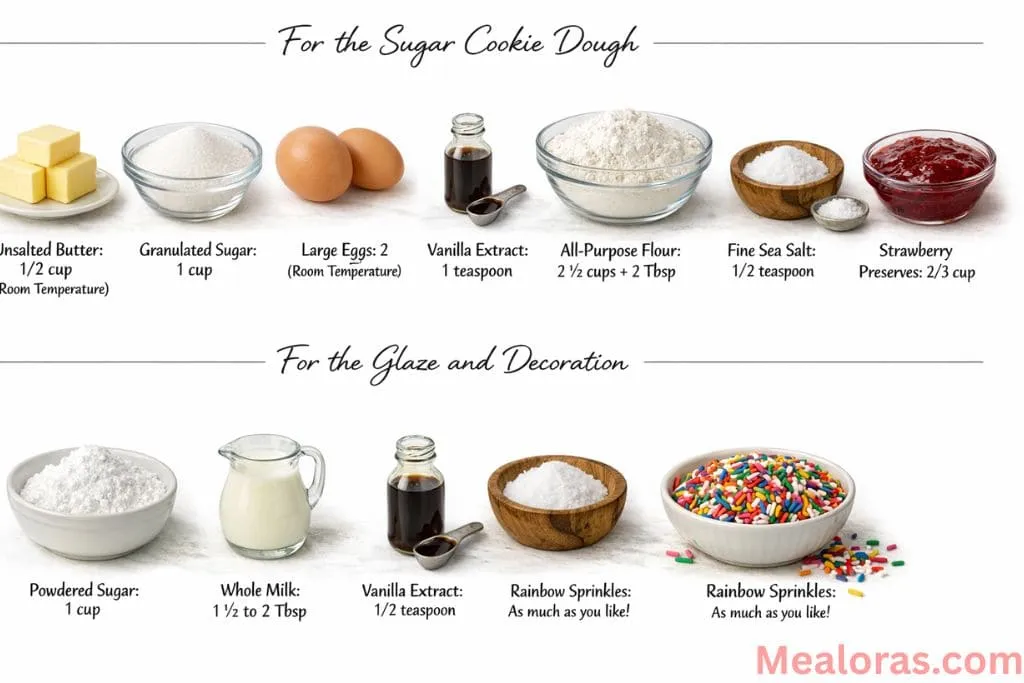
For the Sugar Cookie Dough
- Unsalted Butter: 1/2 cup (room temperature)
- Granulated Sugar: 1 cup
- Large Eggs: 2 (room temperature)
- Vanilla Extract: 1 teaspoon (or vanilla bean paste)
- All-Purpose Flour: 2 1/2 cups plus 2 tablespoons
- Fine Sea Salt: 1/2 teaspoon
- Baking Soda: 1/2 teaspoon
- Strawberry Preserves: 2/3 cup
For the Glaze and Decoration
- Powdered Sugar: 1 cup
- Whole Milk: 1 1/2 to 2 tablespoons
- Vanilla Extract: 1/2 teaspoon
- Rainbow Sprinkles: As much as you like!
Essential Kitchen Tools
- 8×8-inch Square Baking Pan: Metal pans are recommended for the best heat distribution.
- Parchment Paper: Essential for lifting the bars out easily.
- Stand Mixer or Hand Mixer: To cream the butter and sugar effectively.
- Offset Spatula: Helpful for spreading the jam and the glaze smoothly.
- Kitchen Scale: Highly recommended for measuring flour accurately.
Step-by-Step Instructions
Follow these clear steps to create your layered cookie bars. Patience is key, especially when letting the dough chill and the bars cool.
1. Prepare Your Pan and Oven
Start by preheating your oven to 375°F (190°C). Take your 8×8-inch square baking pan and line it with parchment paper. It is best to let the paper hang over the sides slightly so you can use it as a handle later.
2. Cream the Butter and Sugar
In the bowl of your mixer, combine the softened unsalted butter and the granulated sugar. Beat them together on medium-high speed for about 3 minutes. You want the mixture to look very light in color and fluffy in texture. This step creates the base for a soft cookie.
3. Add the Wet Ingredients
Lower the mixer speed and add the eggs one at a time. Make sure each egg is fully incorporated before adding the next. Pour in the vanilla extract and scrape down the sides of the bowl to ensure everything is evenly mixed.
4. Mix in the Dry Ingredients
Add the flour, sea salt, and baking soda to the wet mixture. Mix on low speed until the dough just starts to come together and form clumps. Be careful not to over-mix, as this can make the bars tough.
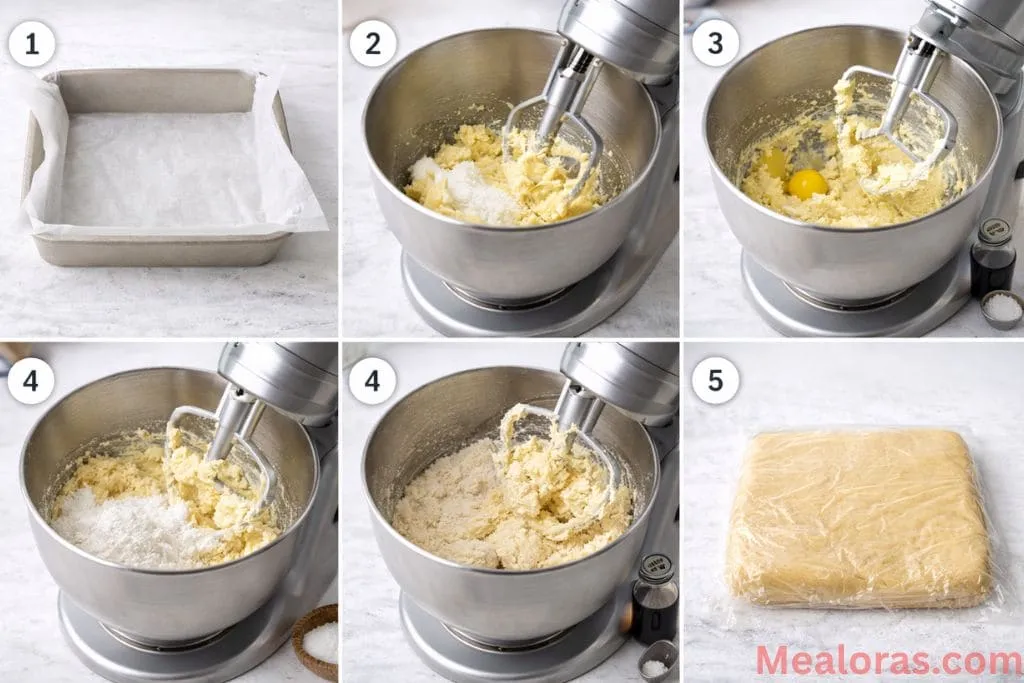
5. Chill the Dough
Since the dough can be a bit soft, wrap it and place it in the refrigerator for about 20 minutes. This makes it much easier to handle when you are ready to layer it in the pan.
6. Create the First Layer
Take half of the chilled dough (roughly 348 grams if using a scale) and press it firmly and evenly into the bottom of your prepared pan. Once it is level, lift the parchment paper out of the pan and place this layer on a baking sheet or cutting board. Put it in the freezer for a few minutes to firm up.
7. Assemble the Bottom and Filling
Place new parchment strips in your pan. Take the remaining half of the dough and press it into the bottom of the pan. Once level, spread the 2/3 cup of strawberry preserves over the dough, leaving a very small border around the edges.
8. Add the Top Layer
Retrieve the first dough layer from the freezer. Remove it from its parchment paper and carefully place it on top of the strawberry preserves. Press down gently but firmly around the edges to seal the jam inside.
9. Bake to Perfection
Place the pan in the oven and bake for 25 to 28 minutes. You are looking for the top to turn a beautiful golden brown. Once finished, remove from the oven and let the bars cool completely in the pan on a wire rack.
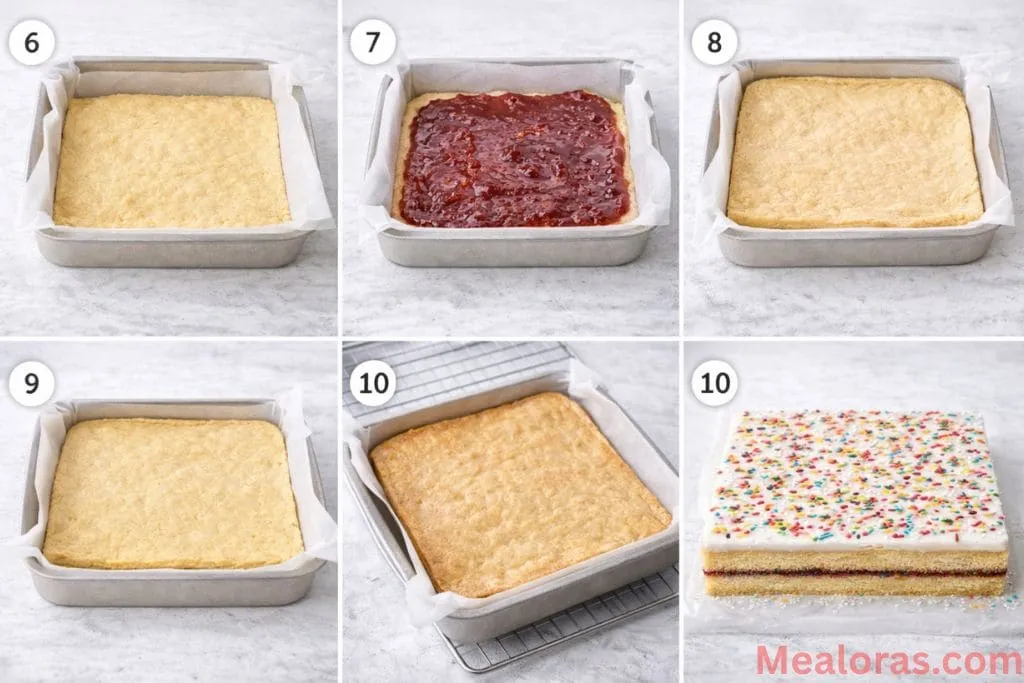
10. Glaze and Finish
Once the bars are totally cool, lift them out of the pan. A pro tip is to flip the whole block over so the flat bottom becomes the top—this makes for a much smoother glazing surface! Whisk the powdered sugar, milk, and vanilla together until smooth. Spread the glaze over the top and immediately top with rainbow sprinkles. Let the icing set for an hour or two before slicing into 15 bars.
Tips for Success
- Measure by Weight: Using a kitchen scale for the flour is the best way to ensure your cookies aren’t dry. If you use cups, fluff the flour first and level it off without packing it down.
- Cool Completely: Never glaze warm bars! The icing will melt and run off the sides. Patience ensures a thick, opaque frosting layer just like the real thing.
- Seal the Edges: When placing the top layer of dough, try to pinch the edges slightly to keep the jam from bubbling out too much, though a little leakage is perfectly fine and looks rustic.
- Room Temperature Ingredients: Make sure your eggs and butter are not cold. This allows the fats and liquids to emulsify properly, leading to a much better cookie crumb.
If you find yourself enjoying the process of making filled treats, you might want to explore making as well. They offer another wonderful way to practice layering flavors and textures in a handheld dessert.
If you are looking for more ways to use your baking skills for layered treats, you should definitely try these gingerbread oatmeal cream pies. They offer a wonderful combination of spiced, chewy cookies and a smooth cream filling that pairs perfectly with the nostalgic theme of these bars.
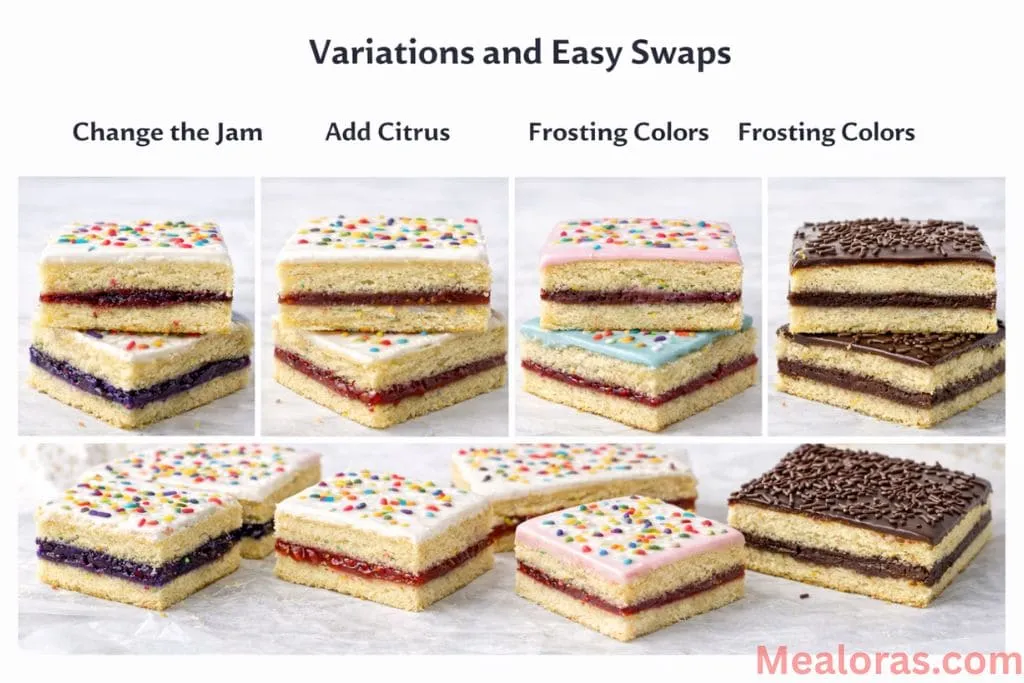
Variations and Easy Swaps
- Change the Jam: While strawberry is classic, raspberry, blueberry, or even grape preserves work wonderfully.
- Add Citrus: A little lemon zest in the sugar cookie dough can brighten up the flavors and add a fresh twist.
- Frosting Colors: You can add a drop of food coloring to the glaze if you want to match the color of the fruit filling inside.
- Chocolate Version: For a different vibe, use a chocolate hazelnut spread as the filling and top with a chocolate-flavored glaze.
Storage and Serving
These bars are best kept in an airtight container at room temperature. They will stay fresh and soft for about 3 to 4 days. If you need to stack them, place a piece of parchment paper between the layers so the glaze doesn’t stick.
When serving, these are delightful on their own, but they also pair beautifully with a cold glass of milk or a warm cup of herbal tea. Because they are quite rich, cutting them into smaller rectangles makes them a perfect portion for a snack.
Frequently Asked Questions
1. Can I use a different size pan? It is best to stick to an 8×8-inch pan for the correct thickness. A larger pan will result in very thin bars that may bake too quickly.
2. Why did my glaze turn out too thin? This usually happens if too much milk was added. Add more powdered sugar one tablespoon at a time until it reaches a thick, spreadable consistency.
3. Do I have to chill the dough? Yes, chilling makes the dough less sticky and much easier to press into the pan without it sticking to your hands.
4. Can I freeze these bars? Yes! You can freeze the baked bars for up to 2 months. It is best to freeze them before glazing, then add the fresh glaze once they have thawed.
5. My jam leaked out the sides, is that okay? Absolutely. It is very common for a little jam to bubble up. It actually adds to the homemade charm of the bars.
6. Can I make the dough in advance? You can make the dough a day ahead and keep it in the fridge. Just let it sit at room temperature for a few minutes before trying to press it into the pan.
7. What kind of sprinkles are best? Traditional “jimmies” (the long ones) give the most authentic Pop Tart look, but nonpareils or holiday-themed sprinkles work too.
8. Why are my bars dry? Dry bars are usually the result of too much flour. Always measure carefully and avoid over-baking.
9. Can I use fresh fruit instead of preserves? Preserves are recommended because they have a lower moisture content and a concentrated flavor. Fresh fruit may release too much juice and make the dough soggy.
10. How do I get clean cuts? Wait until the glaze is completely set and use a sharp knife. Wiping the knife between cuts will give you the cleanest edges.
Conclusion
Creating your own Pop Tart Cookie Bars is a rewarding experience that brings a bit of magic back to the kitchen. These treats are far superior to store-bought versions, offering a rich, buttery flavor that only homemade baking can provide. They are simple to assemble and even more fun to decorate.
If you enjoyed this recipe, please consider sharing it with your friends and family! Bringing a batch of these to your next gathering is a guaranteed way to make everyone feel like a kid again. Happy baking!

Pop Tart Cookie Bars
Ingredients
- Sugar Cookie Dough
- 1/2 cup Unsalted Butter room temperature
- 1 cup Granulated Sugar
- 2 Large Eggs room temperature
- 1 teaspoon Vanilla Extract
- 2 1/2 cups plus 2 tablespoons All-Purpose Flour
- 1/2 teaspoon Fine Sea Salt
- 1/2 teaspoon Baking Soda
- 2/3 cup Strawberry Preserves
- Glaze and Decoration
- 1 cup Powdered Sugar
- 1 1/2 to 2 tablespoons Whole Milk
- 1/2 teaspoon Vanilla Extract
- Rainbow Sprinkles
Instructions
- Prepare Your Pan and Oven Preheat the oven and line an 8×8-inch square baking pan with parchment paper, leaving a slight overhang on the sides for easy removal.
- Cream the Butter and Sugar Using a mixer, beat the softened butter and granulated sugar together on medium-high speed until the mixture is light, fluffy, and pale in color.
- Add the Wet Ingredients Lower the speed and incorporate the eggs one at a time, followed by the vanilla extract, scraping down the sides of the bowl to ensure a thorough mix.
- Mix in the Dry Ingredients Add the flour, sea salt, and baking soda, mixing on low speed until the dough just begins to clump together without over-working it.
- Chill the Dough Wrap the dough and let it rest in the refrigerator to firm up, making it easier to handle and layer.
- Create the First Layer Press half of the chilled dough evenly into the bottom of the pan, then lift it out using the parchment and place it in the freezer briefly to set.
- Assemble the Bottom and Filling Press the remaining dough into the bottom of the lined pan and spread the strawberry preserves over it, leaving a small border around the edges.
- Add the Top Layer Place the chilled top layer of dough over the preserves and gently press the edges to seal the filling inside.
- Bake to Perfection Bake until the top is a light golden brown, then remove from the oven and allow the bars to cool completely in the pan.
- Glaze and Finish Whisk together the powdered sugar, milk, and vanilla to create a smooth glaze. Flip the cooled bars for a flat surface, spread the icing on top, add sprinkles, and let set before slicing.
Notes
• Temperature Check: Ensure your bars are entirely cool before adding the glaze to prevent it from melting and running off.
• Sealing the Edges: Pinching the dough layers together helps keep the jam from bubbling out during the baking process.
• Storage: Keep these in an airtight container at room temperature for up to four days to maintain their soft texture.

Mealoras your go-to for simple, flavorful recipes! From quick weeknight dinners to sweet treats and family favorites, we make cooking easy, fun, and delicious for everyone in the kitchen.