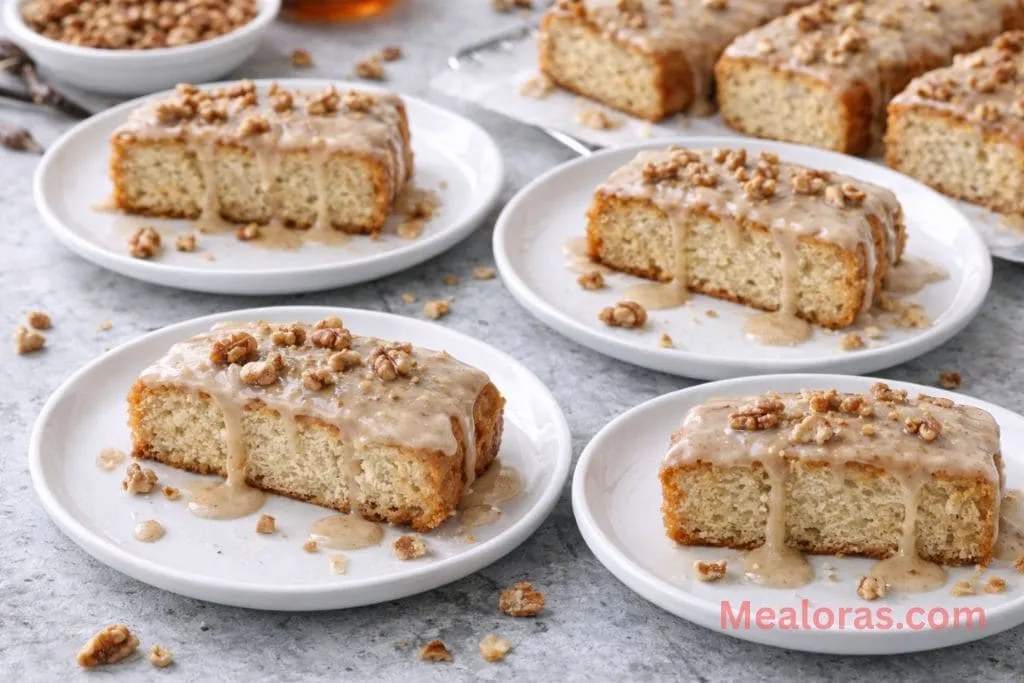
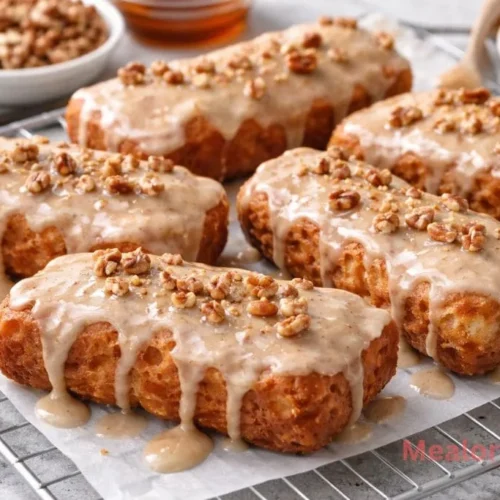
There is something incredibly nostalgic about the smell of fresh donuts in the morning. While many people think they have to visit a local bakery to get that perfect “old-fashioned” texture, it is surprisingly easy to recreate at home. These Old-Fashioned Buttermilk Donut Bars are the ultimate comfort food. They feature a tender, cake-like interior with those signature craggy edges that catch every bit of glaze.
Table of Contents
What sets this recipe apart is the addition of a rich brown butter maple vanilla bean glaze. Instead of a simple sugar coating, this glaze uses toasted butter to bring out a deep, nutty flavor that pairs beautifully with the tangy buttermilk in the dough. If you have ever enjoyed a classic New York style cheesecake recipe, you know how much a high-quality, creamy texture matters in a dessert. These donut bars deliver that same level of satisfaction in a handheld, fried treat.
Whether you are hosting a cozy weekend brunch or simply want to master the art of homemade frying, this guide will walk you through every step. You don’t need to be a professional pastry chef to succeed; you just need a bit of patience and some simple pantry staples.
Ingredients for the Perfect Donut Bars
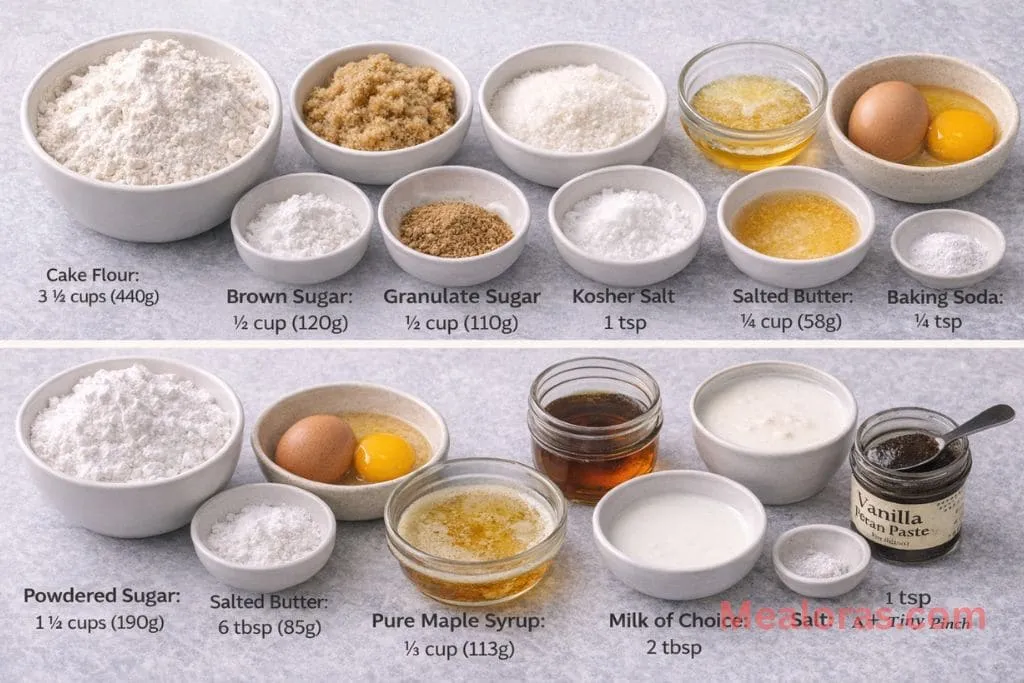
To ensure these donuts have the best possible texture and flavor, gather the following ingredients. Using fresh buttermilk and real maple syrup makes a significant difference in the final result.
For the Donut Dough
- Cake Flour: 3 ½ cups (440g)
- Baking Powder: 2 ½ tsp
- Kosher Salt: 1 tsp
- Ground Nutmeg: ¾ tsp
- Baking Soda: ¼ tsp
- Brown Sugar: ½ cup (120g)
- Granulated Sugar: ½ cup (110g)
- Salted Butter: ¼ cup (58g), melted
- Large Eggs: 2 whole eggs plus 1 egg yolk (room temperature)
- Vanilla Extract: 1 tbsp
- Buttermilk: ¾ cup (180ml)
For the Brown Butter Maple Vanilla Bean Glaze
- Powdered Sugar: 1 ½ cups (190g)
- Salted Butter: 6 tbsp (85g)
- Pure Maple Syrup: ⅓ cup (113g)
- Milk of Choice: 2 tbsp
- Vanilla Bean Paste (or Extract): 1 tsp
- Salt: A tiny pinch
Essential Kitchen Tools
- Large mixing bowls
- Whisk and rubber spatula
- Rolling pin
- Bench scraper or sharp knife
- Heavy-bottomed pot or Dutch oven
- Candy thermometer
- Wire cooling rack
Step-by-Step Instructions
1. Prepare the Dry Base
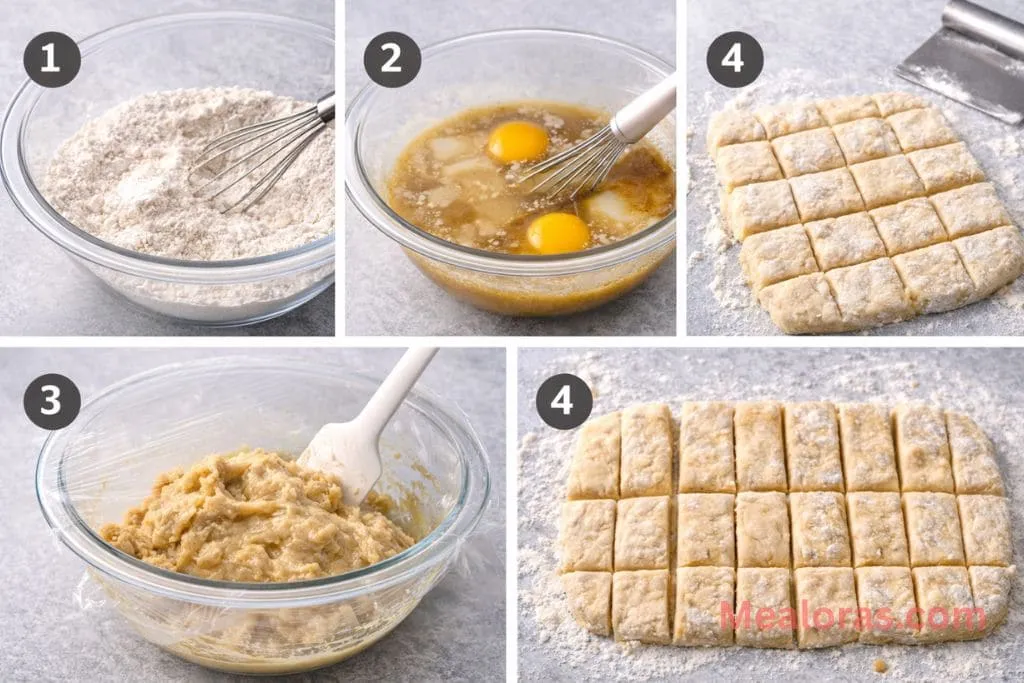
In a large mixing bowl, combine the cake flour, baking powder, salt, nutmeg, and baking soda. Use a whisk to stir everything together until the ingredients are evenly distributed. The nutmeg is a secret ingredient in old-fashioned donuts, giving them that traditional bakery aroma.
2. Mix the Wet Ingredients
In a separate bowl, whisk together the melted butter with both the brown and granulated sugars. Once combined, add the two whole eggs and the extra egg yolk. The extra yolk is crucial for a richer, more tender crumb. Pour in the vanilla extract and the buttermilk, whisking until the mixture is smooth.
3. Combine and Chill
Gradually add the dry flour mixture into the wet ingredients. Use a spatula to fold the dough gently. It is important not to overmix here; stop as soon as no dry flour streaks remain. The dough will be very sticky, which is perfectly normal. Cover the bowl and let it rest in the refrigerator for at least 30 to 60 minutes. Chilling the dough makes it much easier to handle and prevents the donuts from falling apart during cooking.
4. Shape the Donut Bars
Heavily flour your countertop and your hands. Turn the chilled dough out onto the surface and sprinkle more flour on top. Gently pat or roll the dough into a large rectangle, roughly 18 inches long and half an inch thick.
Using a floured bench scraper or knife, cut the dough in half lengthwise. Then, make 8 or 9 cuts across to create 16 to 18 rectangular bars. For that authentic “buttermilk bar” look, take your floured scraper and gently press a line down the center of each bar. Do not cut all the way through; you just want a deep indentation.
5. Heat the Frying Oil
Pour your preferred frying oil into a heavy-bottomed pot until it is about 2 inches deep. Heat the oil over medium-high heat until it reaches a temperature between 350°F and 370°F. Keeping the oil at a consistent temperature ensures the donuts cook through without becoming greasy.
6. Fry to Golden Perfection
Carefully lower 3 or 4 bars into the hot oil at a time. It is best to start with the indentation side facing up. Fry for about 1 to 2 minutes until the bottom is a deep golden brown, then flip them over. Fry the second side for another 1 to 2 minutes. Use a slotted spoon to transfer the hot donuts to a wire rack lined with paper towels to drain.
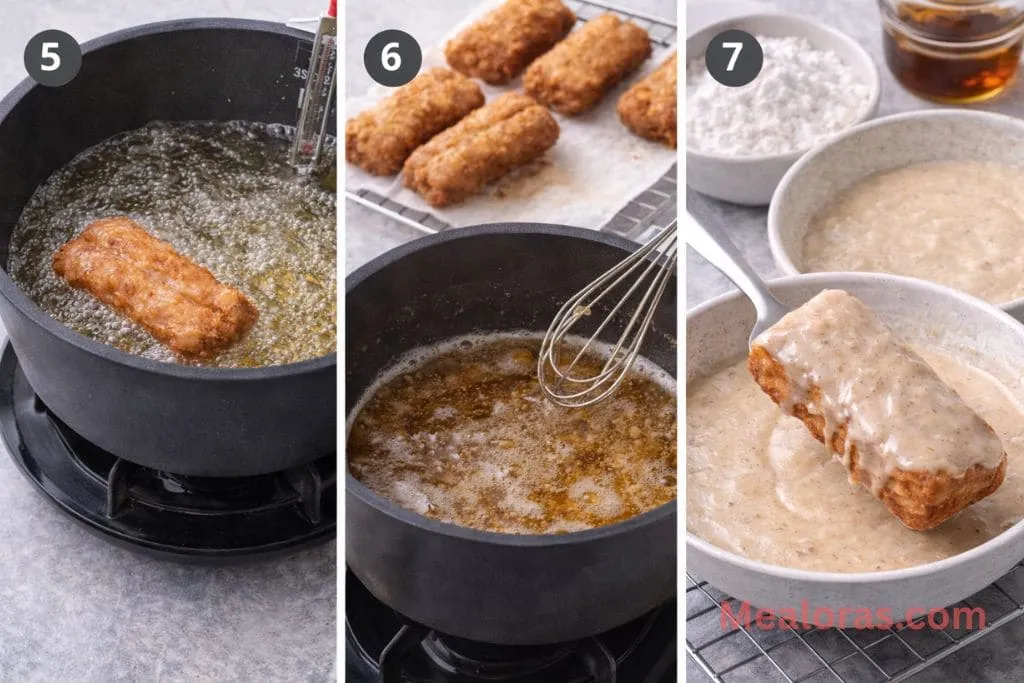
7. Create the Brown Butter Glaze
While the donuts are cooling, prepare the glaze. Place the 6 tablespoons of butter in a small saucepan over medium heat. Melt the butter and continue cooking, swirling the pan occasionally, until it begins to foam and brown bits form at the bottom. Once it smells nutty and looks amber-toned, remove it from the heat.
In a bowl, whisk the browned butter with the powdered sugar, maple syrup, milk, vanilla, and salt. If the glaze feels too thick, add an extra teaspoon of milk until it reaches a dippable consistency.
8. Glaze and Serve
Once the donuts are cool enough to touch but still slightly warm, dip the top side of each bar into the glaze. Place them back on the wire rack to allow the glaze to set.
Expert Tips for Success
- Temperature Control: Always use a thermometer. If the oil is too cold, the dough will soak up the oil and become heavy. If it’s too hot, the outside will burn before the inside is cooked.
- Handling Sticky Dough: Since this is a cake-style dough, it is naturally soft. If it sticks to your hands, don’t be afraid to use extra flour on your work surface.
- The Brown Butter Secret: Don’t walk away from the stove when browning butter. It can go from perfect to burnt in just a few seconds.
- Similar Textures: If you enjoy the soft, pillowy texture of these bars, you might also love learning how to make gingerbread oatmeal cream pies, which also balance a soft base with a sweet, creamy filling.
Storage and Serving Suggestions
These donut bars are best enjoyed the day they are made, ideally while the glaze is still fresh. If you have leftovers, store them in an airtight container at room temperature for up to two days. Avoid refrigerating them, as this can cause the glaze to become weepy and the dough to turn stale.
Serve these bars with a tall glass of cold milk or a hot cup of coffee. They make a wonderful addition to a breakfast spread alongside fresh fruit and yogurt.
Frequently Asked Questions
1. Can I use all-purpose flour instead of cake flour? Yes, but the texture will be slightly denser. To make a DIY cake flour, remove 2 tablespoons of flour from 1 cup of all-purpose flour and replace it with 2 tablespoons of cornstarch.
2. What is the best oil for frying donuts? High-smoke point oils like canola oil, vegetable oil, or peanut oil are best. They won’t burn at the temperatures required for frying.
3. Why is my donut dough so sticky? This is a high-moisture dough, which ensures the donuts stay soft. Chilling the dough is the best way to manage the stickiness.
4. Can I bake these instead of frying? This specific recipe is designed for frying to get the classic craggy texture. Baking them would result in a very different, more muffin-like consistency.
5. How do I know when the butter is browned? Look for little brown specks at the bottom of the pan and a distinct toasted, nutty aroma.
6. Can I make the dough the night before? Yes, you can leave the dough in the fridge overnight. This actually allows the flavors to develop even more.
7. Why didn’t my donuts get the “cracked” look? The “crack” usually comes from the indentation you make with the bench scraper and the reaction of the buttermilk with the leavening agents.
8. Can I use maple extract instead of syrup? Real maple syrup provides both flavor and texture to the glaze. If you use extract, you will need to add more milk or liquid to compensate.
9. How do I keep the donuts from being greasy? Ensure your oil returns to the proper temperature (350°F-370°F) before adding a new batch of donuts to the pot.
10. Is there a substitute for buttermilk? You can make a quick substitute by adding 1 tablespoon of lemon juice or white vinegar to a cup of regular milk and letting it sit for 5 minutes.
Conclusion
Making Old-Fashioned Buttermilk Donut Bars at home is a rewarding experience that fills your kitchen with the most incredible aroma. The combination of the tangy buttermilk dough and the sophisticated brown butter maple glaze creates a treat that feels both classic and elevated. Once you master this simple frying technique, you’ll find yourself reaching for this recipe every time you want to impress your houseguests or treat yourself to a special morning.
If you enjoyed this recipe, please consider sharing it with your friends and family! Spreading the joy of home cooking is the best way to keep these traditional recipes alive. Don’t forget to pin this to your favorite dessert board for later!
Old-Fashioned Buttermilk Donut Bars with Brown Butter Maple Vanilla Bean Glaze
Ingredients
- For the Donut Dough
- 3 ½ cups 440g Cake Flour
- 2 ½ tsp Baking Powder
- 1 tsp Kosher Salt
- ¾ tsp Ground Nutmeg
- ¼ tsp Baking Soda
- ½ cup 120g Brown Sugar
- ½ cup 110g Granulated Sugar
- ¼ cup 58g Salted Butter, melted
- 2 Large Eggs plus 1 egg yolk room temperature
- 1 tbsp Vanilla Extract
- ¾ cup 180ml Buttermilk
- For the Brown Butter Maple Vanilla Bean Glaze
- 1 ½ cups 190g Powdered Sugar
- 6 tbsp 85g Salted Butter
- ⅓ cup 113g Pure Maple Syrup
- 2 tbsp Milk of Choice
- 1 tsp Vanilla Bean Paste or Extract
- A tiny pinch of Salt
Instructions
- Whisk the dry base: Stir the cake flour, baking powder, salt, nutmeg, and baking soda together in a large bowl until the mixture is uniform.
- Combine wet ingredients: In a separate container, blend the melted butter with both sugars, then whisk in the eggs, egg yolk, vanilla, and buttermilk until smooth.
- Form the dough: Gently fold the flour mixture into the wet ingredients with a spatula until just combined, being careful not to overwork the sticky dough.
- Chill: Cover the bowl and refrigerate for at least thirty to sixty minutes to make the dough manageable.
- Shape the bars: On a heavily floured surface, roll the dough into a large rectangle about half an inch thick, then cut into eighteen bars and press a light indentation down the center of each.
- Prepare the oil: Fill a heavy pot with two inches of frying oil and heat until a thermometer reads between three hundred fifty and three hundred seventy degrees.
- Fry until golden: Carefully cook the bars in small batches for about two minutes per side until they reach a deep golden brown, then drain on a wire rack.
- Brown the butter: Melt the glaze butter in a saucepan over medium heat, cooking until it foams and smells nutty with toasted amber bits at the bottom.
- Whisk the glaze: Combine the browned butter with powdered sugar, maple syrup, milk, vanilla bean paste, and salt until it reaches a smooth, dippable consistency.
- Finish and set: Dip the top of each warm donut bar into the glaze and return them to the rack to let the coating firm up before serving.
Notes
• Temperature Check: Keep a candy thermometer in the pot at all times; consistent oil heat is the secret to a non-greasy donut.
• Storage: These are best served fresh but can be kept in an airtight container at room temperature for up to two days.

Mealoras your go-to for simple, flavorful recipes! From quick weeknight dinners to sweet treats and family favorites, we make cooking easy, fun, and delicious for everyone in the kitchen.