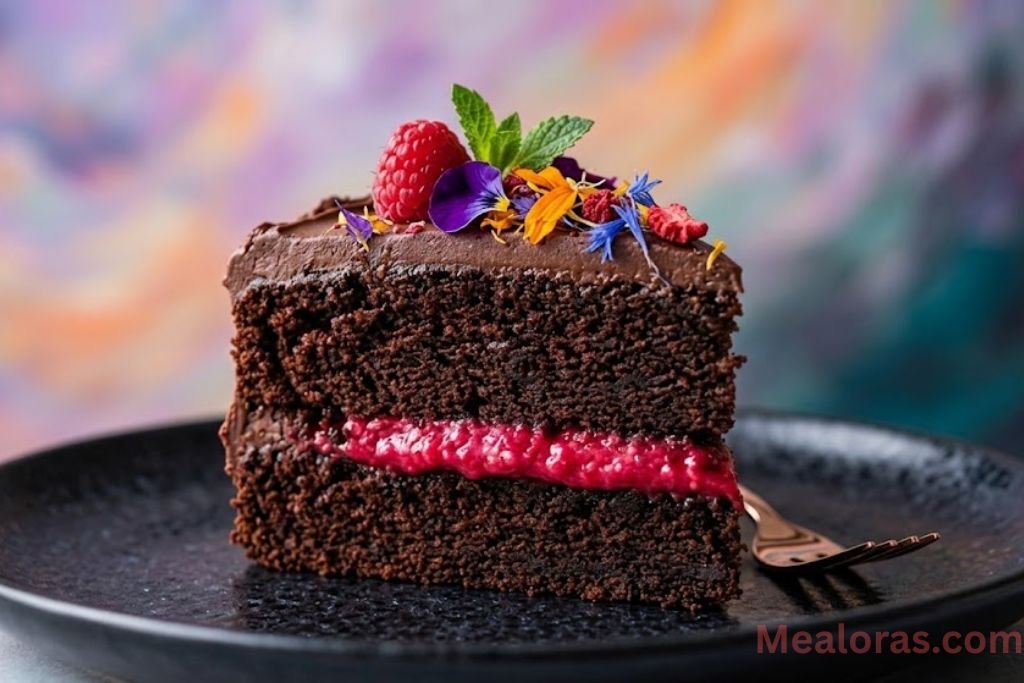
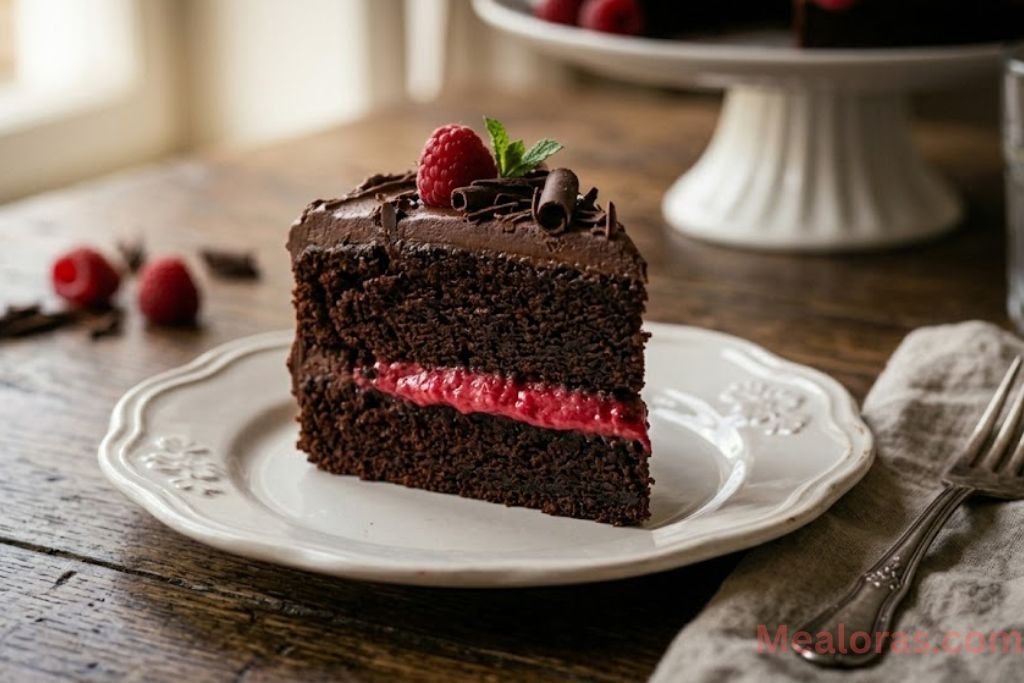
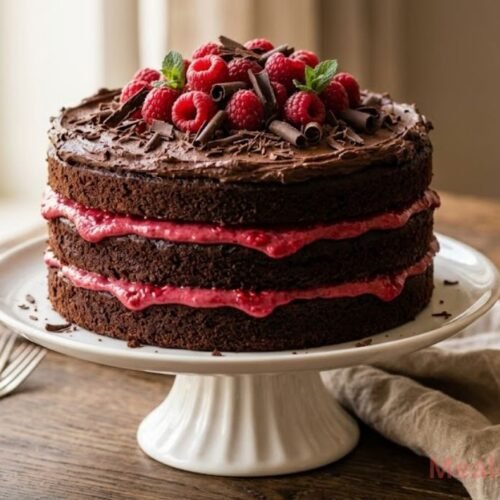
Imagine cutting into a rich, deeply chocolatey layer cake and finding a bright, jewel-toned raspberry filling tucked between every soft layer. That’s exactly what this chocolate cake with raspberry filling delivers every single time.
Table of Contents
This is the kind of cake that stops conversations. It looks stunning, tastes even better, It’s much more beginner-friendly than it looks. The chocolate sponge is incredibly moist and tender. The raspberry filling is tart, fruity, and perfectly balanced. And the chocolate buttercream frosting ties everything together in the most silky, creamy way possible.
Whether you’re baking for a celebration, or simply because the craving hit this chocolate raspberry cake is always the right answer.
Why This Recipe Works
What makes this cake stand out is the balance of flavors. Deep, rich cocoa meets bright, slightly tart raspberries in a way that feels elegant but never complicated. The frosting is fluffy and light, not heavy or overly sweet.
The batter comes together quickly with everyday pantry staples. The raspberry filling uses frozen raspberries, which means this cake is fully possible any time of year. And because every component can be made ahead of time, it’s a stress-free bake even for special occasions.
If you love fudgy, rich chocolate desserts, you might also want to try these fudgy Biscoff cookie butter brownies another crowd-pleasing treat that’s easy to make and impossible to resist.
Ingredients
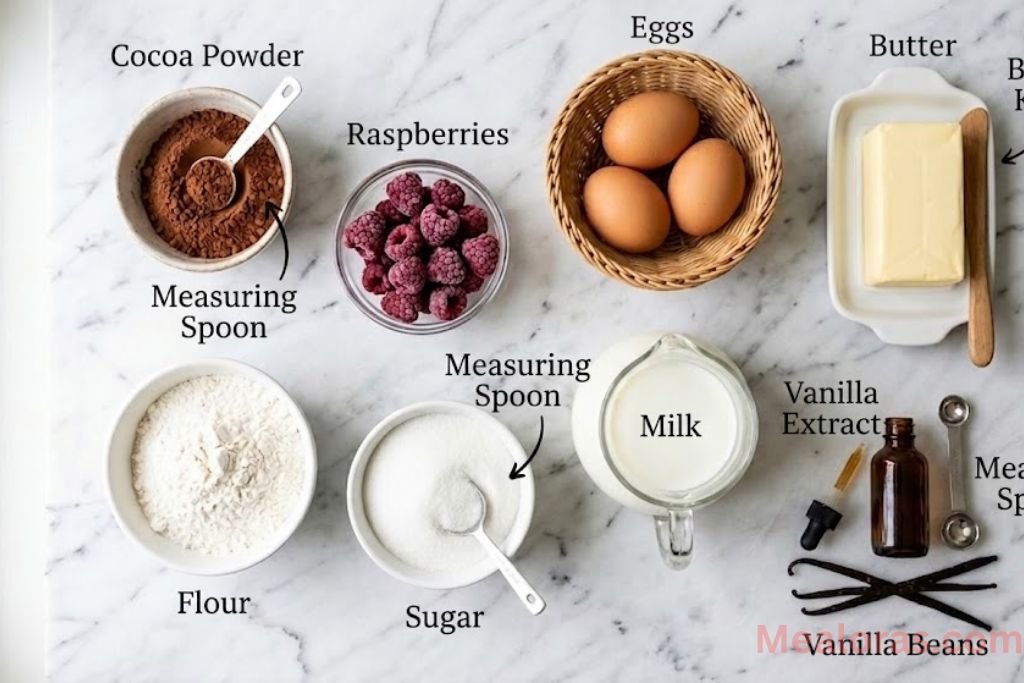
For the Chocolate Cake
- 1 ¾ cups (225 g) all-purpose flour
- ¾ cup (65 g) unsweetened cocoa powder
- ½ teaspoon baking soda
- 1 ½ teaspoons baking powder
- 1 teaspoon fine sea salt
- 2 cups (400 g) granulated sugar
- ½ cup (113 g) vegetable oil
- 2 large eggs
- 1 cup (216 g) whole or 2% milk
- 1 teaspoon vanilla extract
- ⅔ cup (160 ml) hot water
For the Raspberry Filling
- 3 cups (335 g) frozen raspberries
- ⅓ cup (67 g) granulated sugar
- 2 tablespoons lemon juice
- 2 tablespoons cornstarch
- 2 tablespoons water
For the Chocolate Buttercream Frosting
- 1 ½ cups (340 g) unsalted butter, softened
- 2 cups (240 g) powdered sugar
- 2 tablespoons unsweetened dark cocoa powder
- 2 tablespoons heavy cream or whole milk
- 2 teaspoons vanilla extract
Equipment Needed
- Three 8-inch round cake pans
- Parchment paper
- Stand mixer or hand mixer
- Fine mesh strainer
- Piping bag (optional but helpful)
- Wire cooling rack
Instructions
Step 1 – Prepare the Pans and Preheat
Preheat the oven to 325°F (165°C). Grease the sides of three 8-inch cake pans and line the bottoms with parchment paper. Set aside.
Step 2 – Mix the Dry Ingredients
In a large bowl, whisk together the flour, cocoa powder, baking soda, baking powder, and salt until well combined. Set this bowl aside.
Step 3 – Make the Cake Batter
In a separate large bowl, whisk together the vegetable oil and granulated sugar until smooth. Add the vanilla extract, then whisk in the eggs one at a time, mixing well after each addition. Pour in the milk and whisk again until everything is evenly combined.
Add the dry ingredient mixture to the wet ingredients and whisk until just combined don’t overmix. Finally, pour in the hot water and gently whisk until the batter is smooth and glossy. The batter will be thin, which is perfectly normal.
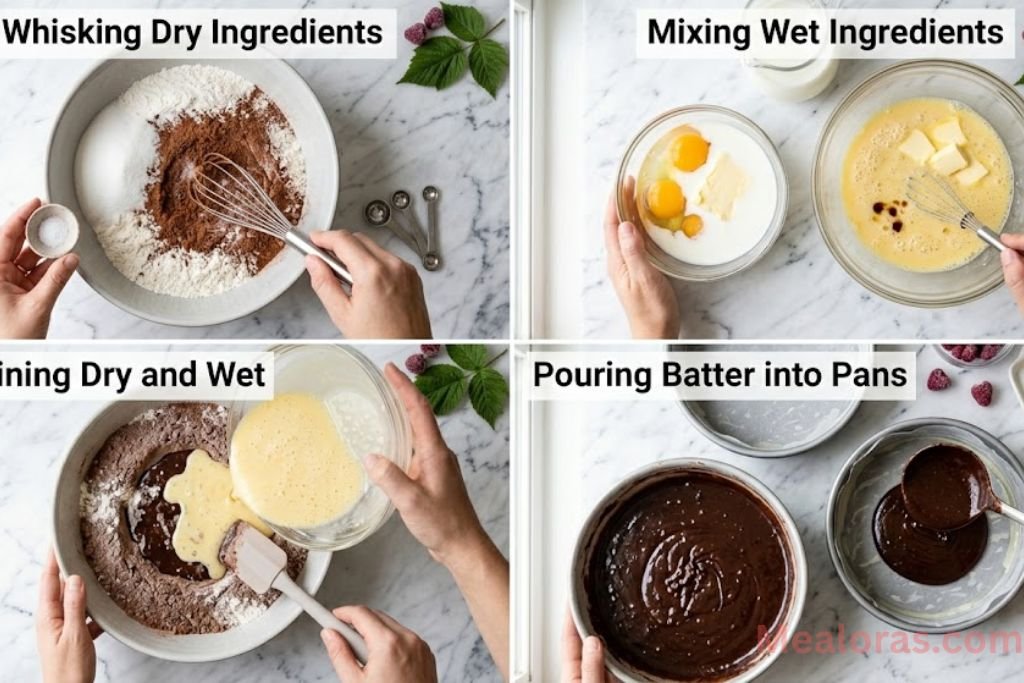
Step 4 – Bake the Cake Layers
Divide the batter evenly among the three prepared pans. Bake for approximately 20–25 minutes, or until a toothpick inserted into the centre comes out clean. Transfer the pans to a wire rack and allow the cakes to cool completely before assembling.
Step 5 – Make the Raspberry Filling
Place the frozen raspberries, granulated sugar, and lemon juice in a small saucepan over medium heat. Cook, stirring occasionally, until the mixture comes to a boil. Use the back of a spoon to gently mash the berries as they soften.
In a small bowl, stir together the cornstarch and water to create a slurry, then pour it into the raspberry mixture. Continue cooking until the filling thickens noticeably. Remove from heat and press the mixture through a fine mesh strainer to remove the seeds. Set the smooth filling aside to cool completely.
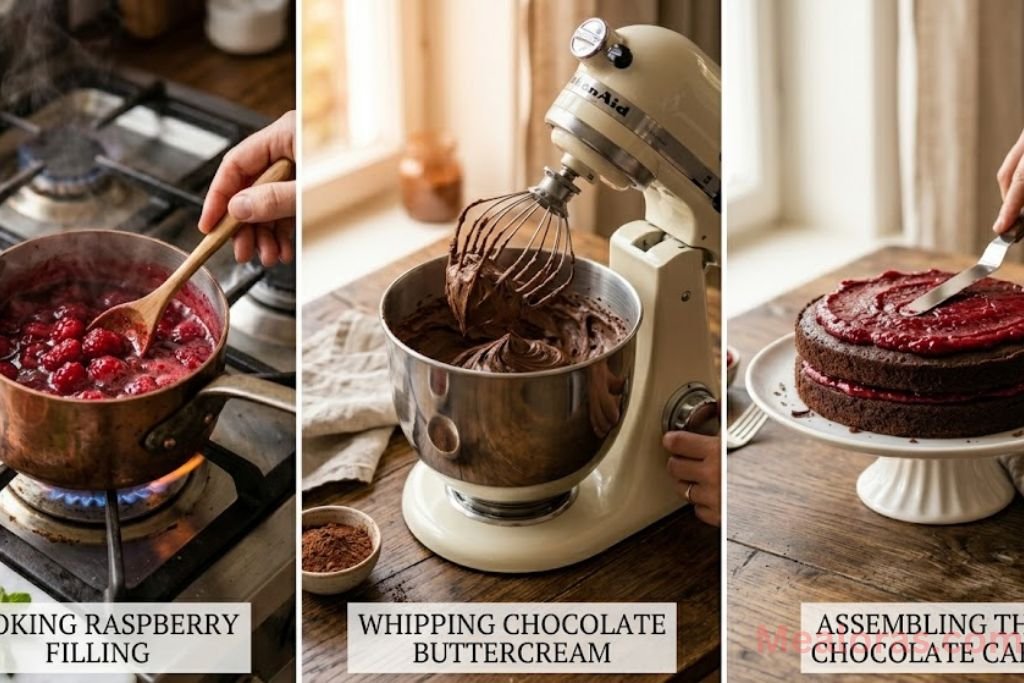
Step 6 – Make the Chocolate Buttercream
In the bowl of a stand mixer fitted with a paddle attachment (or using a hand mixer), beat the softened butter, powdered sugar, and dark cocoa powder together on low speed until combined. Add the heavy cream and vanilla extract, then increase the speed to medium-high. Beat for 4 to 5 minutes until the frosting becomes very light, fluffy, and nearly doubles in volume.
Step 7 – Assemble the Cake
Place the first cooled cake layer on a serving plate or cake board. Spread a thin layer of chocolate buttercream across the top. Then, pipe a border of frosting around the outer edge of the layer to create a “dam” — this keeps the raspberry filling from spilling out.
Spoon and spread half of the cooled raspberry filling inside the dam. Gently place the second cake layer on top and repeat the process. Add the final cake layer on top.
Apply a thin crumb coat of frosting all over the outside of the cake. Refrigerate for 15–20 minutes to set, then frost the entire cake with the remaining buttercream. Decorate with fresh raspberries, chocolate shavings, or a drizzle of chocolate sauce if desired.
Tips and Variations
Use a kitchen scale. Measuring by weight (grams) is the most reliable way to get consistent results, especially for flour and cocoa powder. Too much flour is the most common reason cakes turn out dense or dry.
Don’t skip the “dam” technique. Piping a border of frosting around each layer before adding the filling keeps everything neat and prevents the raspberry from bleeding into the sides during assembly.
Let everything cool completely. Both the cake layers and the raspberry filling need to be fully cooled before assembling. Warm layers will melt the frosting and cause the filling to run.
Make components ahead. The cake layers can be baked a day in advance, wrapped tightly in plastic wrap, and stored at room temperature. The raspberry filling can be made 2–3 days ahead and stored in the fridge.
Swap the hot water for hot milk. If hot water feels too plain, use hot milk instead to add a slightly richer flavour to the chocolate sponge.
Add a layer of raspberry jam. Prefer a more intense fruit flavour? Spread a thin layer of seedless raspberry jam on top of the fresh filling for extra punch.
For another rich, chocolatey bake that’s just as satisfying, check out these fudgy Oreo brownies — they’re quick to make and always disappear fast.
Storage and Serving
At room temperature: The assembled cake can sit at room temperature for up to 1 day if the kitchen isn’t too warm.
In the refrigerator: Store the cake covered in the fridge for up to 4–5 days. The frosting will firm up when chilled, so allow slices to come to room temperature for about 20–30 minutes before serving for the best texture.
Freezing: Individual cake layers (unfrosted) can be frozen for up to 2 months. Wrap them tightly in plastic wrap, then place in a zip-lock freezer bag. Thaw at room temperature before assembling.
Serving ideas: This cake pairs beautifully with a glass of cold milk, a scoop of vanilla bean ice cream on the side, or a drizzle of warm chocolate sauce over each slice just before serving.
Frequently Asked Questions
1. Can fresh raspberries be used instead of frozen? Yes, fresh raspberries work well. Frozen raspberries are preferred for the filling because they break down more easily and are available year-round, but fresh raspberries will produce equally delicious results.
2. Can the cake layers be baked in advance? Absolutely. Bake the layers a day ahead, let them cool completely, then wrap each one tightly in plastic wrap. Store at room temperature overnight before assembling.
3. What if the raspberry filling turns out too runny? Cook it down for a few more minutes over medium heat, or stir in a little extra cornstarch mixed with cold water. Make sure the slurry is fully dissolved before adding it to the hot filling.
4. Can two 9-inch pans be used instead of three 8-inch pans? Yes. Pour the batter into two 9-inch pans and check for doneness at around 25–30 minutes, as the layers will be thicker and need slightly longer to bake through.
5. Why is the batter so thin? This is completely normal for this recipe. The thin batter is what helps create a super moist, tender crumb once baked. Don’t add extra flour — trust the process.
6. How do you prevent the layers from doming in the middle? Use cake strips around the outside of the pans (damp strips of fabric or professional baking strips). These help the layers bake more evenly. Alternatively, bake at a lower temperature as this recipe already does.
7. Can the frosting be made without a stand mixer? Yes, a good hand mixer works perfectly. Just make sure the butter is softened to room temperature before you start, and allow a full 4–5 minutes of beating to get that fluffy, airy texture.
8. Can this be made as a two-layer cake instead of three? Yes. Use two 8-inch pans and split the filling between the single filling layer. The layers will be a little thicker, so bake for an extra 5–8 minutes and keep an eye on the toothpick test.
9. Is there a substitute for vegetable oil? Melted coconut oil or a neutral-flavoured oil like canola or sunflower oil works as a direct swap. Avoid using olive oil as the flavour can interfere with the chocolate.
10. How far ahead can the finished cake be made? The fully assembled and frosted cake can be made up to 2 days ahead. Store it covered in the refrigerator and bring it to room temperature before slicing and serving.
Conclusion
This chocolate cake with raspberry filling is one of those recipes that truly delivers on every promise — rich, moist chocolate layers, a bright fruity filling, and a creamy frosting that brings it all together beautifully.
It might look like a bakery-style showstopper, but every step is designed to be clear, approachable, and repeatable. Whether it’s the first time making a layered cake or the hundredth, this recipe is reliable and absolutely worth every minute spent in the kitchen.
Go ahead and bake it then share a slice (or two) with someone who deserves something extra special. This is the kind of cake that makes people smile before they even take a bite.
Chocolate Cake with Raspberry Filling
Ingredients
- Chocolate Cake
- 1 ¾ cups 225 g all-purpose flour
- ¾ cup 65 g unsweetened cocoa powder
- ½ tsp baking soda
- 1 ½ tsp baking powder
- 1 tsp fine sea salt
- 2 cups 400 g granulated sugar
- ½ cup 113 g vegetable oil
- 2 large eggs
- 1 cup 216 g whole or 2% milk
- 1 tsp vanilla extract
- ⅔ cup 160 ml hot water
- Raspberry Filling
- 3 cups 335 g frozen raspberries
- ⅓ cup 67 g granulated sugar
- 2 tbsp lemon juice
- 2 tbsp cornstarch
- 2 tbsp water
- Chocolate Buttercream Frosting
- 1 ½ cups 340 g unsalted butter, softened
- 2 cups 240 g powdered sugar
- 2 tbsp unsweetened dark cocoa powder
- 2 tbsp heavy cream or whole milk
- 2 tsp vanilla extract
Instructions
- Make the Cake
- Preheat the oven to 325°F (165°C). Grease the sides of three 8-inch cake pans and line the bottoms with parchment paper.
- Whisk together the flour, cocoa powder, baking soda, baking powder, and salt in a large bowl. Set aside.
- In a separate bowl, whisk the vegetable oil and sugar until smooth. Add vanilla, then whisk in the eggs one at a time. Pour in the milk and whisk until combined.
- Add the dry ingredients to the wet ingredients and whisk until just combined. Pour in the hot water and gently whisk until the batter is smooth. Do not overmix.
- Divide the batter evenly among the three prepared pans. Bake for 20–25 minutes, or until a toothpick inserted in the centre comes out clean. Cool completely on a wire rack.
- Make the Raspberry Filling
- Combine the frozen raspberries, sugar, and lemon juice in a small saucepan over medium heat. Cook until boiling, then mash the berries with the back of a spoon.
- Stir together the cornstarch and water to form a slurry, then pour into the raspberry mixture. Cook until thickened. Strain through a fine mesh strainer to remove seeds. Cool completely.
- Make the Chocolate Buttercream
- Beat the softened butter, powdered sugar, and dark cocoa powder together on low speed until combined.
- Add the heavy cream and vanilla extract. Increase to medium-high speed and beat for 4–5 minutes until the frosting is very light and fluffy.
- Assemble the Cake
- Place the first cake layer on a plate or cake board. Spread a thin layer of buttercream on top, then pipe a frosting border around the edge to create a dam.
- Spoon half the raspberry filling inside the dam. Add the second cake layer and repeat the process. Top with the final cake layer.
- Apply a thin crumb coat of frosting over the entire cake and refrigerate for 15–20 minutes. Frost the cake fully with the remaining buttercream and decorate as desired.
Notes
• Cool completely — both the cake layers and raspberry filling must be fully cooled before assembling.
• Make ahead — cake layers can be baked a day in advance and wrapped tightly in plastic wrap at room temperature. Raspberry filling keeps in the fridge for up to 3 days.
• Filling too runny? Cook it down further or add a little extra cornstarch slurry.
• Two 9-inch pans can be used instead of three 8-inch pans — increase bake time to 25–30 minutes.
• Storage — store the frosted cake covered in the refrigerator for up to 5 days. Bring to room temperature before serving.
• Freezing — unfrosted cake layers can be frozen for up to 2 months, wrapped tightly in plastic wrap.

Mealoras your go-to for simple, flavorful recipes! From quick weeknight dinners to sweet treats and family favorites, we make cooking easy, fun, and delicious for everyone in the kitchen.