Warm, chewy, and bursting with festive colors, these cookies are a true seasonal delight. Combining the deep, toasted aroma of browned butter with the nostalgic crunch of milk chocolate mini eggs, this recipe creates a gourmet treat that is far beyond a standard chocolate chip cookie. The rich, nutty notes from the butter perfectly balance the sweetness of the candy shells, making every bite a complex blend of textures and flavors.
Table of Contents
Whether preparing for a family gathering or simply looking for a comforting weekend baking project, these cookies are a fantastic choice. They offer that high-end bakery feel but are simple enough for any beginner to master. The vibrant pastel colors make them a beautiful addition to any dessert spread, and the irresistible scent of toasting butter filling the kitchen is reason enough to give this recipe a try.
For those who enjoy seasonal baking, pairing these treats with other holiday favorites can create a wonderful tradition. If more festive ideas are needed, this guide to making peanut butter eggs provides excellent inspiration for another classic treat that complements these cookies beautifully.
Ingredients
To achieve the perfect balance of a soft center and golden edges, using high-quality ingredients is essential. Please use the exact measurements below for the best results.
The Cookie Base
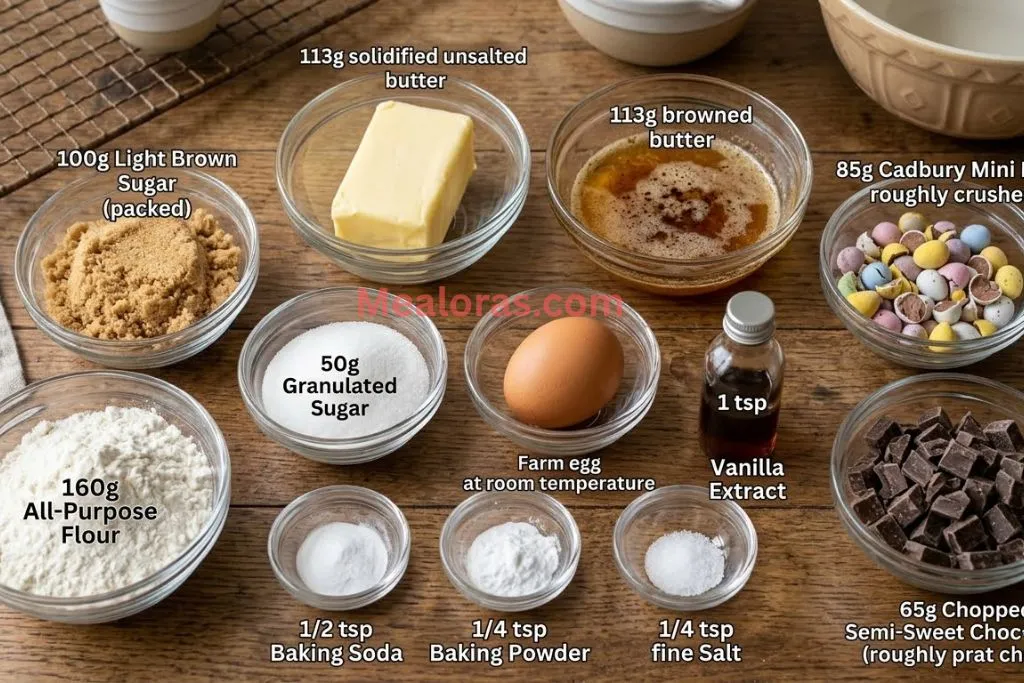
- Unsalted Butter: 113 grams (approximately 1/2 cup or 1 stick).
- Light Brown Sugar: 100 grams (1/2 cup, packed).
- Granulated Sugar: 50 grams (1/4 cup).
- All-Purpose Flour: 160 grams (1 1/3 cups).
- Egg: 1 large, room temperature.
- Vanilla Extract: 1 teaspoon.
- Baking Soda: 1/2 teaspoon.
- Baking Powder: 1/4 teaspoon.
- Salt: 1/4 teaspoon (fine sea salt or table salt).
The Mix-ins
- Cadbury Mini Eggs: 85 grams (about 1/2 cup), roughly crushed.
- Chopped Chocolate: 65 grams (1/3 cup) of your favorite semi-sweet or dark chocolate bar.
Required Tools
- Small saucepan (for browning butter)
- Medium and large mixing bowls
- Whisk and rubber spatula
- Baking sheet
- Parchment paper
- Cookie scoop (roughly 3 tablespoon size)
Instructions
Following these steps carefully will ensure the cookies have that signature chewy texture and deep flavor profile.
1. Brown the Butter
Place the unsalted butter in a small saucepan over medium heat. As it melts, it will begin to sizzle and foam. Stir occasionally or swirl the pan gently. After a few minutes, the foam will subside, and small amber-colored specks will begin to form at the bottom. Once the butter smells nutty and turns a golden brown color, remove it from the heat immediately. Pour the butter into a heat-safe mixing bowl, making sure to scrape in all those toasted bits, as they hold the most flavor.
2. Cool the Butter
To prevent the eggs from cooking and to ensure the right dough consistency, the butter needs to cool. Place the bowl in the freezer for about 5 to 10 minutes. The butter should remain liquid but feel cool to the touch.
3. Mix the Sugars and Wet Ingredients
Add the light brown sugar and granulated sugar to the cooled brown butter. Whisk vigorously until the mixture is smooth. Add the egg and vanilla extract, continuing to whisk for about a minute until the batter looks slightly pale and well-combined.
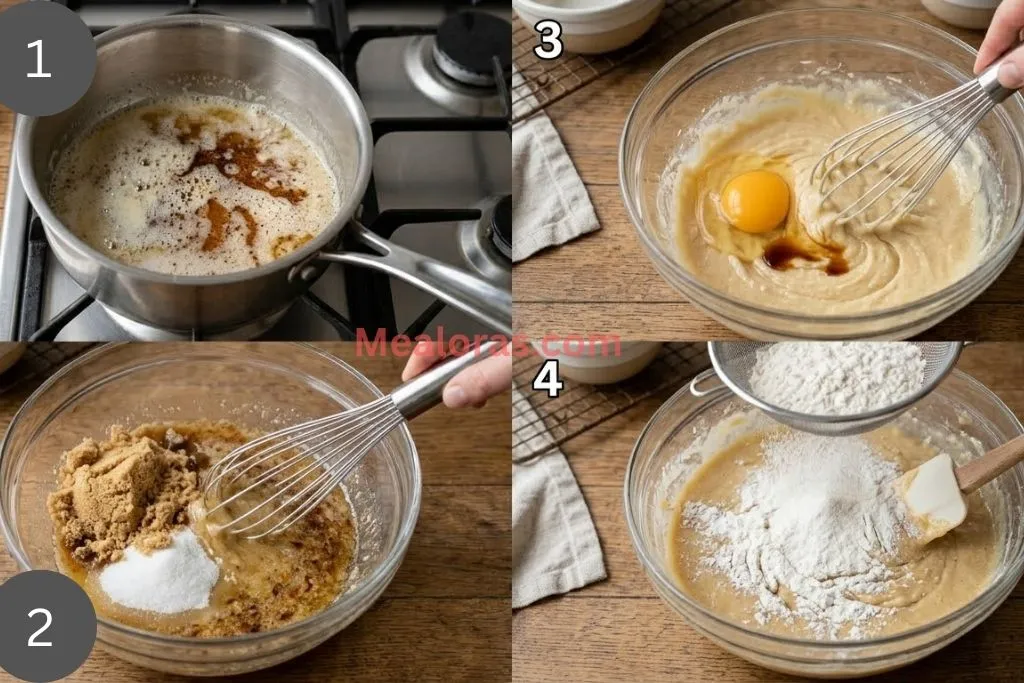
4. Incorporate Dry Ingredients
In a separate bowl, sift together the all-purpose flour, baking soda, baking powder, and salt. Gradually add the dry mixture to the wet ingredients. Using a rubber spatula, fold the ingredients together gently. Stop when only a few small streaks of flour remain visible.
5. Add the Candy and Chocolate
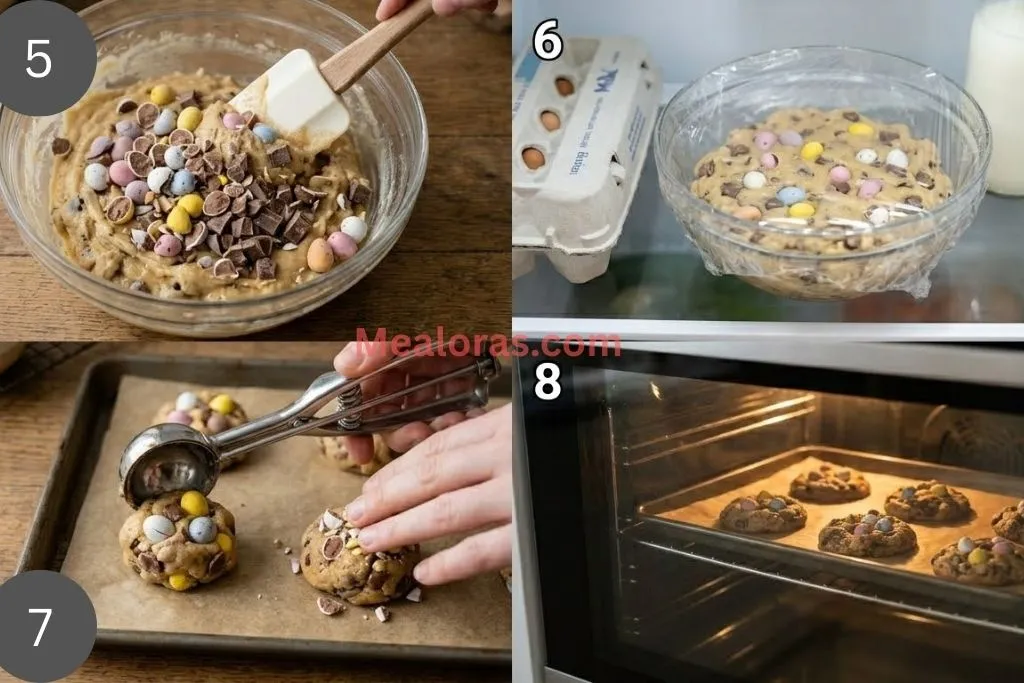
Gently fold in the crushed Cadbury eggs and the chopped chocolate pieces. Be careful not to overmix, as this can make the cookies tough. Ensure the mix-ins are evenly distributed throughout the dough.
6. Chill the Dough
Cover the bowl and refrigerate the dough for at least 30 minutes. This step is crucial because it allows the flour to hydrate and prevents the cookies from spreading too thin in the oven. While the dough chills, preheat the oven to 350°F (175°C) and line a baking sheet with parchment paper.
7. Scoop and Bake
Use a large cookie scoop to form balls of dough (about 3 tablespoons each). Place them on the prepared baking sheet, leaving at least 2 inches of space between each ball. For a professional look, press a few extra pieces of crushed mini eggs onto the top of each dough ball.
Bake for 10 to 12 minutes. The edges should be set and lightly golden, while the centers may still look a bit soft.
8. Final Touch and Cooling
Once removed from the oven, let the cookies rest on the hot baking sheet for 5 to 10 minutes. This allows the centers to finish setting. Transfer them to a wire rack to cool completely.

Tips & Variations
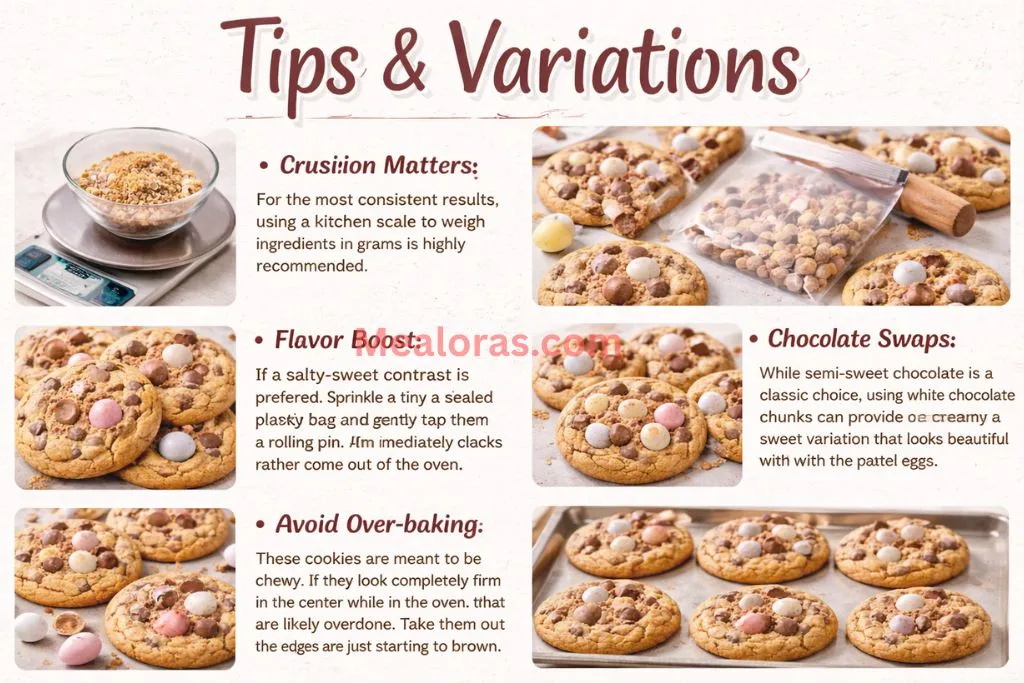
- Precision Matters: For the most consistent results, using a kitchen scale to weigh ingredients in grams is highly recommended.
- Crushing the Eggs: To crush the mini eggs without making a mess, place them in a sealed plastic bag and gently tap them with a rolling pin. Aim for large chunks rather than a fine powder.
- Flavor Boost: If a salty-sweet contrast is preferred, sprinkle a tiny pinch of flaky sea salt on top of the cookies immediately after they come out of the oven.
- Chocolate Swaps: While semi-sweet chocolate is a classic choice, using white chocolate chunks can provide a creamy, sweet variation that looks beautiful with the pastel eggs.
- Avoid Over-baking: These cookies are meant to be chewy. If they look completely firm in the center while in the oven, they are likely overdone. Take them out when the edges are just starting to brown.
When planning a full morning of cooking, serving these cookies after a savory brunch is a wonderful idea. For a hearty start to the day, this easy latke eggs benedict recipe offers a sophisticated savory balance to a day filled with sweet treats.
Storage & Serving
To keep these cookies fresh, store them in an airtight container at room temperature. They will remain soft and delicious for up to 4 days. If a longer storage time is needed, the baked cookies can be frozen for up to two months. Simply thaw them at room temperature or warm them briefly in the oven for a “just-baked” experience.
For serving, these cookies pair perfectly with a cold glass of milk or a warm cup of herbal tea. They make a thoughtful gift when tucked into a decorative tin or a clear cellophane bag tied with a ribbon.
Frequently Asked Questions
1. Can the butter be browned in advance? Yes, the butter can be browned and stored in the refrigerator, but it must be melted back to a liquid, cool state before being used in this specific recipe.
2. Why did the cookies spread too much? This usually happens if the butter was too hot when mixed or if the dough was not chilled for the full 30 minutes.
3. Is it possible to use a different type of candy? Absolutely. While Cadbury Mini Eggs are traditional, other candy-coated chocolate eggs or even chocolate gems work well.
4. Can this dough be frozen before baking? Yes, scoop the dough into balls and freeze them on a tray. Once solid, transfer to a bag. Bake directly from frozen, adding 2-3 minutes to the total time.
5. What is the best way to chop the chocolate? Using a sharp chef’s knife to chop a chocolate bar into irregular chunks creates better “pools” of chocolate than standard chips.
6. Do I need a stand mixer for this? No, this recipe is designed to be made by hand with just a whisk and a spatula.
7. Can I use salted butter? If using salted butter, reduce the added salt in the recipe to a small pinch to prevent the cookies from becoming too salty.
8. Why is brown sugar important? Brown sugar contains molasses, which provides the moisture and acidity needed to react with the baking soda, resulting in a chewy texture.
9. How do I know when the butter is browned? Look for a change in color to a golden amber and a distinct nutty, toasty aroma.
10. Can I make these cookies smaller? Yes, but the baking time will need to be reduced to approximately 7 to 9 minutes.
Conclusion
These Brown Butter Cadbury Egg Cookies are a wonderful way to celebrate the season with a touch of elegance. The combination of the deep, caramelized butter and the iconic crunch of mini eggs creates a dessert that is both sophisticated and nostalgic. By following the simple steps of browning the butter and allowing the dough to chill, a professional-quality result is achievable in any kitchen.
Baking is a wonderful way to create memories and share joy with others. This recipe is perfect for bringing a smile to faces of all ages. If this treat brings a little extra sweetness to the day, consider sharing the results with friends and family so they can also enjoy the magic of a perfectly baked cookie.

Brown Butter Cadbury Egg Cookies
Ingredients
- 113 g Unsalted Butter
- 100 g Light Brown Sugar
- 50 g Granulated Sugar
- 160 g All-Purpose Flour
- 1 Large Egg room temperature
- 1 tsp Vanilla Extract
- 1/2 tsp Baking Soda
- 1/4 tsp Baking Powder
- 1/4 tsp Salt
- 85 g Cadbury Mini Eggs roughly crushed
- 65 g Chopped Chocolate
Instructions
- Melt the unsalted butter in a small saucepan over medium heat until it foams, smells nutty, and develops golden amber specks.
- Pour the browned butter into a heat-safe bowl and cool in the freezer for ten minutes until chilled but still liquid.
- Whisk the light brown sugar and granulated sugar into the cooled butter until smooth.
- Incorporate the egg and vanilla extract, whisking until the mixture becomes pale.
- Sift the flour, baking soda, baking powder, and salt into the wet ingredients and fold gently with a spatula.
- Stir in the crushed mini eggs and chopped chocolate chunks until just combined.
- Chill the cookie dough in the refrigerator for at least thirty minutes to prevent spreading.
- Preheat the oven to 350°F and line a baking sheet with parchment paper.
- Scoop the dough into rounded balls and place them two inches apart on the tray.
- Bake until the edges are golden brown while the centers remain soft.
- Allow the cookies to rest on the hot baking sheet for ten minutes before moving to a wire rack.
Notes
• Crush the mini eggs in a sealed bag with a rolling pin to keep the kitchen clean.
• Do not skip the chilling step, as it is essential for the depth of flavor and proper thickness.

Mealoras your go-to for simple, flavorful recipes! From quick weeknight dinners to sweet treats and family favorites, we make cooking easy, fun, and delicious for everyone in the kitchen.