Finding the perfect dessert that feels both fancy and comforting is a rewarding journey for any home baker. Among the many options available, few can compete with the dense, velvety texture of a traditional New York Cheesecake. This recipe is designed for those who appreciate a thick, creamy filling paired with a buttery, crisp crust. Whether it is for a weekend treat or a special celebration, this dessert always leaves a lasting impression.
Table of Contents
One of the best things about making this at home is the control over the quality of ingredients. While some might feel intimidated by the idea of baking a cheesecake from scratch, the process is actually quite straightforward when broken down into simple steps. Much like learning the secrets to making iconic peanut butter sandwich cookies, mastering this classic requires just a bit of patience and attention to detail.
Essential Tools and Equipment
Before starting, it is helpful to gather the necessary tools to ensure a smooth baking experience.
- 9-inch Springform Pan: Essential for removing the cheesecake without damaging the sides.
- Electric Hand Mixer or Stand Mixer: Used to achieve that signature smooth, lump-free batter.
- Food Processor: Perfect for turning crackers into fine crumbs (though a rolling pin and a bag also work).
- Large Mixing Bowls: For preparing the crust and the filling separately.
- Roasting Pan: Needed for the steam bath to keep the cake moist.
- Measuring Cups and Spoons: For accurate ingredient portions.
Ingredients for the Perfect Cheesecake
This recipe uses simple, high-quality ingredients to create a rich flavor profile.
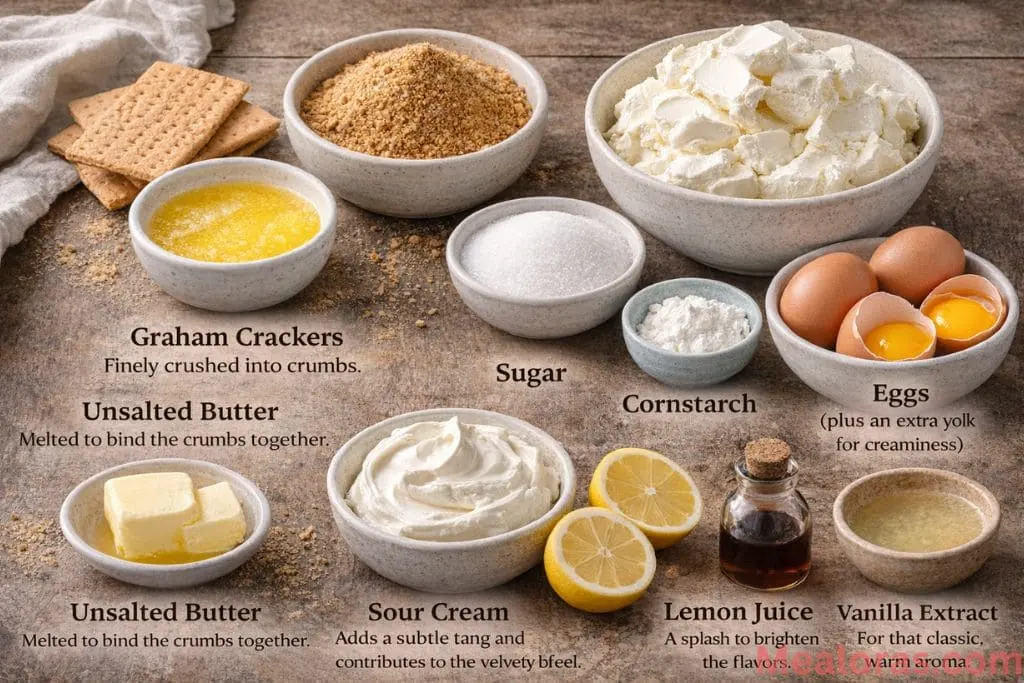
For the Crust
- Graham Crackers: Finely crushed into crumbs.
- Unsalted Butter: Melted to bind the crumbs together.
For the Cheesecake Batter
- Cream Cheese: Full-fat is recommended for the best texture.
- Sugar: Granulated white sugar for sweetness.
- Cornstarch: Helps stabilize the filling and prevents cracks.
- Eggs: Provide structure and richness (plus an extra yolk for creaminess).
- Sour Cream: Adds a subtle tang and contributes to the velvety mouthfeel.
- Lemon Juice: A splash to brighten the flavors.
- Vanilla Extract: For that classic, warm aroma.
Step-by-Step Baking Instructions
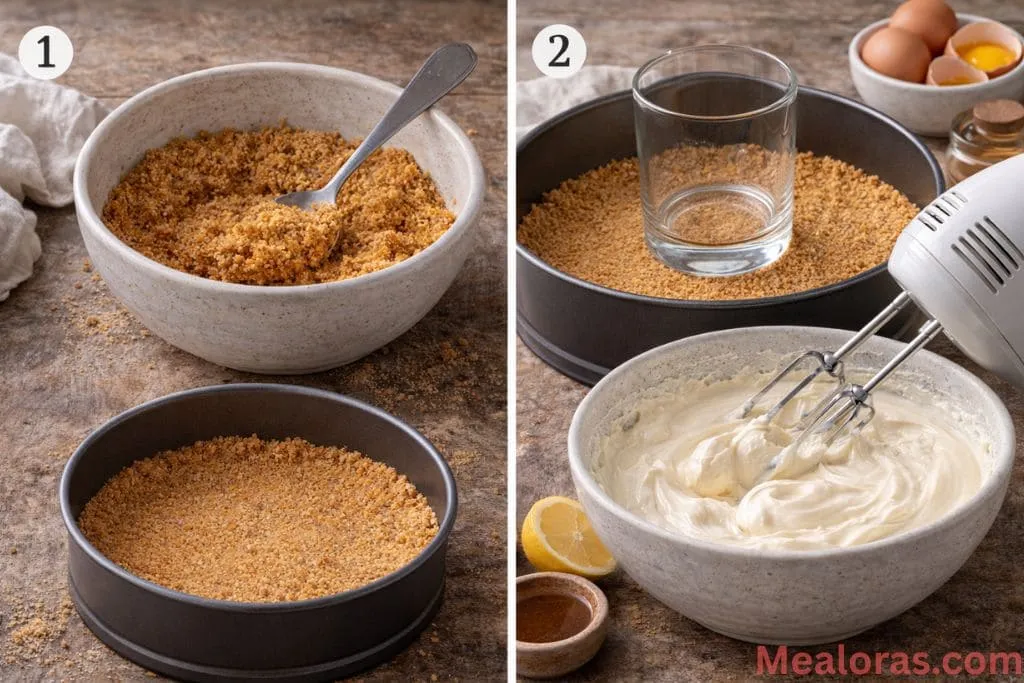
1. Preparing the Crust
Begin by preheating the oven to 300°F (150°C). In a medium bowl, combine the fine graham cracker crumbs with the melted unsalted butter. Mix them until the crumbs are evenly moistened and look like wet sand.
Transfer the mixture into the bottom of a 9-inch springform pan. Use the back of a large spoon or a flat-bottomed glass to press the crumbs down firmly into an even layer. Once pressed, place the pan in the refrigerator for about 30 minutes. Chilling the base helps it stay together and provides a better foundation for the heavy filling.
2. Mixing the Filling
In a large mixing bowl, combine the softened cream cheese, granulated sugar, and cornstarch. Use an electric mixer on a medium speed to beat these together. The goal is to reach a state where the mixture is completely smooth and homogeneous.
Next, add the eggs and the extra egg yolk. Continue mixing at a medium speed until the eggs are fully incorporated. Finally, stir in the sour cream, lemon juice, and vanilla extract. Mix one last time just until everything is combined. It is important to avoid over-mixing at this stage to prevent too much air from entering the batter.
3. The Baking Process
Remove the chilled crust from the fridge. Carefully pour the cream cheese mixture over the crust, using a spatula to smooth out the top.
To ensure the best results, this cheesecake is baked using a steam bath. Place the springform pan inside a larger roasting pan filled with about an inch of hot water. Carefully slide this into the preheated oven. Bake for approximately 90 minutes. You will know it is done when the edges are set but the center still has a slight, gentle jiggle.
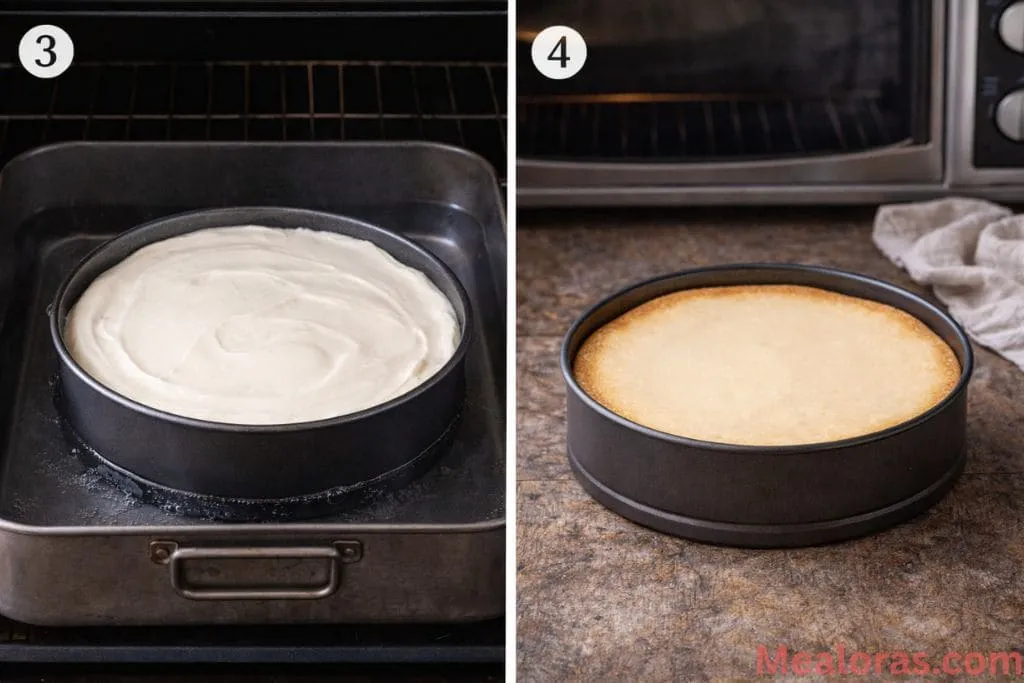
4. Cooling and Setting
Once the baking time is up, turn off the oven. Crack the oven door slightly and let the cheesecake sit inside for one hour. This slow cooling process is the secret to preventing the surface from cracking.
After an hour, remove it from the oven and let it cool completely at room temperature. Once cooled, transfer it to the refrigerator. It needs to chill for at least several hours, though leaving it overnight is the best way to ensure it sets perfectly.
Helpful Tips for Success
- Room Temperature Ingredients: This is the most important tip. Ensure the cream cheese, eggs, and sour cream are at room temperature before you start. This prevents lumps and ensures a silky batter.
- Gentle Mixing: While you want a smooth batter, over-beating the eggs can cause the cheesecake to puff up and then sink, leading to cracks.
- Water Bath Protection: If you are worried about water leaking into your springform pan, you can wrap the outside of the pan in two layers of heavy-duty aluminum foil before placing it in the water bath.
- Clean Slices: For professional-looking slices, dip your knife in hot water and wipe it clean between every single cut.
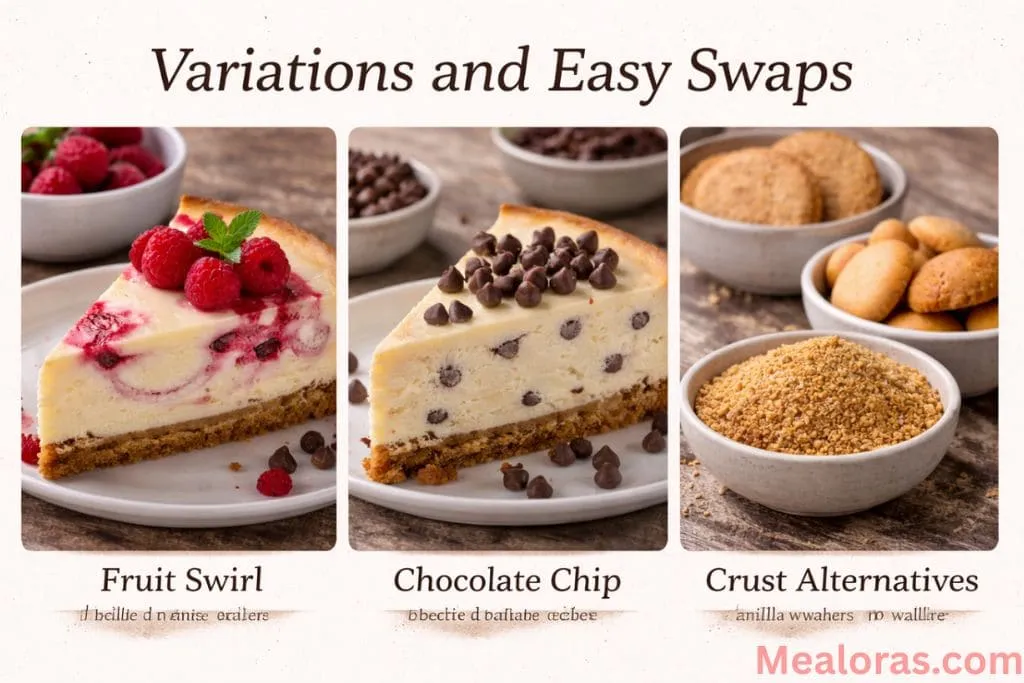
Variations and Easy Swaps
If you want to try something different, you can easily adapt this classic recipe. For those who enjoy bite-sized treats, you might find inspiration in making sweetened condensed milk snowball cookies which share a similar creamy sweetness.
- Fruit Swirl: Gently swirl a few tablespoons of raspberry or strawberry puree into the batter before baking for a decorative look and fruity flavor.
- Chocolate Chip: Fold in a handful of mini chocolate chips for a bit of texture and cocoa sweetness.
- Crust Alternatives: If graham crackers are unavailable, digestive biscuits or even crushed vanilla wafers make an excellent substitute for the base.
Storing and Serving
This cheesecake should always be kept in the refrigerator. If there are leftovers, cover the pan tightly with plastic wrap or aluminum foil. It will stay fresh and delicious for up to 4 or 5 days.
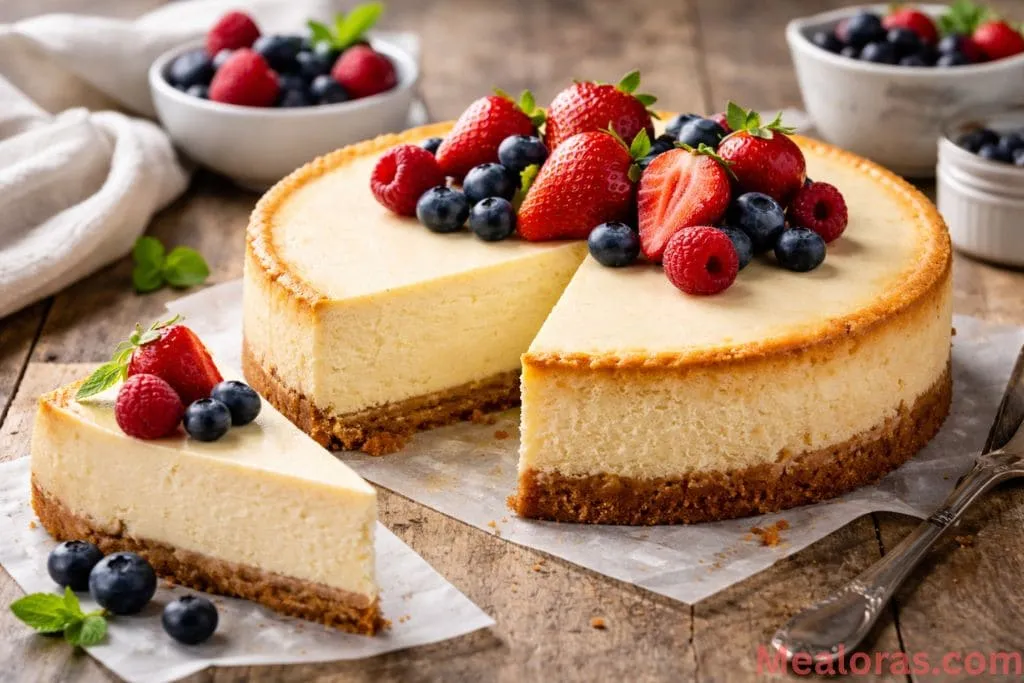
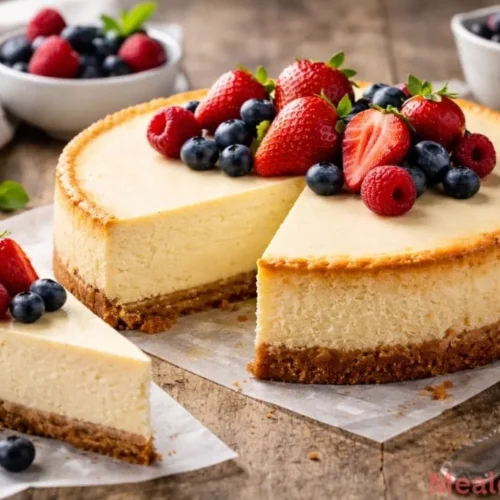
When it comes to serving, this classic New York style is beautiful on its own, but it also pairs wonderfully with simple toppings. A dollop of freshly whipped cream or a handful of fresh berries like blueberries or raspberries adds a lovely touch. Since the cheesecake is quite rich, a tart fruit sauce can provide a nice balance to the sweetness.
Frequently Asked Questions
1. Why did my cheesecake crack on top? Cracks usually happen because of sudden temperature changes or over-mixing air into the batter. Using a water bath and cooling the cake slowly in the oven helps prevent this.
2. Can I use low-fat cream cheese? It is not recommended. Full-fat cream cheese is necessary to achieve the dense, creamy consistency that defines a New York style cheesecake.
3. How do I know when the cheesecake is finished baking? The edges should be firm and slightly puffed, but the center (about 2-3 inches) should still jiggle like gelatin when the pan is gently shaken.
4. Can I freeze this cheesecake? Yes! Wrap the completely cooled and set cheesecake in plastic wrap and then foil. It can be frozen for up to two months. Thaw it in the fridge overnight before serving.
5. Why is cornstarch used in the recipe? Cornstarch acts as a stabilizer. It helps the proteins in the eggs and cheese bond better, which results in a sturdier texture and less chance of cracking.
6. Do I have to use a springform pan? While you can use a regular deep cake pan, it is much harder to remove the cheesecake without breaking it. A springform pan is highly recommended.
7. Can I substitute the sour cream? Plain Greek yogurt is a common substitute for sour cream, though it may make the cheesecake slightly more tangy.
8. What if I don’t have a roasting pan for the water bath? You can place a separate pan of water on the rack below the cheesecake. It won’t be quite as effective as a true water bath, but the steam will still help.
9. How long should I let the cream cheese soften? Usually, leaving it out on the counter for 1 to 2 hours is enough to make it soft enough for easy mixing.
10. Why is it called “New York Style”? This style is known for being taller, denser, and much creamier than other cheesecakes, often using extra cream cheese and sometimes sour cream to achieve its signature texture.
Final Thoughts
Baking a New York Cheesecake is a labor of love that pays off with every creamy bite. By following these steps and keeping an eye on the details, anyone can create a dessert that looks and tastes like it came from a high-end bakery. It is a timeless recipe that brings joy to the table and serves as the perfect end to any meal.
If you enjoyed making this recipe, please consider sharing it with your friends and family. Sharing the love of home baking is a wonderful way to connect with others, and there is nothing better than seeing someone’s face light up when they try a slice of cheesecake for the first time!
New York Cheesecake (Classic Recipe)
Ingredients
- For the Crust:
- Graham Crackers finely crushed
- Unsalted Butter melted
- For the Cheesecake Batter:
- Cream Cheese full-fat, softened
- Sugar granulated white
- Cornstarch
- Eggs plus one extra yolk
- Sour Cream
- Lemon Juice
- Vanilla Extract
Instructions
- Prepare the Crust Preheat the oven and combine the fine graham cracker crumbs with the melted unsalted butter in a medium bowl. Mix until the crumbs are evenly moistened and resemble wet sand. Press the mixture firmly into an even layer at the bottom of a 9-inch springform pan. Place the pan in the refrigerator to chill while preparing the filling.
- Create the Filling In a large mixing bowl, beat the softened cream cheese, granulated sugar, and cornstarch with an electric mixer on medium speed until the mixture is completely smooth. Add the eggs and the extra egg yolk, continuing to mix until fully incorporated. Stir in the sour cream, lemon juice, and vanilla extract, mixing just until combined to avoid trapping too much air.
- Bake in a Steam Bath Pour the cream cheese batter over the chilled crust and smooth the top with a spatula. Place the springform pan inside a larger roasting pan and fill the outer pan with an inch of hot water. Bake until the edges are set and the center has a slight, gentle jiggle.
- Cool and Set Turn off the oven and leave the cheesecake inside with the door slightly cracked for one hour to cool slowly. Remove from the oven and let it reach room temperature before transferring it to the refrigerator. Chill for several hours or overnight to allow the texture to set perfectly before slicing.
Notes
• Avoid Over-mixing: Once the eggs are added, mix only until combined to prevent the cake from rising and cracking.
• Slicing Tip: Use a warm, wet knife and wipe it clean between every cut for those signature clean New York-style slices.
• Storage: Keep leftovers covered in the refrigerator for up to five days.

Mealoras your go-to for simple, flavorful recipes! From quick weeknight dinners to sweet treats and family favorites, we make cooking easy, fun, and delicious for everyone in the kitchen.