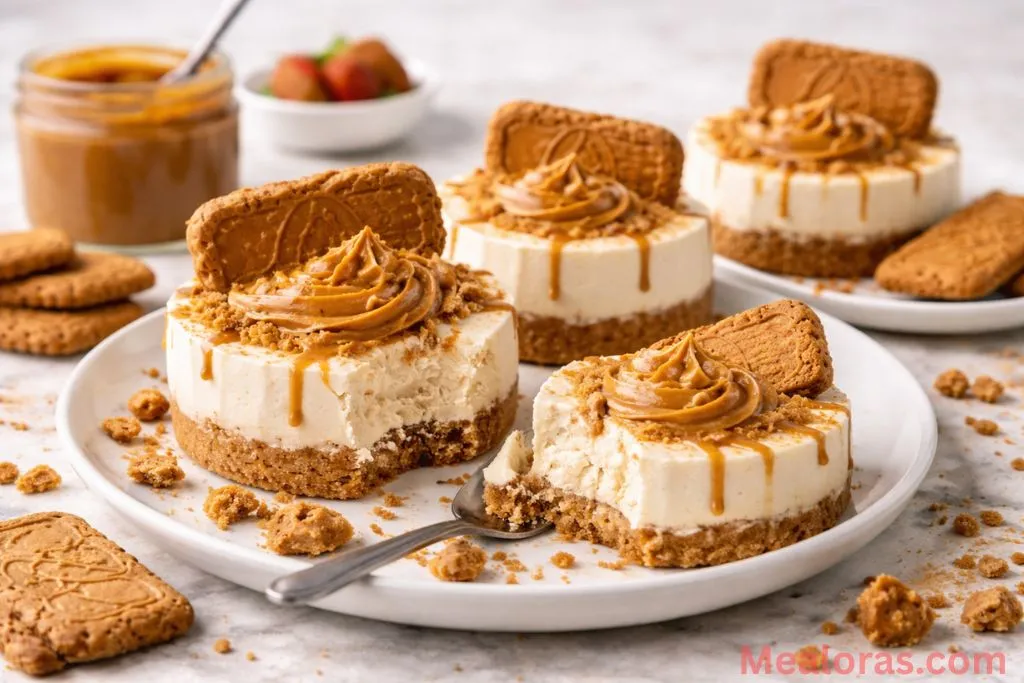
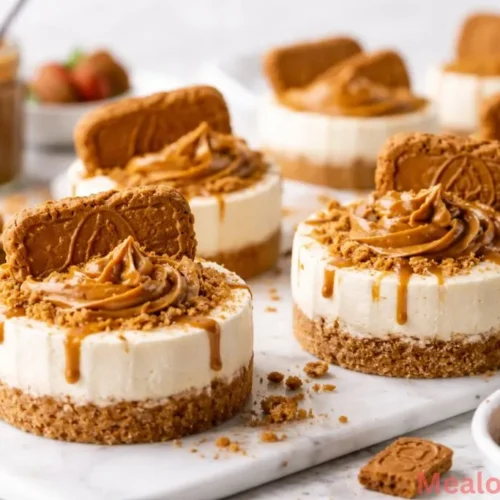
If there is one flavor that has taken the dessert world by storm, it is definitely Biscoff. There is something truly magical about that deep caramel flavor combined with warm spices like cinnamon and nutmeg. When you take that iconic cookie butter taste and swirl it into a velvety, rich cheesecake, you get a dessert that is simply irresistible.
Table of Contents
These No Bake Mini Biscoff Cheesecakes are the ultimate treat for anyone who loves a sophisticated flavor profile but wants a recipe that is easy enough for a beginner to master. Because they are individual servings, they are naturally portion-controlled (though it is very hard to stop at just one!) and look absolutely stunning on a serving platter.
The best part? You don’t even have to turn on your oven. This no-bake method ensures a light, airy texture that melts in your mouth, unlike some baked versions that can feel heavy or dense. Whether you are looking for a special weekend treat or a simple dessert to brighten up your week, these mini cheesecakes are a perfect choice. If you enjoy creamy, fruit-filled bakes as well, you might also want to try this blueberry cream cheese bread for your next baking project.
Why You Will Love This Recipe
Making cheesecake can sometimes feel intimidating, especially when you hear about water baths and cracked tops. This recipe removes all that stress. Since it is a no-bake version, the structure comes from chilling the ingredients rather than cooking eggs.
The base is made of crushed Biscoff cookies, which provides a much more flavorful crust than a standard graham cracker. The filling is a dream—tangy cream cheese balanced with sweet powdered sugar and a generous amount of Biscoff cookie butter. To finish it off, a drizzle of melted cookie butter on top adds that extra “wow” factor.
If you are a fan of desserts that feature a fun twist on a classic, you should also check out this strawberry jello poke cake recipe for another crowd-pleasing option.
Ingredients for Mini Biscoff Cheesecakes
To get the best results, it is important to use the exact measurements and high-quality ingredients. Here is everything you will need to make 24 of these delicious mini treats.
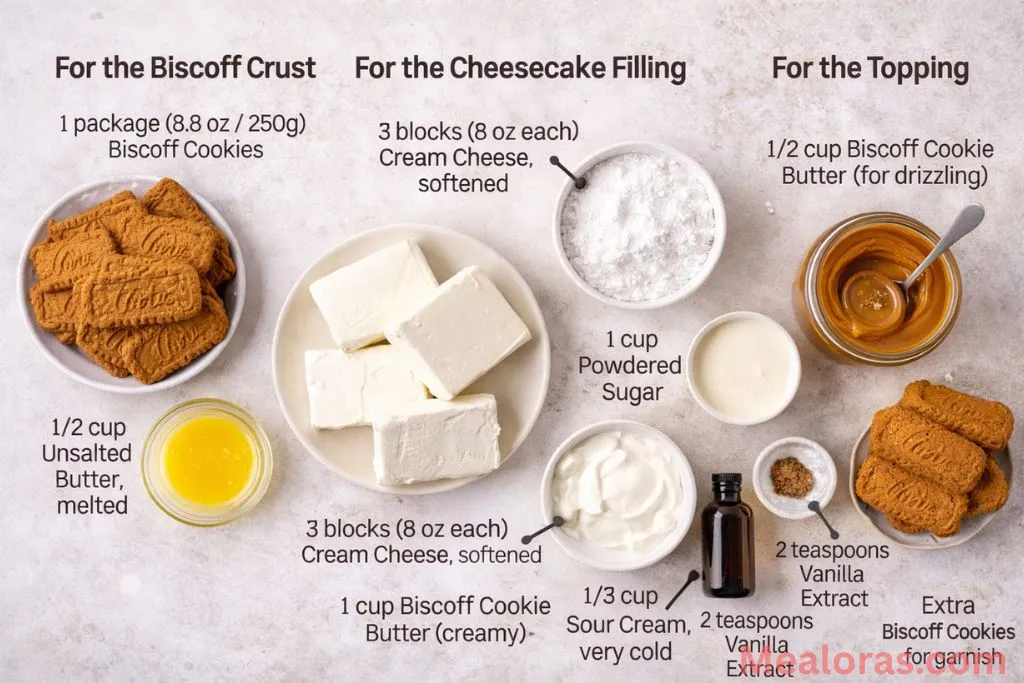
For the Biscoff Crust
- Biscoff Cookies: 1 package (8.8 oz / 250g)
- Unsalted Butter: 1/2 cup (melted)
For the Cheesecake Filling
- Cream Cheese: 3 blocks (8 oz each), softened to room temperature
- Powdered Sugar: 1 cup
- Biscoff Cookie Butter: 1 cup (creamy variety)
- Heavy Cream: 1 cup (must be very cold)
- Sour Cream: 1/3 cup (room temperature)
- Vanilla Extract: 2 teaspoons
- Salt: A small pinch
For the Topping
- Biscoff Cookie Butter: 1/2 cup (for drizzling)
- Biscoff Cookies: Extra cookies for garnish (either whole or crushed)
- Whipped Cream: Optional for decoration
Required Kitchen Tools
- Muffin Pan: A standard 12-count muffin tin (or a mini cheesecake pan)
- Muffin Liners: To ensure the cheesecakes don’t stick
- Food Processor: To finely crush the cookies
- Electric Hand Mixer: Or a stand mixer for the filling
- Mixing Bowls: At least two for separate steps
- Spatula: For folding the ingredients gently
Step-by-Step Instructions
1. Prepare the Pan and Crust
Start by lining your muffin tins with paper liners. This recipe makes 24 mini cheesecakes, so you will likely need two 12-count pans.
In a food processor, pulse the Biscoff cookies until they become fine crumbs. Pour in the melted unsalted butter and pulse a few more times until the mixture looks like wet sand.
Distribute the cookie crumbs evenly among the 24 liners. Use the back of a small spoon or a flat-bottomed glass to press the crumbs down firmly. This creates a solid base that won’t crumble when you eat it. Place the pans in the freezer to set while you prepare the filling.
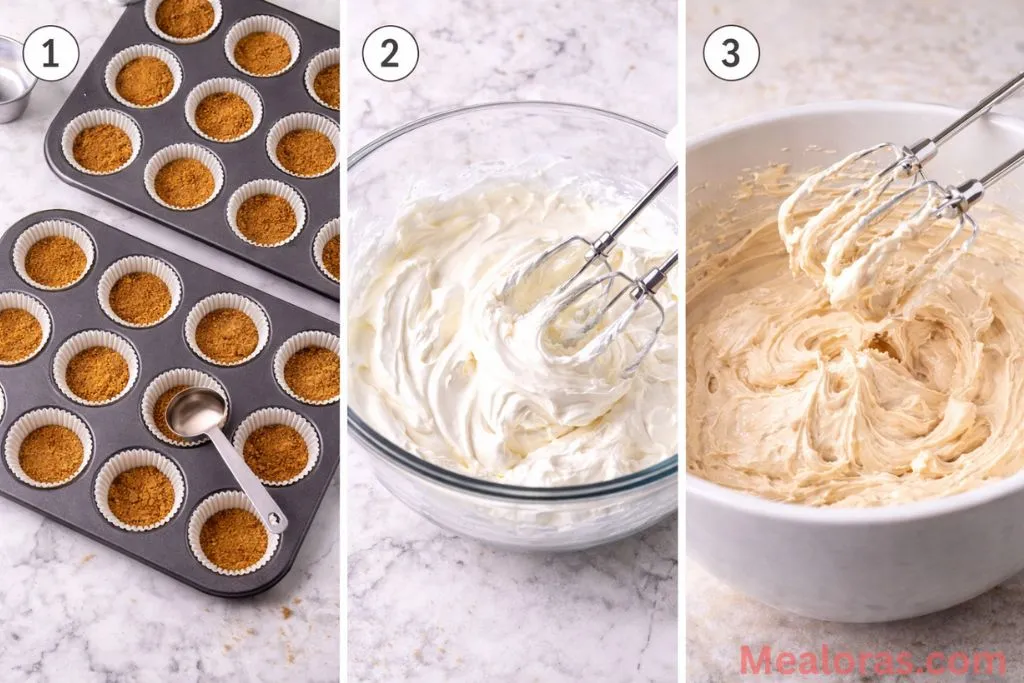
2. Whip the Heavy Cream
In a medium bowl, pour in the cold heavy cream. Using an electric mixer, beat the cream on medium-high speed until stiff peaks form. Stiff peaks mean that when you lift the beaters, the cream stands straight up without drooping. Set this bowl aside in the refrigerator to keep it cold.
3. Mix the Cheesecake Filling
In a separate large bowl, beat the softened cream cheese and powdered sugar together until the mixture is completely smooth and free of lumps. This usually takes about 2 to 3 minutes.
Add in the Biscoff cookie butter, sour cream, vanilla extract, and a pinch of salt. Continue to beat until everything is fully incorporated and the mixture is light and fluffy.
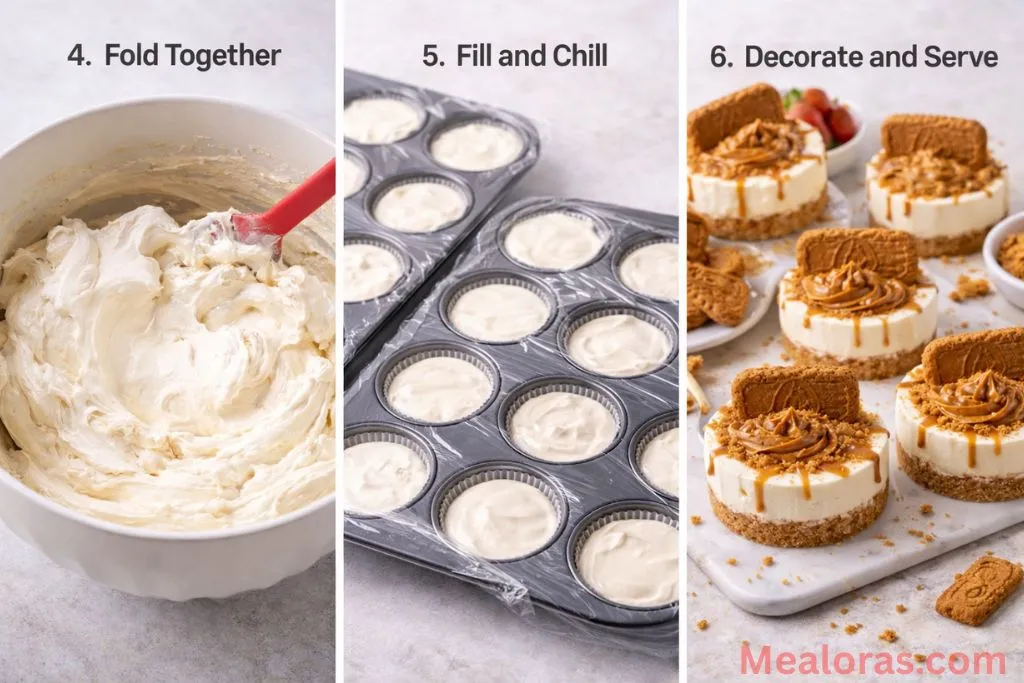
4. Fold Together
Gently remove the whipped cream from the fridge. Using a rubber spatula, fold the whipped cream into the cream cheese mixture. Be careful not to stir too vigorously; you want to maintain the airiness of the whipped cream to keep the cheesecake light. Fold until no white streaks of cream remain.
5. Fill and Chill
Take the muffin pans out of the freezer. Spoon the cheesecake filling over the chilled crusts, filling each cup almost to the top. Use a small spatula or the back of a spoon to smooth out the tops.
Cover the pans with plastic wrap and place them in the refrigerator. They need to chill for at least 6 hours, but for the absolute best texture, leaving them overnight is recommended.
6. Decorate and Serve
Once the cheesecakes are firm, it is time to add the finishing touches. Place the 1/2 cup of Biscoff cookie butter in a microwave-safe bowl and heat it for 15-20 seconds until it becomes runny.
Drizzle the melted cookie butter over each mini cheesecake. You can also add a dollop of whipped cream, a whole Biscoff cookie, or some extra cookie crumbs on top. Carefully remove them from the liners before serving.
Helpful Tips & Variations
- Softened Cream Cheese is Key: To avoid a lumpy filling, ensure your cream cheese is truly at room temperature. Take it out of the fridge at least 2 hours before you start.
- Cold Heavy Cream: Unlike the cream cheese, your heavy cream should be as cold as possible. This helps it whip up faster and hold its shape better.
- Firm Pressing: When making the crust, don’t be afraid to press down hard. A well-compacted crust is what keeps the mini cheesecake stable.
- Easy Removal: If you find the cheesecakes are sticking to the liners, you can pop the pan in the freezer for 15 minutes before peeling the paper off.
- Flavor Swap: If you want a different flavor profile, you can swap the Biscoff cookies for chocolate sandwich cookies and use a chocolate hazelnut spread instead of cookie butter.
Common Mistakes to Avoid
- Over-mixing the Whipped Cream: If you beat the heavy cream too long, it will turn into butter. Stop as soon as you see stiff peaks.
- Using Low-Fat Products: For the best set and richest flavor, always use full-fat cream cheese and sour cream. Low-fat versions have higher water content and may not set properly.
- Rushing the Chill Time: No-bake cheesecakes need time for the fats to solidify. If you try to eat them too early, they might be too soft or mushy.
Storage & Serving Ideas
Storage: These mini cheesecakes should always be kept in the refrigerator. Store them in an airtight container to keep them fresh and to prevent them from absorbing other fridge odors. They will stay delicious for up to 5 days. You can also freeze them for up to 3 months—just thaw them in the fridge before serving.
Serving: These are perfect for a brunch spread or a dessert table. Since they don’t require forks and plates, they are excellent “finger food” desserts. Serve them alongside fresh berries for a bit of acidity to balance the sweetness, or with a cup of hot coffee or tea.
Frequently Asked Questions
1. Can I make these in a regular 9-inch cake pan? Yes, you can use a springform pan. You may need to chill it longer (at least 8-12 hours) to ensure the center is fully set before slicing.
2. Do I have to use a food processor for the cookies? No, you can place the cookies in a sealed plastic bag and crush them with a rolling pin until they are fine crumbs.
3. Why is my filling still runny? This usually happens if the cream cheese wasn’t beaten well enough with the sugar or if the whipped cream wasn’t whipped to stiff peaks before folding.
4. Can I use a different brand of cookie butter? Absolutely. While Biscoff is the most famous, many grocery stores have their own “speculoos” or cookie butter brands that work perfectly.
5. Is there a substitute for sour cream? You can use full-fat Greek yogurt as a substitute for sour cream if needed.
6. Can I make these dairy-free? You can attempt this with plant-based cream cheese and heavy cream alternatives, but the setting time and texture may vary slightly.
7. How do I get a clean drizzle on top? Put the melted cookie butter into a small piping bag or a plastic sandwich bag with the corner snipped off for a more professional look.
8. Do I need to grease the muffin liners? No, the butter in the crust prevents them from sticking to the paper liners.
9. Can I add fruit to the filling? It is best to add fruit as a topping rather than mixing it in, as the moisture from the fruit can prevent the cheesecake from setting properly.
10. How long can they sit out on a dessert table? Because they contain dairy, they should not sit at room temperature for more than 2 hours.
Conclusion
These No Bake Mini Biscoff Cheesecakes are a dream come true for dessert lovers. They combine the ease of a no-bake recipe with the sophisticated, spiced flavor of cookie butter. Whether you are making them for a special occasion or just a cozy night in, they are sure to be a hit. The creamy texture and crunchy base create a perfect balance that will have everyone asking for the recipe.
If you enjoyed this recipe, please consider sharing it with your friends and family! Sharing great food ideas is a wonderful way to bring people together. We would love to see how your mini cheesecakes turned out, so feel free to tell others about your baking success!
No Bake Mini Biscoff Cheesecakes
Ingredients
- For the Biscoff Crust
- 1 package 8.8 oz / 250g Biscoff Cookies
- 1/2 cup Unsalted Butter melted
- For the Cheesecake Filling
- 3 blocks 8 oz each Cream Cheese, softened
- 1 cup Powdered Sugar
- 1 cup Biscoff Cookie Butter creamy
- 1 cup Heavy Cream very cold
- 1/3 cup Sour Cream room temperature
- 2 teaspoons Vanilla Extract
- A small pinch of Salt
- For the Topping
- 1/2 cup Biscoff Cookie Butter for drizzling
- Extra Biscoff Cookies for garnish
Instructions
- Line two standard muffin pans with paper liners and set aside.
- Pulse the cookies in a food processor until fine, then mix with melted butter until the texture resembles wet sand.
- Press the crumbs firmly into the bottom of the liners and freeze while preparing the filling.
- Beat the cold heavy cream in a medium bowl until stiff peaks form, then set aside in the refrigerator.
- In a large bowl, cream together the softened cream cheese and powdered sugar until completely smooth.
- Mix in the cookie butter, sour cream, vanilla, and salt until light and fluffy.
- Gently fold the chilled whipped cream into the cream cheese mixture using a spatula until no streaks remain.
- Spoon the filling over the chilled crusts and smooth the tops.
- Cover and refrigerate for at least six hours or overnight for the best texture.
- Melt the additional cookie butter in the microwave and drizzle over the chilled cheesecakes.
- Garnish with extra cookies or crumbs before removing from the liners to serve.
Notes
• Ensure the heavy cream is very cold to achieve the necessary stiff peaks.
• If the cheesecakes are difficult to remove from the paper, place them in the freezer for fifteen minutes.
• Store in an airtight container in the refrigerator for up to five days.

Mealoras your go-to for simple, flavorful recipes! From quick weeknight dinners to sweet treats and family favorites, we make cooking easy, fun, and delicious for everyone in the kitchen.