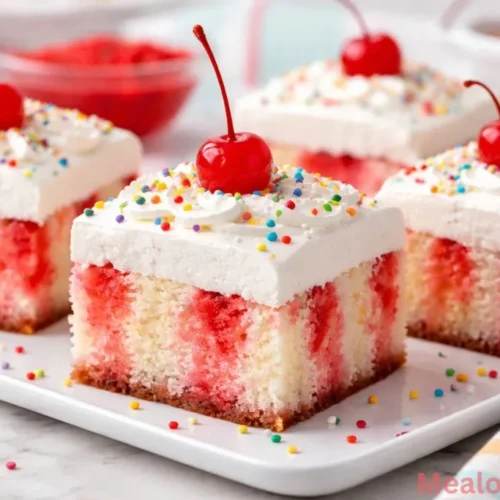
Looking for a dessert that is as bright and cheerful as it is delicious? This Jello Poke Cake is a classic for a reason. It is incredibly moist, bursting with fruity flavor, and topped with a cloud of light, airy whipped cream. Whether you are hosting a small gathering or just want to treat your family to something special, this recipe is a guaranteed winner.
Table of Contents
What makes this cake so unique is the technique. By poking holes into a freshly baked cake and pouring liquid gelatin over the top, you create beautiful “pokes” of color and flavor that seep deep into every bite. It is a nostalgic treat that feels fancy but is actually one of the simplest desserts you can make from scratch using a few kitchen staples.
Why This Recipe Works
The magic of this dessert lies in the contrast of textures. You have the soft crumb of the cake, the slight gelatin-like chew from the Jello-infused sections, and the silky smoothness of the topping. It is refreshing, light, and not overly sweet, making it the perfect finish to any meal.
If you enjoy light and fruity desserts, you might also find inspiration in this delightful raspberry-infused cake recipe which uses similar bright fruit notes to create a stunning treat.
Ingredients and Equipment
Before getting started, gather everything needed to ensure a smooth baking process. This recipe relies on simple, accessible ingredients that produce professional results every time.
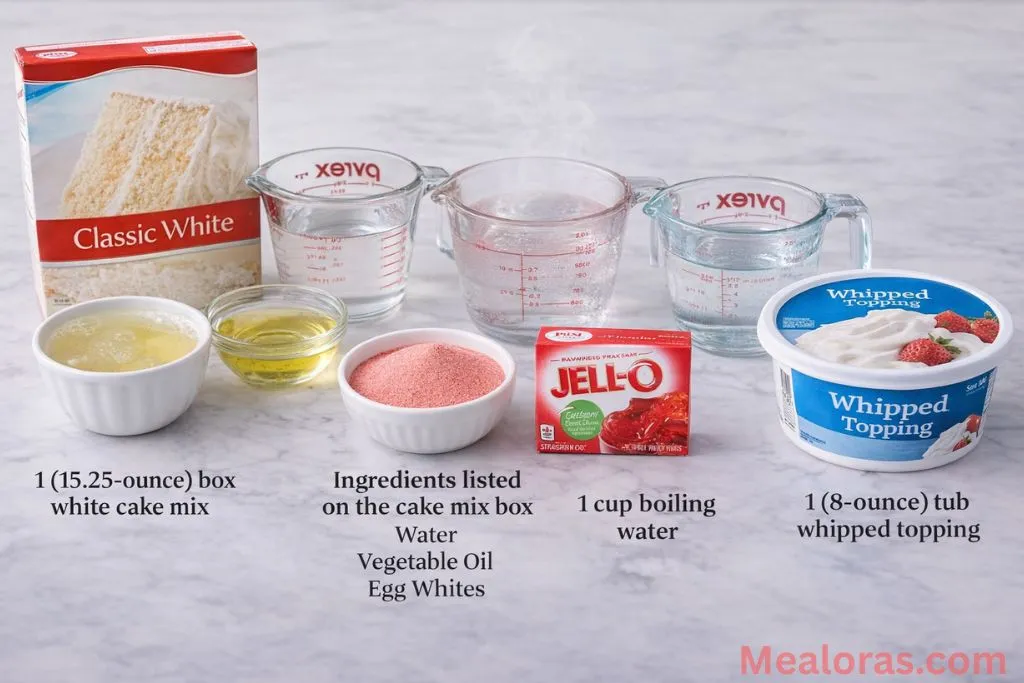
The Ingredients
- 1 (15.25-ounce) box white cake mix: This provides the perfect neutral base to let the Jello colors pop.
- Ingredients listed on the cake mix box: Usually, this includes water, vegetable oil, and egg whites.
- 1 (3-ounce) box strawberry Jell-O: While strawberry is a classic choice, raspberry or cherry work beautifully as well.
- 1 cup boiling water: Necessary to fully dissolve the gelatin powder.
- 1 cup cold water: To help the gelatin mixture reach the right consistency before pouring.
- 1 (8-ounce) tub whipped topping: Or you can use 2 cups of freshly whipped cream.
Essential Equipment
- 9-x-13-inch baking dish
- Mixing bowls
- Electric hand mixer or whisk
- Large fork or the end of a wooden spoon for poking
- Offset spatula for spreading the topping
Step-by-Step Instructions
Follow these clear steps to create a beautiful, striped interior and a perfectly moist crumb.
1. Bake the Foundation
Start by preheating the oven according to the instructions found on the back of your specific cake mix box. Prepare the batter by combining the dry mix with the required water, oil, and egg whites in a large bowl. Beat the mixture until it is smooth and free of lumps. Grease a 9-x-13-inch baking pan and pour the batter in, spreading it evenly. Bake as directed until a toothpick inserted into the center comes out clean.
2. Prepare for the Infusion
Once the cake is finished baking, remove it from the oven. Let it sit and cool for about 15 minutes. While the cake is still warm but not piping hot, take a fork or the handle of a wooden spoon and poke holes across the entire surface. Aim for intervals of about half an inch to one inch. You want enough holes for the Jello to seep through, but not so many that the cake falls apart.
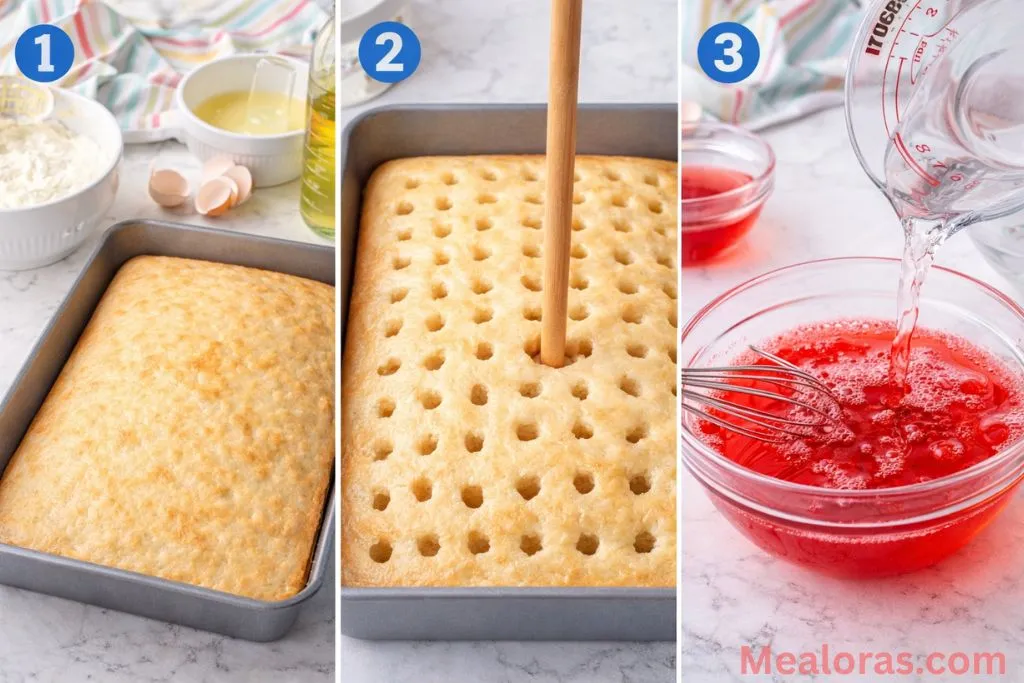
3. Mix the Jello
In a medium heat-proof bowl, add the strawberry Jell-O powder. Pour in 1 cup of boiling water and whisk vigorously for about two minutes, or until every grain of gelatin is completely dissolved. Once dissolved, stir in 1 cup of cold water. This cools the mixture slightly so it doesn’t melt the cake structure but remains thin enough to soak in.
4. The Pouring Process
Carefully and slowly spoon the liquid Jello over the top of the cake. Focus on the holes you created, allowing the liquid to disappear into the sponge. It might look like a lot of liquid at first, but the cake will act like a sponge and absorb every drop.
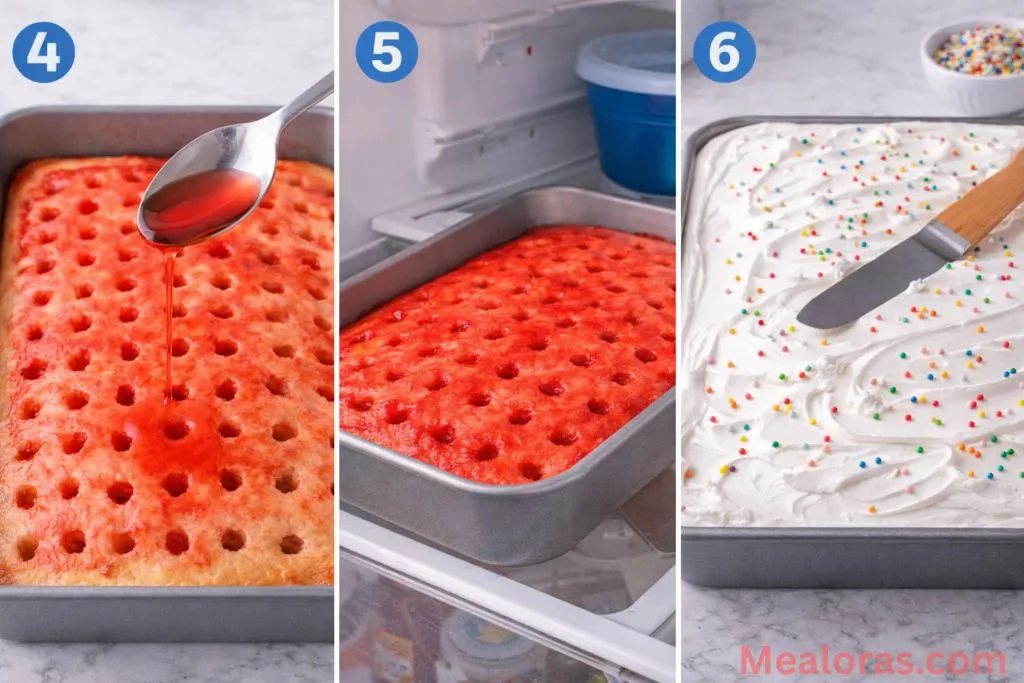
5. The Long Chill
This is the most important part: the cake needs time to set. Place the uncovered or lightly covered dish into the refrigerator. Let it chill for at least 3 to 4 hours. If you have the time, leaving it overnight is even better as it allows the flavors to fully develop and the Jello to firm up.
6. Add the Topping
Just before serving, take the chilled cake out of the fridge. Use an offset spatula to spread the whipped topping or fresh whipped cream in an even layer across the top. You can add a few fresh fruit slices on top for a beautiful presentation.

Much like how a streusel topping adds texture to muffins, a thick layer of whipped cream provides the perfect creamy balance to the moist, fruity cake beneath.
Helpful Tips for Success
- Clean Pokes: If you find the cake is sticking to your fork as you poke holes, dip the fork in a little water between rows. This ensures the holes stay open and clean.
- Don’t Rush the Chill: If you try to frost the cake while it is still warm or before the Jello has set, the topping will slide right off or become a watery mess.
- Even Distribution: Use a small measuring cup or a large spoon to pour the Jello. This gives you more control than pouring straight from the bowl.
- Use White Cake: While yellow cake works, white cake provides the best visual contrast, making those red Jello “streaks” really stand out when you slice it.
Serving and Storage
How to Serve
This cake is best served cold, straight from the refrigerator. Because it is so moist, it doesn’t need much accompaniment, but a side of fresh berries or a sprig of mint can make the plate look even more inviting.
Storing Leftovers
Because of the gelatin and the whipped topping, this dessert must be kept refrigerated.
- Refrigerator: Cover the dish tightly with plastic wrap or a lid. It will stay fresh and delicious for up to 3 days.
- Freezing: You can actually freeze this cake! It is best to freeze it before adding the whipped topping. Wrap the cake tightly in plastic wrap and then a layer of foil. It will last for up to 3 months. When you are ready to eat, let it thaw in the fridge overnight before frosting.
Frequently Asked Questions
1. Can I use different Jello flavors? Absolutely. You can use lime, orange, grape, or raspberry. Any flavor of gelatin works perfectly with the white cake base.
2. Can I make this with a chocolate cake mix? Yes, though the visual “pokes” won’t show up as well. Chocolate cake pairs beautifully with cherry or raspberry Jello.
3. What if I don’t have a 9×13 pan? You can use two round pans or even make cupcakes. Just adjust the baking time based on the package directions and poke each cupcake 3-4 times.
4. Why is my cake soggy? This usually happens if the Jello wasn’t mixed with the right amount of water or if the cake didn’t chill long enough to set. Make sure to use the exact measurements provided.
5. Can I use sugar-free Jello? Yes, sugar-free gelatin works exactly the same way in this recipe and is a great way to reduce the overall sugar content.
6. Do I have to use a box mix? Not at all. You can use any homemade white or yellow cake recipe. Just ensure it is baked in a 9×13 pan.
7. Can I use pudding instead of Jello? Yes, that is called a Pudding Poke Cake. The texture will be creamier and thicker than the light, bouncy texture of the Jello version.
8. Why did my whipped topping melt? The cake was likely still too warm when the topping was applied. Always ensure the cake is completely cold to the touch before frosting.
9. How many holes should I poke? There is no exact number, but aiming for a hole every inch ensures that every slice gets an even amount of flavor.
10. Can I make this a day in advance? Actually, this cake is better when made a day early! It gives the Jello plenty of time to fully infuse the sponge.
Conclusion
The Jello Poke Cake is a timeless dessert that brings a splash of color and a lot of joy to the table. It is the kind of recipe that looks like it took hours of effort but is simple enough for even the most novice bakers to master. The combination of moist cake and fruity gelatin is truly a match made in heaven.
Give this recipe a try the next time you need a dependable, crowd-pleasing dessert. If you enjoyed making this, please consider sharing the recipe with your friends and family so they can enjoy this refreshing treat too! Giving someone a slice of this cake is like sharing a little bit of sunshine.
Jello Poke Cake
Ingredients
- 1 15.25-ounce box white cake mix
- Ingredients listed on the cake mix box water, vegetable oil, and egg whites
- 1 3-ounce box strawberry Jell-O
- 1 cup boiling water
- 1 cup cold water
- 1 8-ounce tub whipped topping
Instructions
- Preheat the oven according to the directions on the cake mix box and grease a 9-x-13-inch baking dish.
- Prepare the cake batter by combining the mix with the required water, oil, and egg whites, then bake until a toothpick comes out clean.
- Allow the cake to cool for fifteen minutes before using a fork or the handle of a wooden spoon to poke holes across the entire surface.
- Whisk the strawberry gelatin powder into the boiling water until fully dissolved, then stir in the cold water.
- Slowly spoon the liquid gelatin over the cake, ensuring it fills the holes, and refrigerate for several hours or overnight to set.
- Spread the whipped topping evenly over the cold cake using an offset spatula just before serving.
Notes
• Contrast: Using a white cake mix provides the best visual contrast for the colorful gelatin “pokes.”
• Storage: Always keep this cake refrigerated due to the gelatin and dairy-based topping.

Mealoras your go-to for simple, flavorful recipes! From quick weeknight dinners to sweet treats and family favorites, we make cooking easy, fun, and delicious for everyone in the kitchen.