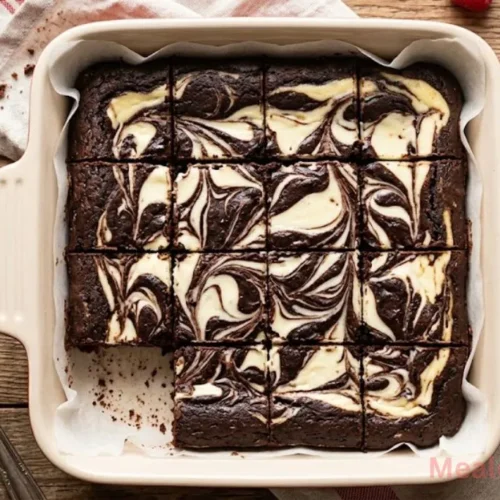
If you are looking for the ultimate dessert that combines two of the world’s most beloved treats, these Cheesecake Marble Brownies are the answer. Imagine a base of rich, dark, fudgy chocolate brownies swirled with a silky, tangy cream cheese topping. Every bite offers a perfect contrast of textures the dense, moist brownie against the light, velvety cheesecake.
Table of Contents
This recipe is surprisingly simple to put together, making it a reliable choice for beginners who want a bakery-quality result. Whether you are baking for a special occasion or just a cozy weekend treat, these brownies never fail to impress. The beautiful swirling pattern on top makes them look like they came from a high-end cafe, yet they are made with straightforward pantry staples.
If you love the combination of chocolate and unique textures, you might also enjoy these fudgy Biscoff cookie butter brownies for your next baking project. But for now, let’s dive into how to create these stunning marbled squares.
Ingredients for Cheesecake Marble Brownies
To get the best results, ensure your refrigerated items are at room temperature. This helps the batters blend smoothly without any lumps.
For the Cheesecake Batter:
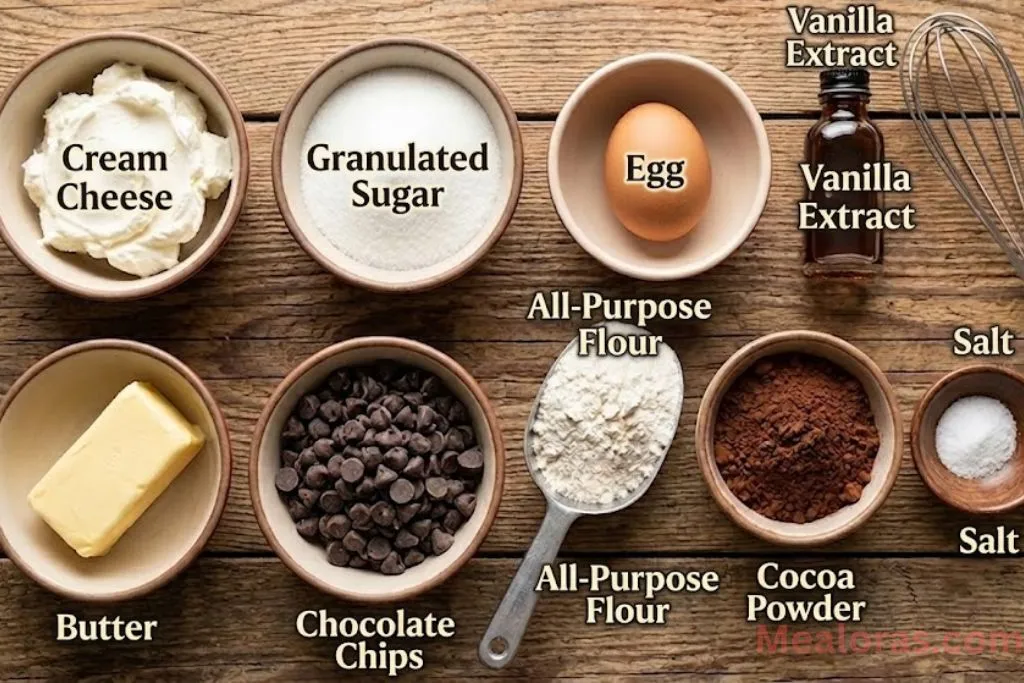
- Cream Cheese: 6 ounces (softened to room temperature)
- Granulated Sugar: 1/4 cup + 2 tablespoons
- Egg: 1 large (room temperature)
- Vanilla Extract: 1 teaspoon (alcohol-free)
For the Brownie Batter:
- Unsalted Butter: 1/2 cup
- Semi-Sweet Chocolate Chips: 2/3 cup
- Granulated Sugar: 3/4 cup
- Eggs: 2 large (room temperature)
- Vanilla Extract: 2 teaspoons (alcohol-free)
- All-Purpose Flour: 1/2 cup
- Unsweetened Cocoa Powder: 1/2 cup
- Salt: 1/2 teaspoon
Basic Equipment Needed:
- 8×8 inch square baking pan
- Parchment paper
- Mixing bowls
- Hand mixer or stand mixer
- Whisk and rubber spatula
- Toothpick or butter knife for swirling
Step-by-Step Instructions
Follow these clear steps to achieve the perfect balance of chocolate and cream cheese in every square.
1. Prepare Your Workspace
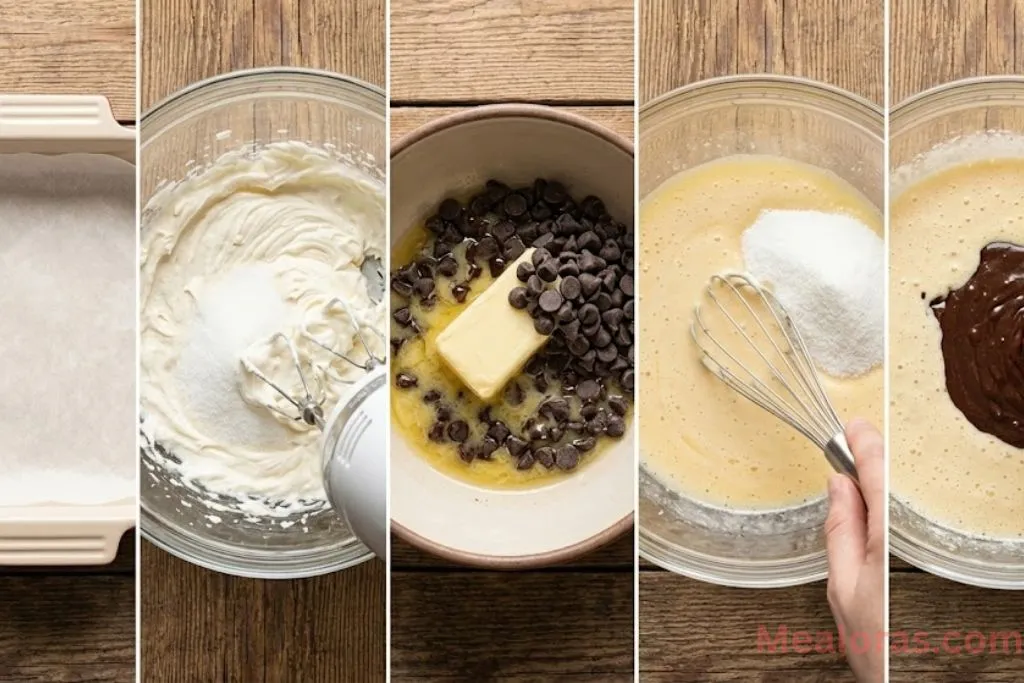
Before starting the batter, preheat your oven to 350°F (175°C). Line an 8×8 inch square baking pan with parchment paper, allowing some to hang over the edges for easy removal.
2. Mix the Cheesecake Filling
In a medium bowl, use your hand mixer to beat the softened cream cheese and the 1/4 cup + 2 tablespoons of sugar. Continue until the mixture is completely smooth and fluffy. Add one egg and a teaspoon of vanilla extract, beating again until fully incorporated. Set this bowl aside for later.
3. Melt the Chocolate and Butter
In a microwave-safe bowl, combine the unsalted butter and 2/3 cup of chocolate chips. Heat in 30-second intervals, stirring in between, until the mixture is glossy and smooth. Set aside to cool slightly.
4. Build the Brownie Base
In a separate large bowl, whisk together the two eggs, 3/4 cup of sugar, and 2 teaspoons of vanilla extract until the mixture looks pale and slightly frothy. Slowly pour the melted chocolate mixture into the eggs, whisking constantly to ensure a smooth emulsion.
5. Incorporate Dry Ingredients
Sift the all-purpose flour, cocoa powder, and salt into the wet chocolate mixture. Use a rubber spatula to gently fold the ingredients together. Stop as soon as you see no more streaks of flour to keep the texture soft and moist.
6. Layer and Marble
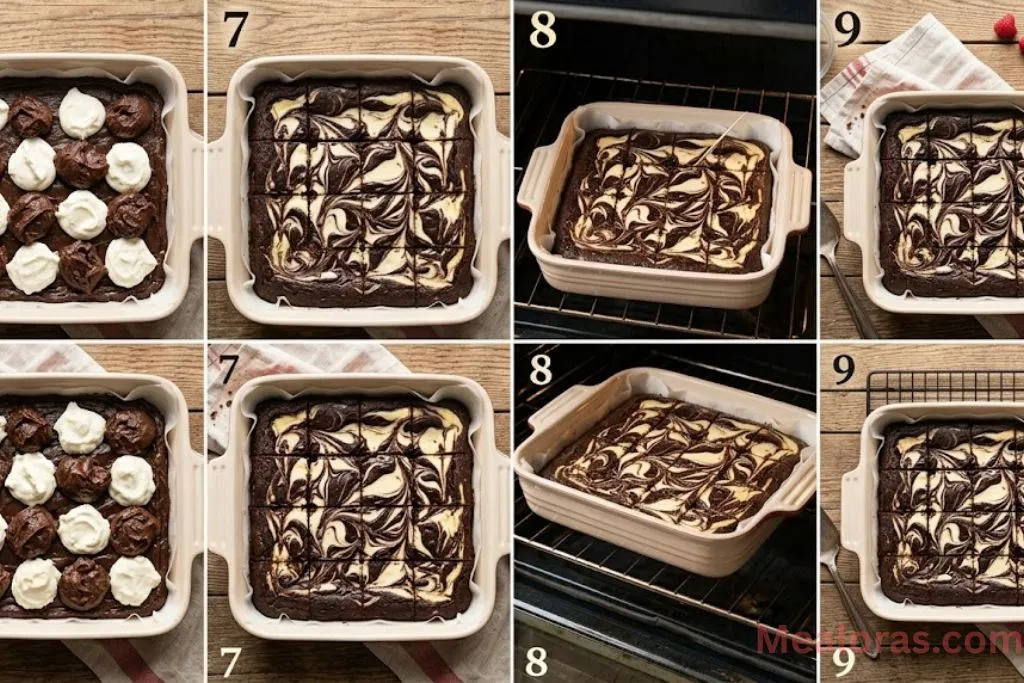
Pour about half of your dark brownie batter into the bottom of the prepared pan and spread it evenly. Next, drop spoonfuls of the cheesecake batter and the remaining brownie batter over the top in an alternating pattern.
7. Create the Swirls
Take a toothpick or a butter knife and gently drag it through the dollops of batter. Move in a zigzag or circular motion to create a beautiful marble effect. Be careful not to over-mix, or the colors will blend into a solid brown rather than distinct swirls.
8. Bake and Set
Place the pan in the oven and bake for approximately 26 minutes. You’ll know they are done when a toothpick inserted into the center comes out with just a few moist crumbs attached.
9. Cool Completely
This is the hardest part! Allow the brownies to cool entirely in the pan on a wire rack. For the cleanest cuts, you can even chill them in the fridge for an hour after they reach room temperature.
Tips for Success & Variations
Achieving the perfect Cheesecake Marble Brownies is easy when you follow a few simple tricks.
- Room Temperature Ingredients: Always ensure your cream cheese is soft. If it is cold, you will end up with tiny white lumps in your cheesecake layer that won’t disappear during baking.
- Don’t Over-Bake: Brownies continue to cook slightly as they cool in the pan. If the edges are firm but the center still has a very slight jiggle, they are ready to come out.
- Clean Slicing: To get those perfect, professional-looking squares, use a sharp knife and wipe it clean with a warm, damp cloth between every single cut.
- Chocolate Swap: If you prefer a darker flavor, you can use bittersweet chocolate chips instead of semi-sweet.
- Add Mix-ins: If you want even more texture, you can follow a similar layering technique found in this fudgy Oreo brownies recipe by adding crushed cookies between the layers.
Storage and Serving Ideas
To keep your brownies tasting fresh, store them in an airtight container. Since they contain cream cheese, they should be kept in the refrigerator. They will stay moist and delicious for up to 4 days.
If you want to save them for later, these brownies freeze beautifully! Wrap individual squares tightly in plastic wrap and place them in a freezer bag. They can be frozen for up to one month. Simply thaw a square in the fridge overnight or at room temperature for an hour before enjoying.
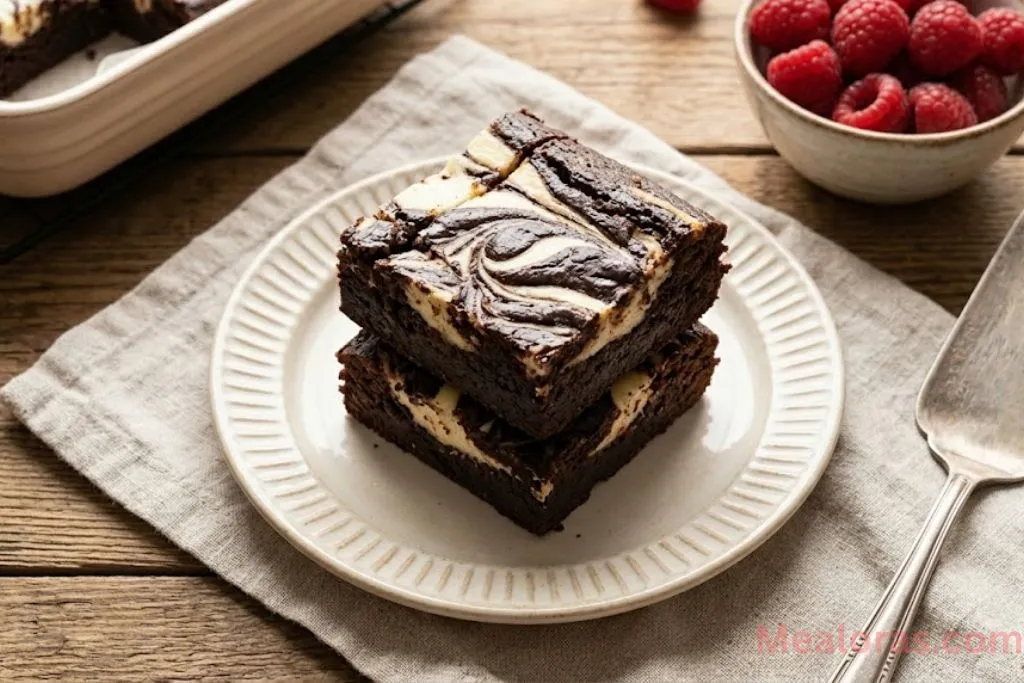
For serving, these are rich enough to stand on their own. However, a drizzle of chocolate syrup or a dollop of whipped cream can turn them into an elegant plated dessert. Since this is a strictly alcohol-free recipe, you can pair them with a cold glass of milk or a hot cup of cocoa for the perfect afternoon treat.
Frequently Asked Questions
1. Can I use a boxed brownie mix for this recipe? Yes, you can substitute the brownie portion with a box mix, but ensure you still follow the cheesecake layer instructions provided here for the best flavor.
2. Why did my cheesecake layer sink? This usually happens if the brownie batter is too thin or if the cheesecake dollops are too heavy. Ensure you follow the measurements exactly to keep the batter consistency correct.
3. Do I have to refrigerate these? Yes, because the topping is made with real cream cheese, it is safest to store them in the fridge.
4. How do I get the “marble” look without mixing the colors too much? Use a light hand. Only swirl the knife through the batter 4 or 5 times in total. Over-swirling creates a muddy appearance.
5. Can I use low-fat cream cheese?It is recommended to use full-fat block cream cheese. Low-fat or “tub” versions have more moisture and may not set properly during baking.
6. My brownies are too cakey. What happened? Cakey brownies usually result from over-measuring the flour. Use the “spoon and level” method or a kitchen scale for accuracy.
7. Can I make these in a 9×13 pan? You can, but the brownies will be very thin and will bake much faster. For thick, fudgy brownies, it is best to stick to an 8×8 pan or double the recipe for a larger pan.
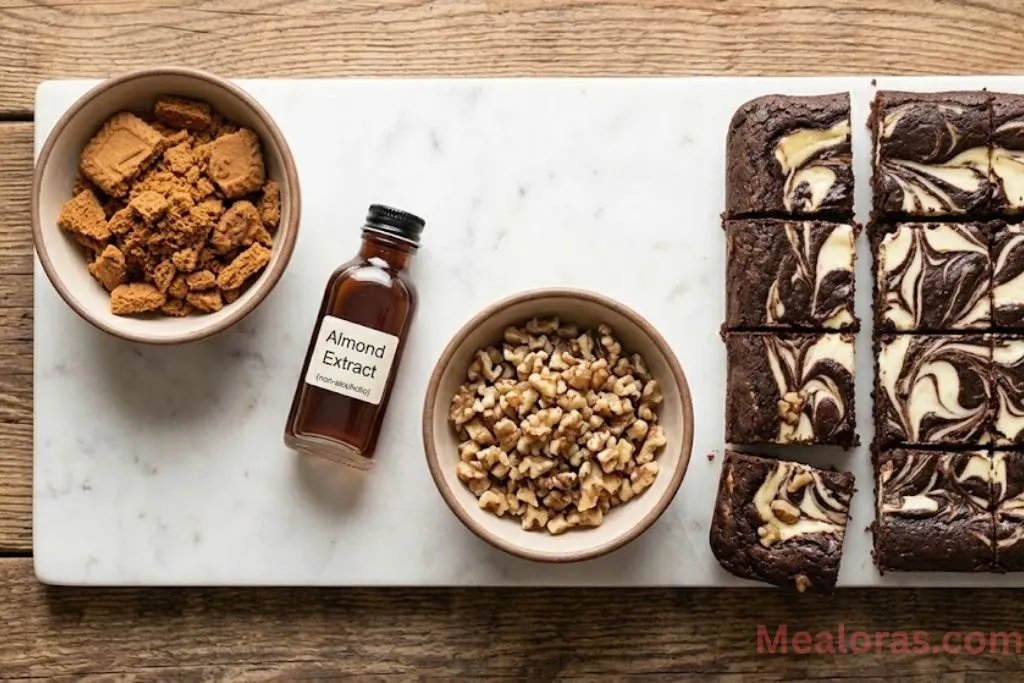
8. Is the almond extract necessary? This specific version uses vanilla extract for a classic flavor, but you can use a tiny drop of alcohol-free almond extract if you enjoy a nutty aroma.
9. Why did my cheesecake layer crack? Cracking is often a sign of over-baking. Check the brownies a few minutes before the timer goes off to ensure they don’t stay in the heat too long.
10. Can I add nuts to this recipe? Absolutely! Chopped walnuts or pecans can be folded into the brownie batter before you add it to the pan for an extra crunch.
Conclusion
These Cheesecake Marble Brownies are the perfect treat for anyone who loves the combination of chocolate and cream. With their striking appearance and decadent flavor, they are guaranteed to be a hit at any gathering. The process is simple, the ingredients are basic, and the result is nothing short of spectacular.
If you enjoyed this recipe, please consider sharing it with your friends and family! There is nothing better than spreading the joy of a perfect, fudgy, and creamy dessert. Happy baking.
Cheesecake Marble Brownies
Ingredients
- Cheesecake Layer:
- 6 ounces cream cheese softened
- 1/4 cup + 2 tablespoons granulated sugar
- 1 large egg room temperature
- 1 teaspoon vanilla extract alcohol-free
- Brownie Layer:
- 1/2 cup unsalted butter
- 2/3 cup semi-sweet chocolate chips
- 3/4 cup granulated sugar
- 2 large eggs room temperature
- 2 teaspoons vanilla extract alcohol-free
- 1/2 cup all-purpose flour
- 1/2 cup unsweetened cocoa powder
- 1/2 teaspoon salt
Instructions
- Prepare the oven and line the square baking pan with parchment paper.
- Beat the softened cream cheese and sugar until smooth before adding the egg and vanilla.
- Melt the butter and chocolate chips together until the mixture is glossy.
- Whisk the eggs, sugar, and vanilla together until frothy, then combine with the melted chocolate.
- Gently fold in the flour, cocoa powder, and salt until just combined.
- Spread half of the brownie batter into the pan and drop spoonfuls of cheesecake and remaining brownie batter on top.
- Use a toothpick to gently create a marble pattern through the layers.
- Bake until a toothpick comes out with a few moist crumbs.
- Cool the pan completely on a wire rack before slicing into squares.
Notes
• For the cleanest squares, chill the brownies in the refrigerator before cutting.
• Store leftovers in an airtight container in the fridge for up to four days.
• Avoid over-swirling the batter to keep the chocolate and cheesecake colors distinct.

Mealoras your go-to for simple, flavorful recipes! From quick weeknight dinners to sweet treats and family favorites, we make cooking easy, fun, and delicious for everyone in the kitchen.