Finding a meal that is both nutritious and genuinely delicious can sometimes feel like a challenge, especially when trying to incorporate more plant-based options into a weekly routine. These Chickpea Vegetable Nuggets are the perfect solution. They offer a wonderful balance of protein-packed legumes and fresh vegetables, all tucked into a bite-sized shape that is crispy on the outside and tender on the inside.
Table of Contents
Whether looking for a wholesome snack for the afternoon or a main course that the whole family will enjoy, these nuggets deliver on both flavor and texture. They are essentially a colorful, veggie-packed twist on a classic favorite, making them a fantastic way to enjoy more greens without sacrificing the satisfaction of a “comfort food” meal. Because they are homemade, there is full control over the quality of the ingredients, ensuring a fresh and vibrant result every time.
Why You Will Love This Recipe
One of the best things about these chickpea nuggets is their versatility. They are naturally vegetarian and can easily be adapted to suit various dietary needs. The combination of chickpeas, zucchini, and carrots creates a nutrient-dense base that keeps everyone feeling full and energized.
Unlike many store-bought frozen options, these are made with simple, whole-food ingredients that are likely already sitting in the pantry or refrigerator. They are also incredibly easy to prepare. With just a food processor and a few minutes of prep time, a large batch can be ready to cook. If looking for other easy and wholesome ideas, these egg bites no cottage cheese are another great way to meal prep for the week ahead.
Ingredients for Chickpea Vegetable Nuggets
To make these nuggets, a few basic staples are required. Using fresh vegetables ensures the best texture and a bright, natural flavor.
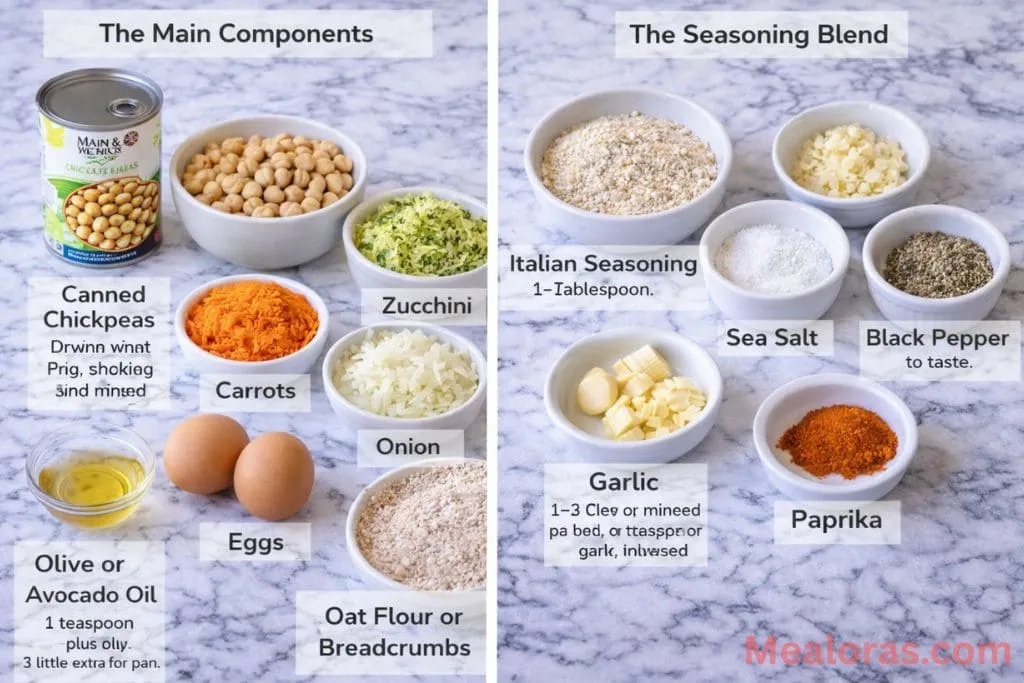
The Main Components
- Canned Chickpeas: One 15-ounce can, thoroughly drained and rinsed.
- Zucchini: Half a cup, finely grated.
- Carrots: Half a cup, finely grated.
- Onion: A quarter cup, minced very finely.
- Eggs: Two large eggs to help bind everything together.
- Oat Flour or Breadcrumbs: Half a cup (oat flour works great for a slightly heartier texture).
- Olive or Avocado Oil: One teaspoon for the mixture, plus a little extra for the pan.
The Seasoning Blend
- Italian Seasoning: Half a tablespoon for an earthy, herbal note.
- Garlic: One to two cloves, minced (or half a teaspoon of garlic powder).
- Sea Salt: One teaspoon.
- Black Pepper: To taste.
- Paprika: A quarter teaspoon for a hint of warmth and color.
Equipment Needed
- Food Processor: This is essential for getting the right consistency without over-mashing.
- Clean Dish Towel: Used to squeeze excess moisture from the vegetables.
- Large Skillet or Pan: For stovetop cooking.
- Spatula: For flipping the nuggets gently.
- Small Cookie Scoop or Tablespoon: To ensure even sizing.
Step-by-Step Instructions
1. Prepare the Vegetables
The secret to a nugget that holds its shape and stays crispy is removing excess water. Start by grating the zucchini and carrots. Place the shredded vegetables in the center of a clean dish towel or a thick paper towel. Wrap the towel around them and squeeze firmly over the sink. Continue squeezing until most of the moisture has been removed. This step prevents the nuggets from becoming soggy.
2. Combine the Ingredients
In the bowl of a food processor, add the drained chickpeas, the squeezed zucchini and carrots, minced onion, eggs, oil, and all the seasonings. Finally, pour in the oat flour or breadcrumbs.

3. Pulse the Mixture
Pulse the food processor a few times. It is very important not to over-mix; the goal is a mixture that is well-combined and “scoopable” but still has some visible texture. If it becomes a smooth puree, the nuggets will be too soft. It should feel slightly wet but thick enough to hold a shape when pressed.
4. Heat the Pan
Drizzle a small amount of oil into a large skillet and set it over medium-high heat. Allow the pan to get hot enough so that the nuggets sizzle as soon as they touch the surface.
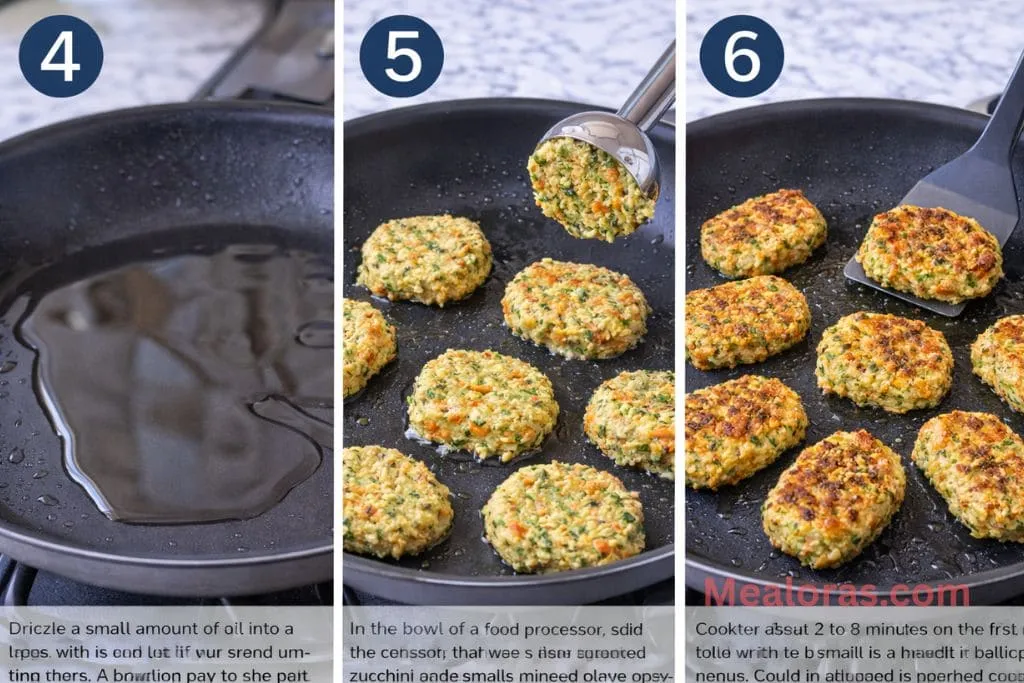
5. Cook the Nuggets
Using a small cookie scoop or a heaping tablespoon, portion out the mixture and place it directly into the hot pan. Use the back of a spatula to gently press down on each scoop, flattening it into a classic nugget shape.
6. Brown and Flip
Cook for about 3 to 5 minutes on the first side until the bottom is a beautiful golden brown. Carefully flip each nugget and cook for another 3 to 5 minutes on the second side. Once they are firm and golden on both sides, remove them from the heat. If looking for a different kind of handheld meal, these crispy chicken Caesar sandwiches offer a wonderful inspiration for using crispy textures in a meal.
Expert Tips for Success
- Don’t Skip the Squeeze: It might be tempting to toss the veggies straight in, but the water content in zucchini is very high. Squeezing it out is the difference between a crispy nugget and a mushy one.
- The Right Texture: When pulsing the chickpeas, look for a “crumbly” appearance. The eggs and flour will act as the glue once they hit the heat.
- Consistent Sizing: Using a scoop ensures that all the nuggets cook at the same rate, preventing some from burning while others remain underdone.
- Pan Space: Do not crowd the skillet. If too many nuggets are in the pan at once, the temperature will drop, and they will steam rather than sear.
Flavor Variations and Swaps
- Go Spicy: Add a pinch of cayenne pepper or red chili flakes to the seasoning mix for a little kick.
- Cheesy Twist: Stir in a tablespoon of nutritional yeast or grated parmesan cheese for a savory, umami flavor.
- Different Greens: If zucchini isn’t available, finely chopped spinach (with the moisture squeezed out) can be a great substitute.
- Breadcrumb Options: Use Panko breadcrumbs for an extra crunchy exterior, or use certified gluten-free oats to keep the recipe gluten-free.

Storage and Serving Suggestions
How to Store
Allow the nuggets to cool completely on a wire rack or plate before storing. This prevents steam from making them soft. Place leftovers in an airtight container and keep them in the refrigerator for up to 4 or 5 days.
Reheating
To bring back the original crispiness, it is best to reheat these in a toaster oven, a standard oven at 350°F, or an air fryer for a few minutes. While the microwave works in a pinch, it may result in a softer texture.
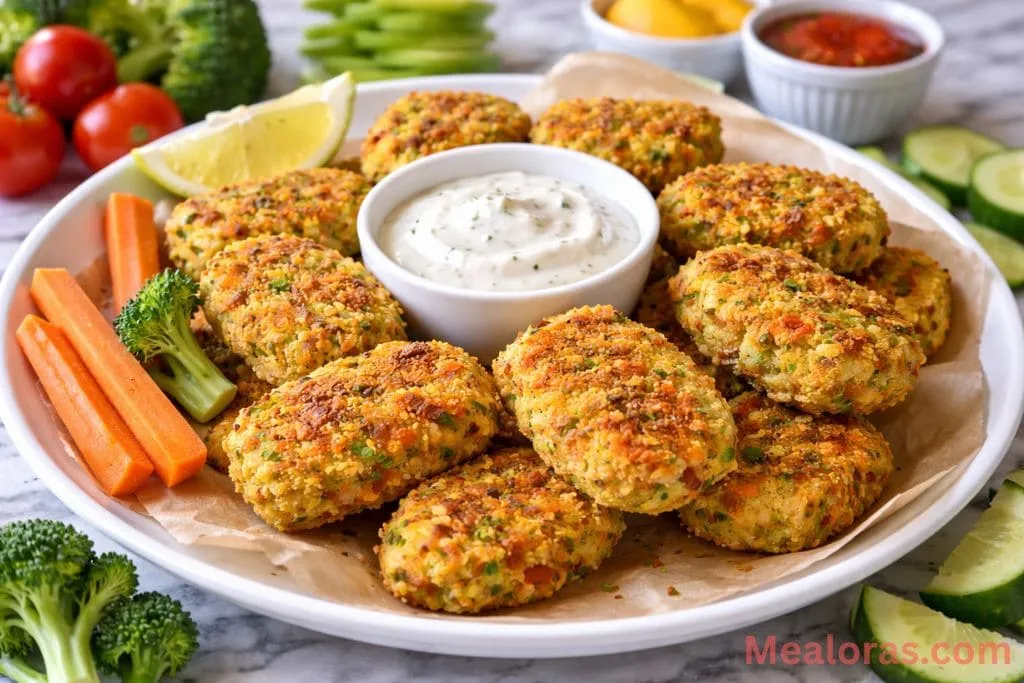
Serving Ideas
These nuggets are fantastic when served with a variety of dips. Classic ketchup, honey mustard, or a creamy Greek yogurt dip with herbs all pair beautifully. For a full meal, serve them alongside a crisp garden salad, roasted potatoes, or tucked into a wrap with fresh greens and sliced tomatoes.
Frequently Asked Questions
1. Can these be made in an air fryer? Yes! Arrange them in a single layer and cook at 400°F for about 10–12 minutes, flipping halfway through.
2. Can I bake them in the oven instead of frying? Absolutely. Place them on a lined baking sheet at 400°F for 20–25 minutes, turning them over at the midpoint of cooking.
3. Are these nuggets gluten-free? They are gluten-free if using certified gluten-free oat flour or gluten-free breadcrumbs.
4. Can I freeze these for later? Yes. Freeze them in a single layer on a tray first, then move them to a freezer bag. They stay fresh for up to 3 months.
5. Why are my nuggets falling apart? This usually happens if the vegetables were too wet or if the mixture was over-processed into a paste. Ensure the veggies are squeezed very dry.
6. Can I use dried chickpeas instead of canned? You would need to soak and cook the dried chickpeas first. Canned chickpeas are recommended for the best texture and convenience.
7. Do I have to use eggs? The eggs are the primary binder. Some people use “flax eggs,” but the nuggets may be more delicate and prone to crumbling.
8. Can I use a different vegetable? Finely grated sweet potato or broccoli can work, as long as they are prepared to be as dry as possible.
9. My mixture is too sticky to handle, what should I do? If the mix is too wet to form, add an extra tablespoon or two of oat flour or breadcrumbs to absorb the moisture.
10. Are these nuggets kid-friendly? Yes, they are a favorite for children! The mild flavor and fun shape make them a great way to introduce more vegetables.
Conclusion
These Chickpea Vegetable Nuggets prove that plant-based eating can be simple, affordable, and incredibly satisfying. By combining pantry staples with fresh garden vegetables, a meal is created that feels both wholesome and indulgent. They are a wonderful addition to any weekly meal plan, offering a reliable go-to for busy weeknights or relaxed weekend lunches.
If this recipe becomes a new favorite in the kitchen, consider sharing it with friends and family members who are looking for fresh, veggie-forward meal ideas. Sharing recipes is a wonderful way to inspire others to get creative with whole foods and discover just how delicious homemade plant-based cooking can be!
Chickpea Vegetable Nuggets
Ingredients
- 15- ounce can chickpeas drained and rinsed
- 1/2 cup zucchini finely grated
- 1/2 cup carrots finely grated
- 1/4 cup onion minced very finely
- 2 large eggs
- 1/2 cup oat flour or breadcrumbs
- 1 teaspoon olive or avocado oil
- 1/2 tablespoon Italian seasoning
- 1 to 2 cloves garlic minced
- 1 teaspoon sea salt
- Black pepper to taste
- 1/4 teaspoon paprika
Instructions
- Grate the zucchini and carrots then place them in a clean dish towel and squeeze firmly until all excess moisture is removed. Add the drained chickpeas, squeezed vegetables, onion, eggs, oil, seasonings, and oat flour into a food processor. Pulse the mixture several times until well-combined but still textured, being careful not to over-process into a smooth puree. Heat a small amount of oil in a large skillet over medium-high heat. Use a tablespoon or cookie scoop to place portions of the mixture into the pan and gently flatten them with a spatula. Cook for several minutes on the first side until golden brown then carefully flip to cook the other side. Remove from the heat once both sides are firm and crispy.
Notes

Mealoras your go-to for simple, flavorful recipes! From quick weeknight dinners to sweet treats and family favorites, we make cooking easy, fun, and delicious for everyone in the kitchen.