Baking does not always have to be a complicated task that takes all day. Sometimes, the most wonderful treats come from just a handful of simple pantry staples. These Sweetened Condensed Milk Snowball Cookies are a perfect example of how a few basic ingredients can transform into something truly magical. These cookies are soft, buttery, and have a delicate sweetness that makes them impossible to resist.
Table of Contents
Commonly known as Mexican Wedding Cookies or Russian Tea Cakes in other variations, this specific version uses sweetened condensed milk to create a unique, tender texture. Because they look like tiny, sugar-dusted snowballs, they bring a sense of joy to any dessert table. Whether you are a seasoned baker or someone just starting their journey in the kitchen, this recipe is straightforward and rewarding.
Why You Will Love These Snowball Cookies
There are so many reasons to keep this recipe in your permanent collection. First, the texture is incredible. They are slightly crisp on the outside but melt away the moment you take a bite. The use of condensed milk provides a milky richness that standard sugar cookies often lack.
Additionally, this is a great project for those who want to avoid using eggs. The condensed milk acts as both the sweetener and a binding agent, resulting in a sturdy yet soft dough. Since the recipe requires very little prep time, it is ideal for busy afternoons when you want a homemade treat without the stress.
If you enjoy making simple, rounded treats, you might also want to try No-Bake Moose Farts (Chewy Chocolate & Coconut Balls). Just like these snowballs, they are easy to portion and offer a satisfying chew.
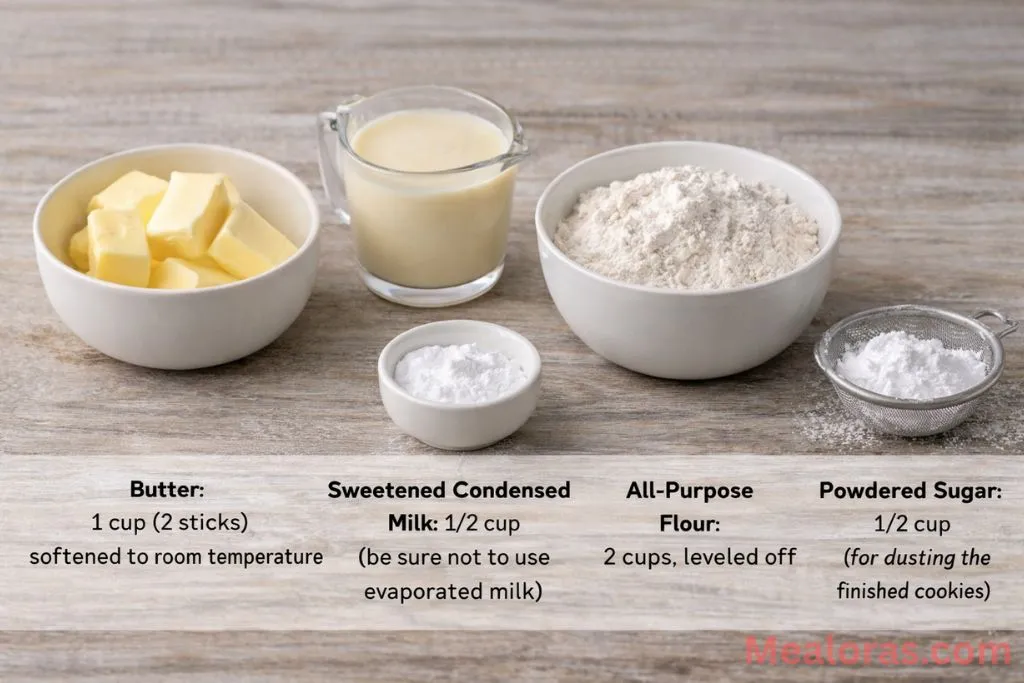
Ingredients for Condensed Milk Snowballs
To ensure the best results, try to use high-quality ingredients. Since there are so few components, the flavor of the butter and milk will really shine through.
The Essentials
- Butter: 1 cup (2 sticks), softened to room temperature.
- Sweetened Condensed Milk: 1/2 cup (be sure not to use evaporated milk).
- All-Purpose Flour: 2 cups, leveled off.
- Baking Powder: 3 teaspoons.
- Powdered Sugar: 1/2 cup (for dusting the finished cookies).
Recommended Tools
- Large Mixing Bowl: For combining the dough.
- Electric Hand Mixer: Helps to get the butter light and fluffy.
- Baking Sheets: Two standard sheets work best.
- Parchment Paper: Prevents sticking and makes cleanup easy.
- Cookie Scoop: A 1-tablespoon scoop ensures even sizing.
- Wire Cooling Rack: Essential for letting air circulate around the cookies.
- Fine Mesh Sieve: For sifting the powdered sugar over the top.
Step-by-Step Instructions
Follow these simple steps to create a batch of beautiful, snowy treats.
1. Prepare the Workspace
Start by preheating the oven to 320°F (160°C). While the oven warms up, line your baking sheets with parchment paper. Having everything ready before you start mixing helps the process go smoothly.
2. Cream the Butter
Place the softened butter into a large mixing bowl. Using an electric mixer, beat the butter on medium-high speed for about 3 minutes. You want the butter to look very pale and creamy. This step incorporates air, which contributes to the light texture of the cookies.

3. Incorporate the Condensed Milk
Pour the sweetened condensed milk into the whipped butter. Continue beating for another 2 minutes. Stop halfway through to scrape down the sides of the bowl with a spatula to ensure everything is perfectly combined. The mixture should look smooth and uniform.
4. Add the Dry Ingredients
Slowly add the all-purpose flour and the baking powder to the wet mixture. Turn the mixer to a low speed to avoid a flour cloud. Mix just until the flour disappears and a soft dough forms. Avoid over-mixing, as this can make the cookies tough.
5. Shape the Cookies
Use a cookie scoop or a tablespoon to portion out the dough. Roll the dough into small balls between your palms. Place them on the prepared baking sheets, leaving about two inches of space between each ball. These cookies do not spread much, but they do need a little breathing room.
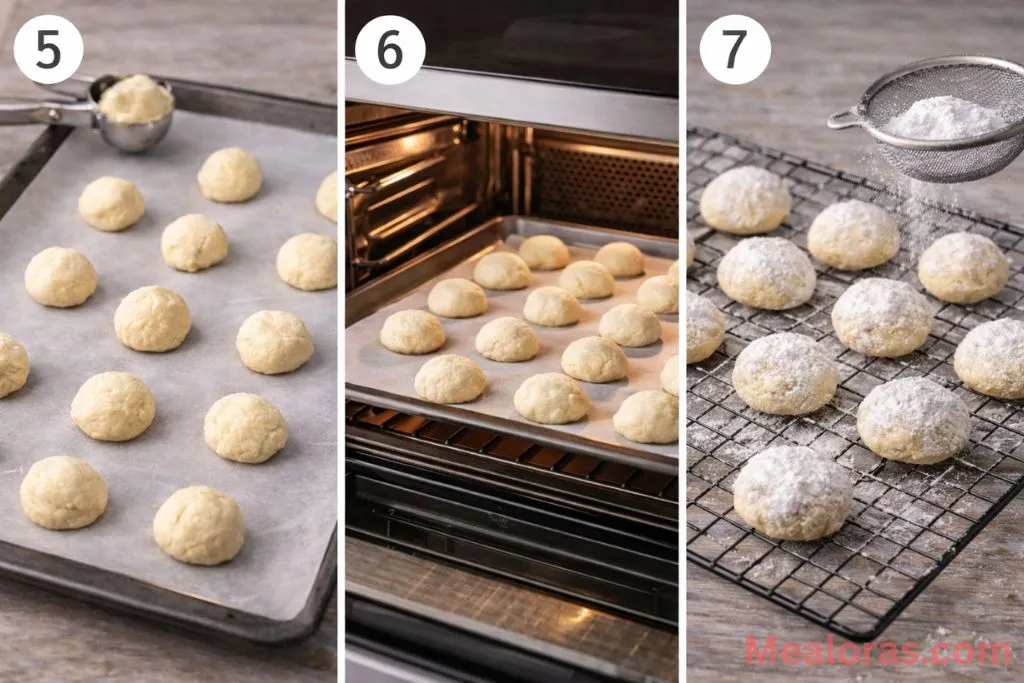
6. The Baking Process
Slide the trays into the oven and bake for 12 minutes. The cookies should stay pale on top; you are looking for just a hint of light golden brown on the very bottom. Do not overbake them, as they will firm up as they cool.
7. Cooling and Dusting
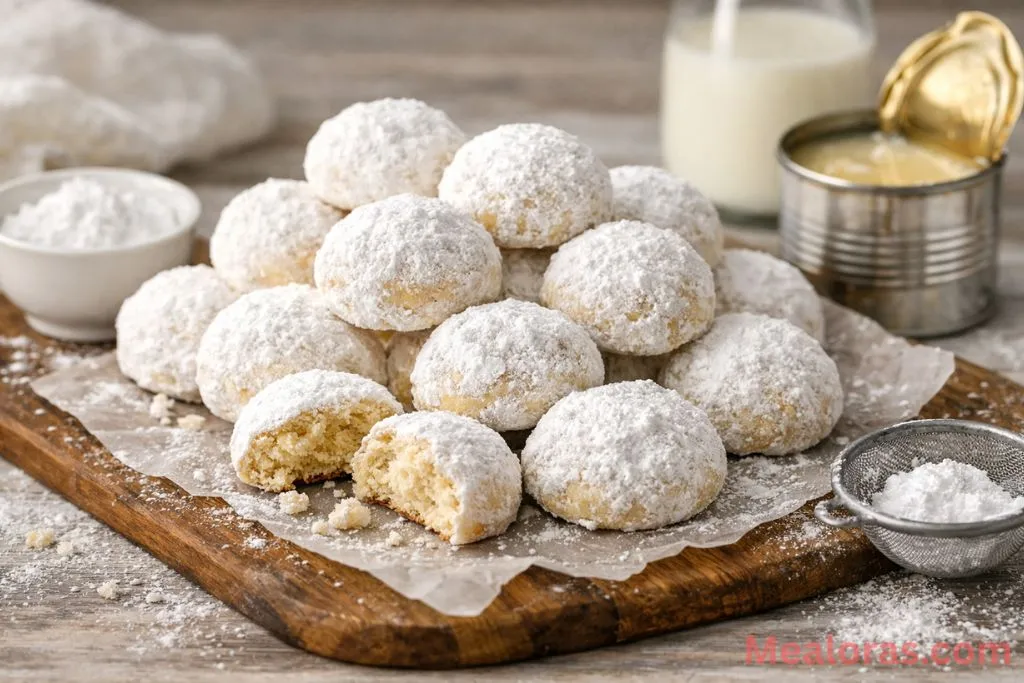
Let the cookies sit on the baking sheet for about 5 minutes after removing them from the oven. This allows them to set so they don’t break. Transfer them to a wire cooling rack. Once they have cooled significantly but are still slightly warm, use a sieve to dust them generously with powdered sugar. This creates the classic “snowball” appearance.
Tips for Success and Variations
- Butter Temperature: It is vital that the butter is softened but not melted. If the butter is too cold, it won’t cream properly. If it’s melted, the cookies will spread too much.
- Sifting: Sifting the flour and baking powder together before adding them to the butter can help prevent any lumps in the dough.
- Uniformity: Using a cookie scoop is the best way to make sure all cookies are the same size, which ensures they all finish baking at the exact same time.
- Flavor Boost: While the base recipe is delicious, you can add a teaspoon of vanilla extract or almond extract during the creaming step for a deeper flavor.
- Nutty Crunch: If you like texture, you can fold in half a cup of very finely chopped pecans or walnuts right before shaping.
- Warm Drinks: These cookies are the perfect companion for a cozy evening beverage. They pair beautifully with a Summer Moon Milk Recipe, which offers a calming and creamy balance to the buttery cookie.
Storage and Serving Ideas
These cookies are quite sturdy once they have cooled completely, making them easy to store.
Room Temperature: Place the cookies in an airtight container. They will stay fresh for up to 5 days. If you need to stack them, place a piece of parchment paper between the layers to keep the powdered sugar looking fresh.
Freezing: These cookies freeze remarkably well. You can freeze the baked cookies for up to 3 months. For the best look, wait to do the final dusting of powdered sugar until after you have thawed them.
Serving: Arrange them on a dark platter to make the white sugar “snow” pop. They look lovely as part of a dessert tray or packed into small jars as a thoughtful homemade gift. They are best served at room temperature alongside a glass of cold milk or a warm cup of herbal tea.
Frequently Asked Questions (FAQ)
1. Can I use margarine instead of butter? While margarine works, real butter provides the best flavor and the characteristic melt-in-your-mouth texture that makes these cookies special.
2. Why did my cookies spread so much? This usually happens if the butter was too soft or nearly melted when you started. It can also happen if the oven temperature is too high.
3. Do I need to chill the dough before baking? This recipe does not require chilling, but if your kitchen is very warm and the dough feels too soft to handle, you can pop it in the fridge for 15 minutes.
4. Can I make these gluten-free? You can try using a 1-to-1 gluten-free baking flour blend. Note that the texture may be slightly different and more crumbly.
5. Why is there no egg in this recipe? The sweetened condensed milk acts as the binder and provides moisture, so eggs are not necessary for this specific cookie structure.
6. Can I use evaporated milk instead? No, evaporated milk is much thinner and unsweetened. It will not work as a substitute for sweetened condensed milk in this recipe.
7. How do I know when the cookies are done? They should look set and dry on the surface. If you lift one gently, the bottom should be a very pale golden color.
8. Can I add chocolate chips? Yes, mini chocolate chips work best so they don’t overwhelm the small size of the snowball.
9. Why did the powdered sugar disappear after I dusted them? If the cookies are too hot, the sugar will melt into them. Wait until they are just barely warm or completely cool before dusting.
10. Can I double the recipe? Absolutely. This recipe scales up very well if you need to make a larger batch for a gathering or for gifting.
Conclusion
Sweetened Condensed Milk Snowball Cookies are a testament to the idea that simplicity is often the key to deliciousness. With their snowy coating and rich, buttery center, they are a treat that appeals to people of all ages. They are easy to whip up on a whim and store beautifully, making them a reliable go-to for any occasion.
If you enjoyed making these delightful little treats, please consider sharing this recipe with your friends and family. There is nothing quite like sharing a plate of cookies and a warm drink with the people you care about!

Sweetened Condensed Milk Snowball Cookies
Ingredients
- Butter: 1 cup 2 sticks, softened to room temperature
- Sweetened Condensed Milk: 1/2 cup
- All-Purpose Flour: 2 cups
- Baking Powder: 3 teaspoons
- Powdered Sugar: 1/2 cup for dusting
Instructions
- Preheat the oven and prepare your baking sheets with parchment paper to prevent sticking.
- Cream the softened butter in a large bowl using an electric mixer until it is light, pale, and fluffy.
- Pour in the sweetened condensed milk and continue to beat the mixture until it is completely smooth and combined.
- Gradually add the flour and baking powder, mixing on low speed just until the dough forms and no dry streaks remain.
- Scoop small portions of dough and roll them into smooth balls between your palms.
- Place the dough balls on the prepared trays and bake until the bottoms are barely golden and the tops are set.
- Let the cookies cool slightly on the pan before moving them to a wire rack to finish cooling.
- Dust the warm cookies generously with powdered sugar through a sieve to create the signature snowball look.
Notes
• Sugar Dusting: For the best appearance, wait until the cookies are cool enough to touch but still slightly warm so the sugar sticks without melting.
• Storage: Keep these in an airtight container at room temperature for up to five days to maintain their softness.
• Egg-Free: This recipe is naturally egg-free as the condensed milk provides all the necessary moisture and binding.

Mealoras your go-to for simple, flavorful recipes! From quick weeknight dinners to sweet treats and family favorites, we make cooking easy, fun, and delicious for everyone in the kitchen.