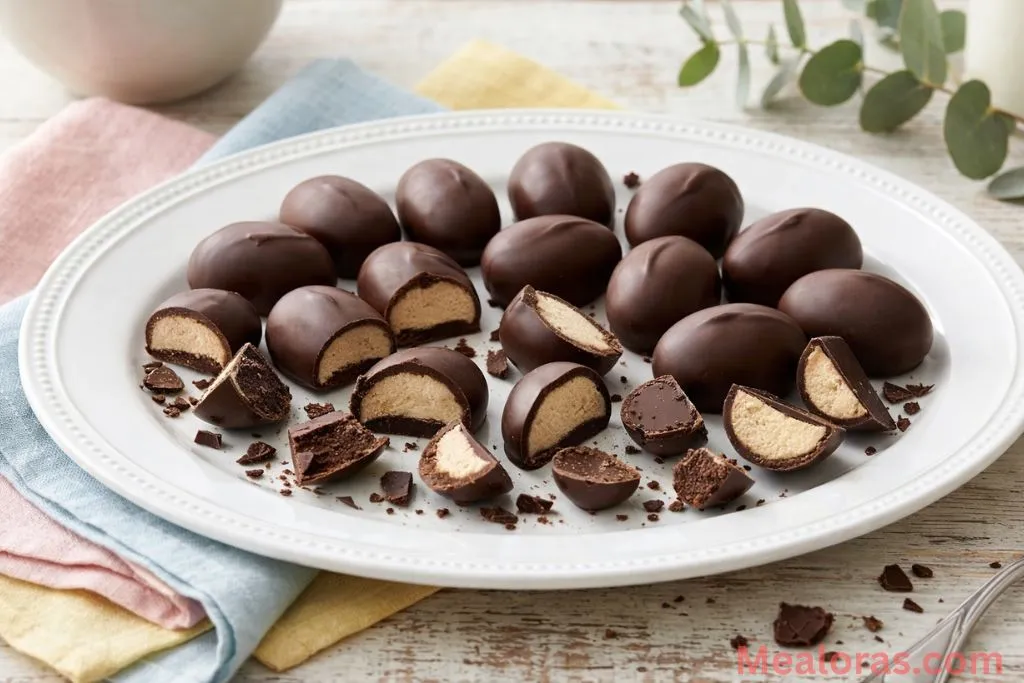
There is something truly special about the arrival of spring. The days get longer, flowers begin to bloom, and the kitchen starts to smell like sweet treats. Among all the seasonal sweets available, nothing quite compares to the classic combination of creamy peanut butter and rich chocolate. While store-bought versions are a staple this time of year, making them from scratch takes the experience to a whole new level. These Easter Peanut Butter Eggs are incredibly satisfying, offering a fresh, high-quality alternative to the factory-made candies available in stores.
Table of Contents
The beauty of this recipe lies in its simplicity. It requires no baking and uses just a few wholesome ingredients that are likely already in the pantry. Whether preparing for a family gathering or just looking for a fun weekend kitchen project, these treats are a guaranteed hit. The texture is perfectly balanced soft and fudgy on the inside with a crisp, snappy chocolate shell on the outside.
Why These Handcrafted Eggs Are a Must-Try
Many people find that commercial candies can be a bit too sugary or contain additives that mask the true flavor of the ingredients. By preparing these in a professional manner, the quality of the peanut butter and chocolate shines through. This version is naturally sweetened and gluten-free, making it a fantastic option for various dietary needs without sacrificing any of the indulgence.
Working with peanut butter dough is also a great way to get comfortable with candy making. It is very forgiving and easy to handle. If you enjoy creating delicious snacks, you might also want to explore other hearty options like this oven-baked cabbage burgers recipe which provides a wonderful savory contrast to a holiday dessert spread.
Ingredients for Easter Peanut Butter Eggs
To ensure the best results, gather these specific ingredients. Using high-quality components will result in a professional-tasting candy that rivals any gourmet confectioner.
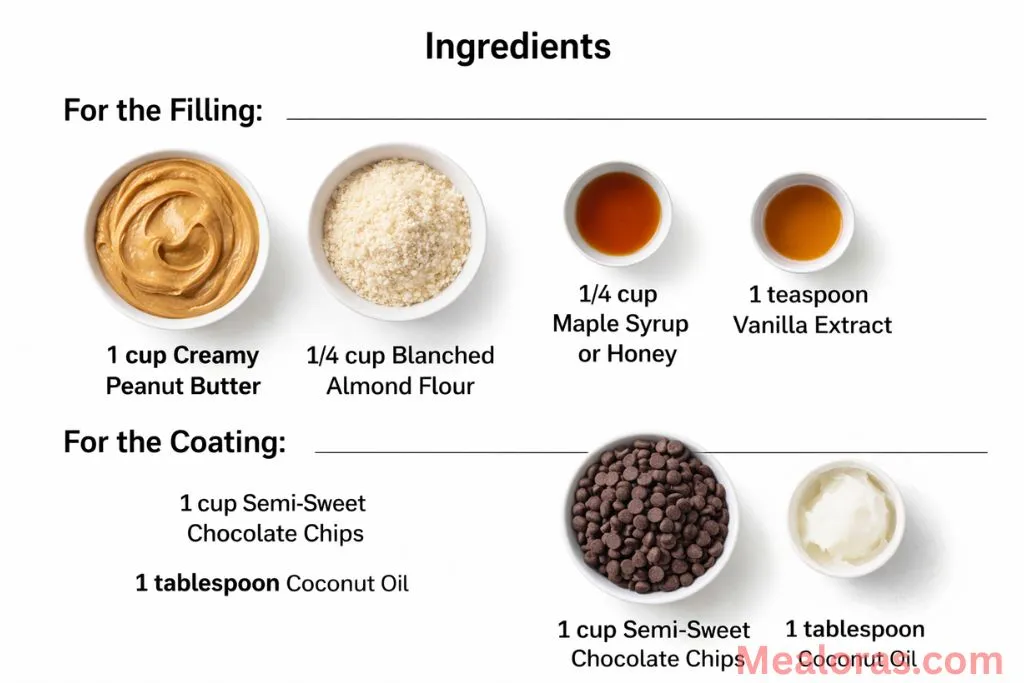
For the Peanut Butter Filling:
- 1 cup Creamy Peanut Butter: Ensure it is smooth for the best texture.
- 1/4 cup Blanched Almond Flour: This helps provide structure and a slight nuttiness.
- 1/4 cup Maple Syrup or Honey: Provides a natural, liquid sweetness.
- 1 teaspoon Vanilla Extract: Adds a layer of aromatic warmth.
- 1/8 teaspoon Sea Salt: Just enough to balance the sugars and enhance the peanut flavor.
For the Chocolate Coating:
- 1 cup Semi-Sweet Chocolate Chips: Dark or milk chocolate can also be used depending on preference.
- 1 tablespoon Coconut Oil: This helps the chocolate melt smoothly and creates a glossy finish.
Necessary Kitchen Tools:
- Large mixing bowl
- Sturdy spatula or wooden spoon
- Baking sheet
- Parchment paper or a silicone mat
- Microwave-safe bowl
- Fork or dipping tool
Step-by-Step Instructions
Follow these clear steps to create beautiful, delicious eggs every time.
1. Prepare the Filling
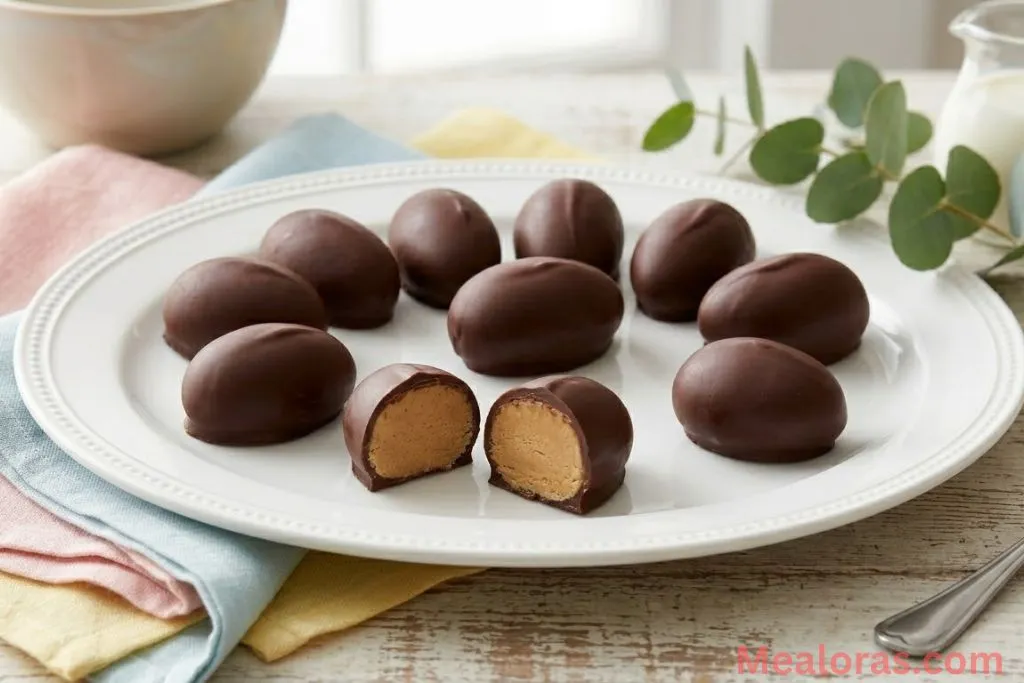
In a large mixing bowl, combine the creamy peanut butter, vanilla extract, maple syrup (or honey), almond flour, and sea salt. Use a spatula to stir everything together until the mixture is well-combined. It should have a slightly crumbly but moldable texture. If it feels too soft, you can let it rest for a few minutes to allow the flour to hydrate.
2. Shape the Eggs
Scoop about two tablespoons of the mixture at a time. Roll the portion into a ball between your palms, then gently press and taper it into an oval shape that resembles an egg. Alternatively, the entire batch of dough can be flattened onto a piece of parchment paper to use an egg-shaped cookie cutter for perfectly uniform results.
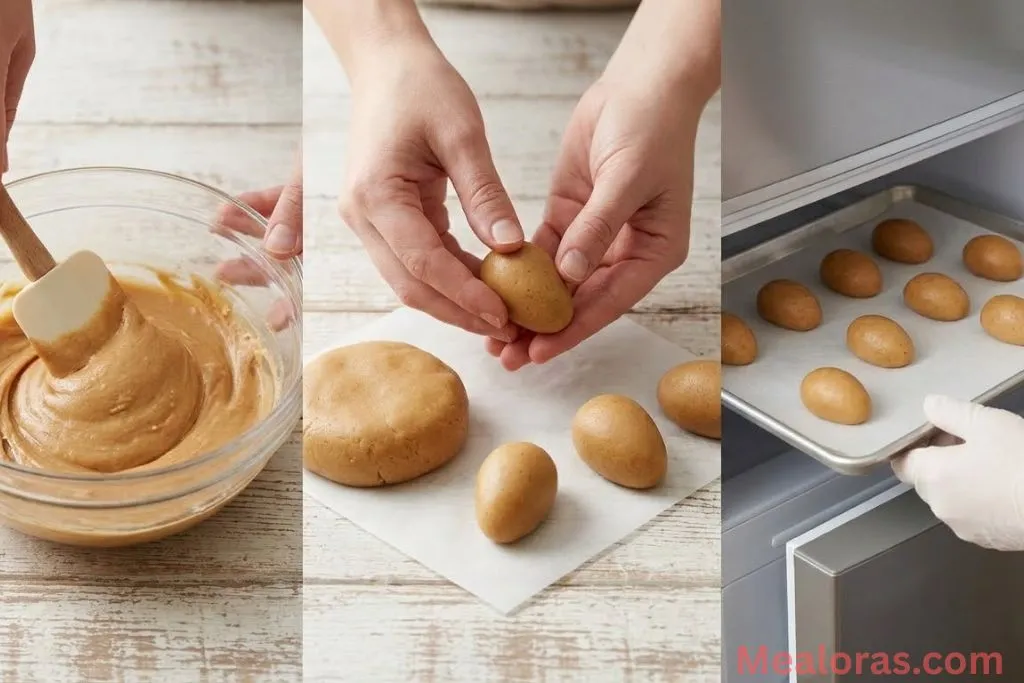
3. The First Chill
Place the shaped peanut butter eggs onto a baking sheet lined with parchment paper. Transfer the sheet to the freezer for at least 15 to 20 minutes. Chilling is a vital step; it firms up the centers so they do not fall apart or melt when they hit the warm chocolate.
4. Melt the Chocolate
While the eggs are chilling, prepare the coating. Place the chocolate chips and coconut oil in a microwave-safe bowl. Heat in 30-second increments, stirring thoroughly after each interval. Continue until the chocolate is completely liquid and smooth. Be careful not to overheat it, as chocolate can burn easily.
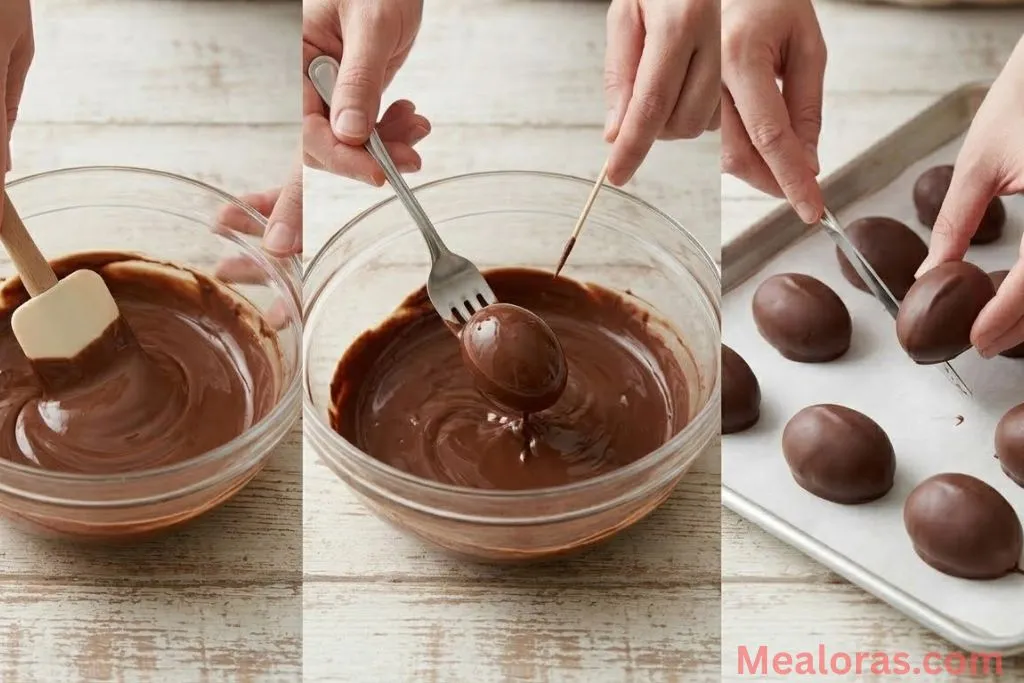
5. Dip and Coat
Take the chilled eggs out of the freezer. Using a fork, lower one egg at a time into the melted chocolate. Turn it to ensure it is fully coated. Lift it out with the fork, allowing any excess chocolate to drip back into the bowl. Carefully slide the coated egg back onto the parchment-lined baking sheet. For a decorative touch, a little extra chocolate can be drizzled over the top in a zigzag pattern.
6. Final Set
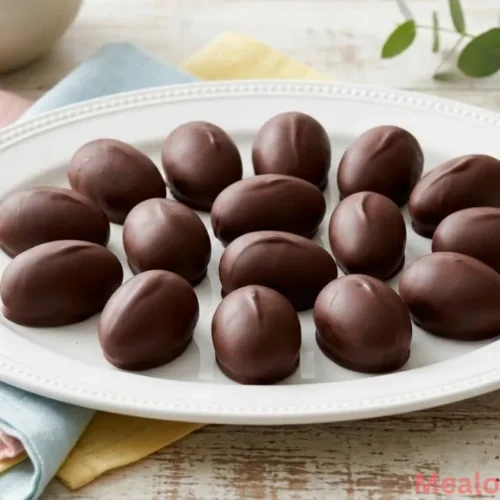
Once all the eggs are dipped, place the baking sheet back into the refrigerator or freezer. Let them sit for about 30 minutes until the chocolate shell is completely hard to the touch. Once set, they are ready to be enjoyed!
Expert Tips for Success
Preparing candy is an art, but these tips will help ensure a flawless finish:
- Check the Consistency: If the peanut butter dough is too sticky to handle, add an extra tablespoon of almond flour. If it is too dry, add a tiny splash of maple syrup.
- Work in Batches: If it is a warm day, keep half of the eggs in the freezer while dipping the first half. This prevents them from softening too much.
- The Fork Method: When lifting the egg out of the chocolate, tap the fork gently against the side of the bowl. This removes the excess and prevents a “pool” of chocolate from forming at the base of the candy.
- High-Quality Chocolate: Since the coating is a major part of the flavor, use a brand of chocolate chips or a baking bar that is genuinely enjoyable on its own.
For those who enjoy themed food preparation, the best creamy cowboy queso recipe is another crowd-pleaser that is easy to assemble for gatherings.
Storage and Serving Suggestions
To keep these treats fresh, store them in an airtight container. They are best kept in the refrigerator, where they will stay fresh for up to two weeks. If a longer storage time is needed, they can be frozen for up to three months. Just let them sit at room temperature for a few minutes before eating so the center softens slightly.
When serving, these look beautiful placed on a platter with some pastel-colored linens. They make excellent gifts when tucked into small paper cupcake liners and placed in a decorative tin. Pair them with a cold glass of milk or a hot cup of herbal tea for a relaxing afternoon snack.
Frequently Asked Questions
1. Can crunchy peanut butter be used instead? Yes, crunchy peanut butter works well if a bit of texture is preferred in the center, though the traditional version is smooth.
2. Is there a substitute for almond flour? Coconut flour or oat flour can work, but quantities may need to be adjusted as they absorb moisture differently.
3. Why is the chocolate coating dull instead of shiny? The coconut oil helps with the shine. Also, avoid getting any water in the chocolate, as even a drop can cause it to “seize” and become grainy.
4. Can these be made vegan? Yes, as long as maple syrup is used and the chocolate chips are dairy-free, this recipe is naturally vegan.
5. How is the egg prevented from sticking to the fork? A thin-tined fork works best. A toothpick can also be used to help slide the egg off the fork onto the parchment paper.
6. Can a different nut butter be used? Almond butter or cashew butter are great alternatives, though they will change the flavor profile significantly.
7. If the filling is too soft to shape, what is the solution? Place the dough in the fridge for 30 minutes before shaping. This allows the fats to firm up, making it much easier to handle.
8. Can white chocolate be used for the coating? Absolutely! White chocolate works beautifully, though it can be more temperamental to melt than dark chocolate.
9. Is coconut oil mandatory? It is recommended for the best texture, but it can be omitted if necessary. The coating may just be a bit thicker and harder.
10. Can decorations be added? Yes! Add sprinkles or a pinch of sea salt immediately after dipping, while the chocolate is still wet.
Conclusion
Creating these Easter Peanut Butter Eggs is a rewarding experience that brings a touch of quality to the holiday season. These treats offer a rich, authentic flavor that celebrates the simple joy of peanut butter and chocolate. They are easy to prepare, fun to shape, and even better to eat.
We hope this guide inspires a new holiday tradition. Please consider sharing this recipe with friends and family members who appreciate high-quality sweets. It is a wonderful way to spread a little bit of cheer and enjoy the season together!
Easter Peanut Butter Eggs
Ingredients
- For the Filling:
- 1 cup Creamy Peanut Butter
- 1/4 cup Blanched Almond Flour
- 1/4 cup Maple Syrup or Honey
- 1 teaspoon Vanilla Extract
- 1/8 teaspoon Sea Salt
- For the Coating:
- 1 cup Semi-Sweet Chocolate Chips
- 1 tablespoon Coconut Oil
Instructions
- In a large mixing bowl, combine the creamy peanut butter, vanilla extract, maple syrup or honey, almond flour, and sea salt.
- Stir with a spatula until the mixture is well-combined and reaches a moldable consistency.
- Scoop portions of the mixture and roll them into balls, then gently press and taper them into egg shapes.
- Place the shaped eggs on a baking sheet lined with parchment paper and freeze until firm.
- Combine the chocolate chips and coconut oil in a microwave-safe bowl and heat in short increments until smooth.
- Dip each chilled egg into the melted chocolate using a fork to coat completely.
- Return the coated eggs to the parchment paper and refrigerate or freeze until the chocolate shell is fully set.
Notes
• If the dough is too sticky to handle, add a small amount of extra almond flour.
• Keep the eggs in the freezer while dipping to prevent them from softening.
• Store finished treats in an airtight container in the refrigerator for up to two weeks.

Mealoras your go-to for simple, flavorful recipes! From quick weeknight dinners to sweet treats and family favorites, we make cooking easy, fun, and delicious for everyone in the kitchen.